Gayle Childers darn. The solder pads are torn off, which is never good, but there might be a chance of soldering some jumpers to it to get this fixed. We would need to get a really good clear picture of this area. That way we can hopefully identify the traces to solder to. It will require some very fine soldering. If you feel that you do not have that skillset or the tools, let us know which general location in this world you are located in. that way we can hopefully get you in touch with some microsoldering person that cn help you further with that.
Gayle Childers it can be done. I would either try and use the old connector or find a board to harvest a replacement from.
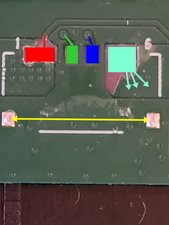
I might even consider just soldering some wires to the board. If using a proper connector, I'd place it properly on the board and use adhesive to attach it. Then I solder the connector to the anchor points (Yellow). Using a scalpel or similar tool, very carefully remove the green masking to the corresponding points. The green masking needs to be removed just deep enough to make the copper in the remaining traces show. Use some very thin enameled wire for jumpers on Red Green and Blue to the new connector. The Teal connector can be soldered anywhere on the area outlined by the arrows. Again, all the green masking has to be CAREFULLY removed. After that you want to use some UV masking to protect those jumpers from creating a short circuit etc.
It is tedious work, but really not impossible to do. Just needs the skills and the tools. I'd contact places like TCRS Circuit who is known to the iFixit community and a validated business member of this community. Otherwise, anyone that does board repair should be able to help you with that. Your board has a good chance of being fixed and thus another device being kept out of the landfill. Remember:
Repair is War on Entropy


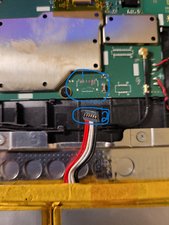


Gayle Childers we'll need to see what that all looks like. Post some good pictures of your board and the damage with your QUESTION. Go to edit and use this guide iFixitでの質問に画像を追加する方法 to add images. Do you still have the old connector?
oldturkey03 さんによる
Does any one know what the name of that connector is? I have the same issue with a fire HD 8 and I need to repair to get something off it that I hadn't saved to the micro sd or the cloud storage.
Jose Gonzalez さんによる