メインコンテンツにスキップ

iFixitツールの分解・修理情報です。

65回答 すべてを表示

High contrast labeling for Manta Precision Bit Set

Hi there,

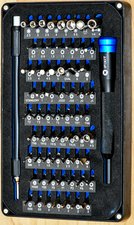
Is there anyone here who adapted the labeling of every tool of his Manta Precision Bit Set for a better contrast ?

I’m not known to have vision impairment but I find the labeling very hard to read on this set (and I assume it is the same with other sets). For instance, making the difference between a P5 and a T5 and a T6 is very hard. A black labeling on a dark gray foam is definitely not a great choice in my point of view.

That been said, I would enjoy to simply print the labeling with a better contrast on a sheet of paper or anything more durable, cut the holes and glue the sheet on my set.

It is still a significant work to prepare for proper dimensions and labels, so I would enjoy if someone already did it. Or even better, if someone at iFixit wouldn’t mind to send the original file ^^

Thanks in advance !

回答がありました! 回答を表示 同じ問題があります

この質問は役に立ちましたか?

スコア 0
コメントを追加

3件の回答

ベストアンサー

Would it not be possible to scale the templates here to the case the bit set comes in, cut the holes out and run it on a printer like a mono or color laser and just overlay it in the set?

I admit even I have trouble at times to the point I need to memorize the location of what bits I need to use often. I would probably see about scaling the template down and putting it in the case, but do not glue it in. At that point, I’d just get some cheap cardstock and run it on a nice color laser (when I get one that isn’t broken out of the box) and just cut the holes out.

このアンサーは役に立ちましたか?

スコア 1

3 件のコメント:

These templates are ewactly what I was looking for ! Thank you very much !

さんによる

@benoit74 Technically you can use any compatible color set as well, especially if white text/black print doesn't work for you but it will need to be modified.

さんによる

Yes, of course, the main issue I had was to re-create the proper layout, with text + tools profile

さんによる

コメントを追加

Instead of printing a full sheet, try printing horizontal strips about one-quarter inch by 6 inches (or whatever dimension.) Cut some paper strips and mark the distances from hole to holes. Do a draft layout with pencil on paper. Then you can print onto Avery white adhesive mailing labels of full sheet. Or, use a Dymo or Brother label maker to make long strips. Using 3/4” white tape I can print 3 lines at 12 point font. It will be difficult to get the spacing right with a label maker. Using your pencil draft as a guide you can hand letter on adhesive strips. Or on card stock plus a bit of rubber cement.

このアンサーは役に立ちましたか?

スコア 0
コメントを追加

Ich habe heute die Vorlagen gefunden, mit der App Greenshot Bildausschnitte gespeichert und diese in den P-touch Editor 5.4 eingefügt. Gedruckt wurde mit dem Brother P-touch D600 auf TZe-325 (9mm weiße Schrift auf schwarzen Hintergrund). Die Länge der Bilder lässt sich im Editor genau einstellen.

Today I found the templates, saved image sections with the Greenshot app and pasted them into P-touch Editor 5.4. Printing was done with the Brother P-touch D600 on TZe-325 (9mm white lettering on a black background). The length of the images can be set precisely in the editor.

Block Image

このアンサーは役に立ちましたか?

スコア 0

1件のコメント:

@ramgeist : I like it, well done ! Wunderbar !

さんによる

コメントを追加

回答を追加する

Benoit74 さん、ありがとうございました!
統計データ:

過去 24時間: 0

過去 7 日: 2

過去 30 日: 6

今までの合計 297