Every 3 minutes my iPhone SE restarts
Hello. I just got a iPhone SE with everything original except display was touch irresponding on left side. So i just replaced the display with a new one and replaced housing bcs it was in very bad condition. Everything was fine. Max battery capacity was like 87%. I fixed it, tested it and everything was working perfectly. After like 2 days i turned on the iPhone and for me i knew something went wrong at this time. The battery stopped charging already. 3uTools showed me “no data” on battery and every 3 minutes just started rebooting it self. If i go to settings, battery and battery health i only see here is unlimited loading. So i just buyed a new battery and test it out and nope. Still the same problems. I cant find any fix to this problem so i asking u guys for a help. Thx a lot.
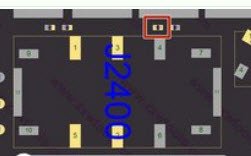
Crash log: {"bug_type":"210","timestamp":"2022-02-25 20:02:24.00 +0100","os_version":"iPhone OS 15.3.1 (19D52)","incident_id":"5B0E9DF0-476A-4A92-9FAD-8EA1B6D14AF4"} { "build" : "iPhone OS 15.3.1 (19D52)", "product" : "iPhone8,4", "kernel" : "Darwin Kernel Version 21.3.0: Wed Jan 5 21:44:35 PST 2022; root:xnu-8019.80.24~23\/RELEASE_ARM64_S8000", "incident" : "5B0E9DF0-476A-4A92-9FAD-8EA1B6D14AF4", "crashReporterKey" : "e0e8bc9e7c5130faee9bff2ca025e8b9d497217b", "date" : "2022-02-25 20:02:24.82 +0100", "panicString" : "panic(cpu 0 caller 0xfffffff010601ce4): userspace watchdog timeout: no successful checkins from thermalmonitord since wake\nservice returned not alive with context : is_alive_func returned unhealthy : current 1fffffe, mask 1ffffff, expected 1ffffff. EC: 1 EH: 3758097110 3758097110 SD: 0 BC: 0 Missing sensor(s): TG0B \nservice: backboardd, total successful checkins since wake (180 seconds ago): 19, last successful checkin: 0 seconds ago\nservice: SpringBoard, total successful checkins since wake (180 seconds ago): 19, last successful checkin: 0 seconds ago\nservice: mediaserverd, total successful checkins since wake (180 seconds ago): 19, last successful checkin: 0 seconds ago\nservice: logd, total successful checkins since wake (180 seconds ago): 19, last successful checkin: 0 seconds ago\nservice: thermalmonitord, no successful checkins since wake (180 seconds ago)\nservice: runningboardd, total successful checkins since wake (180 seconds ago): 19, last successful checkin: 0 seconds ago\nservice: wifid, total successful checkins since wake (180 seconds ago): 19, last successful che\nDebugger message: panic\nMemory ID: 0x6\nOS release type: User\nOS version: 19D52\nKernel version: Darwin Kernel Version 21.3.0: Wed Jan 5 21:44:35 PST 2022; root:xnu-
この質問は役に立ちましたか?