メインコンテンツにスキップ

Repair guides for Tomtom smartwatches.

16回答 すべてを表示

Tomtom Adventurer akku change possible (it differs from Tomtom Runner)

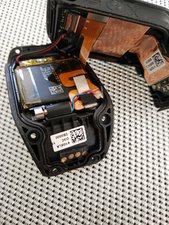
I have an older Model of Tomtom called ADVENTURER. It looks sImilar to the Tomtom Runner. But inside it looks different with 2 connections between front and backside of the clock.

First question: Is ist possible to change the akku for this device as well?

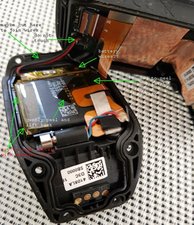
I upload two images and I hope you can explain in which steps I need to change the akku in a successful way. Maybe you can use the images and marke the steps one by one for me within the image?

Second question: Where can I buy a NEW akku for this device (not old/used one)? I could not find any vendor for it. :-(

Block Image

Block Image

Update (07/22/2020)

Thanks so much for the detailled information and the time you spent by helping me.

How do I know which capacity is the right one? Does the other characters on the battery say how much A (amper) and V (voltage) it needs to be?

And one last question: why must I not touch the part you marked in the image with "do not touch". Well I won't touch it now but it seems to be a plug (jack).

This seems to be the complete akku when I watch an article I found at ebay via “Akku PP332727“:

Block Image

回答がありました! 回答を表示 同じ問題があります

この質問は役に立ちましたか?

スコア 1
1件のコメント

Hello,

I need also to change the battery of my Tomtom Adventurer. Could you please tell me where did you get one? I searched for p332727 without success.

Thanks in advanced and best regards!

さんによる

コメントを追加

1 件の回答

ベストアンサー

Hi,

Here’s a supplier for the battery.

Just search for PP332727 to get results for suppliers that may suit you better. There are several listed but most say nil stock.

332727 refers to the dimensions of the battery i.e. 3.3mm depth x 27mm width x 27mm length.

As to replacing the battery, I haven’t done a smartwatch before but I would try to gently lift the flex cable that is across the top of the battery so that it is not in the way and then prise the battery out of its position. It may be glued down so this will make it more difficult to get out, but maybe not. I don’t know

When the battery is out, cut the wires, one at a time at a suitable length so that the wires from the new battery can be connected colour for colour i.e. red to red and black to black to the original wires, (soldered and each joint insulated with heatshrink tubing - example only

That way the circuit board in the other half of the watch won’t have to be touched at all.

Position the new battery and push the flex cables back into position and then gently get the wires to sit in without them catching on anything etc.

Here’s an image that may help.

Block Image

(click on image to enlarge for better viewing)

As always with electronics repair, be gentle when handling and take your time. If it is not going as planned, stop and think about it and then start again. Do not persevere as you can cause more damage due to frustration. Walk away if you have to and then come back and try again.

Hopefully this may be of some help.

このアンサーは役に立ちましたか?

スコア 1

2 件のコメント:

Hi,

The capacity (mAH - milliAmpere Hours) really doesn't matter as long as it is not too much lower, but since the replacement battery has the same model number it should be the same as the original.

With batteries the higher the capacity in mAH (or AH - Ampere Hours) the longer the device will operate or before it needs to be recharged if it is a rechargeable battery. This also means that it will take longer to recharge as well if it is a rechargeable type.

What is IMPORTANT is that the replacement battery's VOLTAGE IS THE SAME as the original battery in the device. Also the dimensions of the battery have to be taken into consideration as it has to physically fit into the device as well

The other characters on the battery give no reference to what the Amperage and Voltage is or none that I can find anyway. All you can rely on is the battery's model number as it will not be used for another battery with different specifications.

Just imagine the confusion and problems that would occur if batteries with different specifications were to have the same model number.

I said "do not touch" because I could not make out clearly from the image you posted (even when zoomed in) how the wires were connected to that board.

So I thought if they were soldered onto the board, then if you don't have to unsolder them, this would mean that you don't have to remove the board from its' position if you couldn't get a soldering iron in there and all the problems that this may potentially cause by doing this etc. Leaving it alone seemed to be the safest and easiest option. Since it is a plug in arrangement it is obviously easier to do. Just plug in the replacement battery rather than cut, join and sleeve the wires together.

Cheers.

さんによる

Great. Thanks so much! Your reply was so much helpful.

さんによる

コメントを追加

回答を追加する

Lars P. さん、ありがとうございました!
統計データ:

過去 24時間: 0

過去 7 日: 0

過去 30 日: 0

今までの合計 634