メインコンテンツにスキップ

冷凍庫を含む冷蔵庫の修理と解体ガイド。

1696回答 すべてを表示

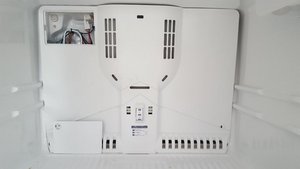
Remove back panel from LG GR-626RW Refridgerator

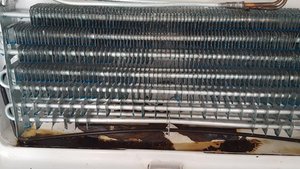
I have a water collection problem at the bottom of the fridge. I know the fix but need to remove the back panel of the freezer to execute it (or investigate further).

The videos/documentation on the fix that I have found show removing a different back panel and this one has me stumped. There are no screws to remove. At the top left there is a rectangular panel with tabs that does not remove easily and I’m hesitant to force it for fear of breaking snapping something and then not having it be the mechanism to remove the panel anyway.

Can anyone confirm that panel is the secret to removal? Or if there is another trick?

— Thanks!

Block Image

回答がありました! 回答を表示 同じ問題があります

この質問は役に立ちましたか?

スコア 0
コメントを追加

3件の回答

ベストアンサー

Hi @g3548dm ,

With the small panel, try using a screwdriver to pry off the “button” as it may only be a cap over a screw and then lever the panel out from the right side slot.

With removing the large panel the LG disassembly video in this link may provide some clues.

Scroll down the page to find the LG Refrigerator disassembly video, start the video and then fast forward to the 7:50 minute mark.

I realize that your model is different to what is shown in the video but the principle may be the same.

このアンサーは役に立ちましたか?

スコア 2

1件のコメント:

Bang on. I had found the video but moved on from it given how different the model was and the amount of other freezer components, but you are correct that the principal is the same for that plastic cover.

The "button" is a screw cap. When I have time to move fridge contents and move forward I'll post back that things are complete.

But yes, thank you. This is the 100% next step. You guys are quick with responses!

さんによる

コメントを追加

What happens when you press the button?

Ot looks like the hinge tab is on the right side. There appears to be a place to insert a flathead screwdriver on the left.

このアンサーは役に立ちましたか?

スコア 1

1件のコメント:

Thanks for quick answer.

* The button does nothing as far as I can tell; it doesn’t push in. It shifts a bit in place but that, I assume, has little to do with anything. May be use when the plastic plate is removed but doesn’t seem to at moment

* There are tabs on either side. I’ve lifted the right one out,but the left doesn’t then pop out the way one would expect. Maybe just heaving on the right tab harder than I think I should would pop it out, but am afraid of snapping it, but I know heaving can work fine sometimes

* Trying left one first: It’s right beside the left wall and I can’t get leverage with screwdriver. Any suggestion on ad hoc tool that might be able to get at the left tab?

* That said, what I’m trying to do (get at the evaporator and the drain hole), the whole back panel has to come off. I assume the plate has to do with it but with its small size I sometimes question that.

さんによる

コメントを追加

Was awhile before shutting down fridge long enough to get back to this, but….

  • Yes, “button” at top left was covering a screw; removing that screw allowed popping out the small panel in top left of the picture
  • Once that panel was out, removed some coupled wiring I could see through the hole that small panel left and then was able to just heave on the back panel a bit and have it come forward to “pop out”. There was some other electrical to disconnect, but the full back panel came out fine
  • I was expecting things to be all iced up, which is usual cause of the leak down in the criper, but in actuality, the area around the drain hole had badly cracked and flaked creating rusty bits that I believe were interfering with the drain hole. It’s quite a mess. WIll get it cleaned out and see if the exposed metal seems to be an ongoing problem, but I’m afraid I’m approaching replacement territory.

Thanks for responses. Got me past where I was stuck.

Photos of back panel “just popped out” (and small panel that was removed via screw) and rusted area around drain hole.

Block Image

Block Image

このアンサーは役に立ちましたか?

スコア 1

2 件のコメント:

Hi @g3548dm ,

Thanks for the feedback.

Did you check if the drain was OK and not blocked by pouring some water down and seeing if all of it got to the evaporator pan OK?

Rust like that to me indicates that it had standing water which then iced up again in cycles as per auto defrost but it never got dry so to speak.

The rust flakes may have exacerbated the problem but I would still check the drain

さんによる

Yes, poured some water down drain hole and got a full pan.  In the next week, should be able to see if any dripping into the area below the crisper continues.

さんによる

コメントを追加

回答を追加する

David Medd さん、ありがとうございました!
統計データ:

過去 24時間: 1

過去 7 日: 21

過去 30 日: 154

今までの合計 8,958