メインコンテンツにスキップ

HPによるフォトインクジェットプリンターモデルの修理ガイドならびにサポート情報。

288回答 すべてを表示

Photosmart 7510e - Paper not feeding automatically, Will feed Manually

With paper in the printer "No Paper Error" keeps coming up. When the printer status page it printed the feed rollers move down to the paper however they do not roll or move at all to pull the paper through the printer. All of the additional rollers after the feed rollers are working properly because when you push just one sheet of paper through the feed rollers the second rollers will grab the paper and pull through the duplexer rollers.

I am looking for a guide to the teardown process to get to the feed rollers to see if a gear is broken.

Thank you for any help.
この質問に回答する 同じ問題があります

この質問は役に立ちましたか?

スコア 8
コメントを追加

19件の回答

最も参考になった回答

I commented below - earlier. There is NO FIX to this trouble. I spoke with senior tech people at HP and they confirm this printer - and many others - are disposable. I complained that a $150-200 purchase was negated by poor quality plastic roller the size of a grape. Furthermore, I would have to buy new machine. Even worse, inventory of ink I just bought was now useless. They agreed and hence the deal on a new generation machine which will likely have similar problems soon enough.

The issue become one of total cost per printed impression over "life time" of machine, not user. There does not seem to be consumer panels/survey on longevity but there certainly is evidence that low-price ink jet printers (or lasers) are "given" away (low/no gross margin) to drive ink sales. The proliferation of models by HP which basically are unchanged in function is part of that marketing plan. It's deliberate and the choice is for the consumer. Can we shame them into growing up and making sense? I doubt it.

I am pledged that next time - too soon, I am sure - I'll will not buy HP and I will buy printer with parts designed to last and made available for vendor or at home repair. Long term, HP is not the tech firm it used to be and buyers need to move on.

このアンサーは役に立ちましたか?

スコア 5

1件のコメント:

There is a solution

さんによる

コメントを追加

I have the same thing - 3 year old machine. Clearly the take up roller is clean and comes down to the supply stock - but the rollers do not turn. They rotate freely when the arm is in "up" position - but that may be normal. The gears are tiny little plastic things and I can guess one is busted - impossible to see and hand to get in there. I will look for a repair center but failing that, I'll just tear the damned thing open and give it a shot. Likely, I throw this out and start out. HP is famous for this. I went through their forum and this problem is never resolved. I think I will try another brand. Too often the HP machines are cheap to buy, ink is pricey, and long term use is futile.

このアンサーは役に立ちましたか?

スコア 4

1件のコメント:

It occurs to me that computer industry (and peripheral suppliers) consider it helpful to have a forum where people who are angry, cheated, or worse hang around to grouse about the supplier and look for home remedies. Imagine Boeing doing this with airlines who fly the 787.

It is amazing how arrogant and dull this field has become. More amazing: Americans put up with it. As though computers are a hobby and we all like to learn how to make them work.

Astounding. Note, the business press says nothing and falls on its face in praise of new stuff, using handouts from corporate PR offices.

Airlines used to be fun - now we hate them. PC folks are coming on strong to be the second tier of most loathed industry in modern time. Third would be mfrs of parking meters.

さんによる

コメントを追加

I spent full day trying to find service locations, schematics, sources for parts, or simply answers. I finally wrote Meg Whitman at HP and got a helpful response from a service office:

1. Parts not available

2. Schematic not available

3. Problem (mine at least)clearly mechanical - gear busted.

4. No solution - no repair - at least at practical costs.

5. HP gave me a deal on new species (Envy 7640) with similar features. Half price reconditioned machine, one year warrantee, shipped free. $80.

6. More or less, service rep agrees printers by HP are not expected to by repaired.

It is the old business model of cheap razor, pricey blades (ink.) Printer is a big razor and a lot of waste and mess in trash heap - but HP doesn't give a %#*@.

I will not buy their lines anymore - printers, PC, or whatever. If anyone wants a couple of new 564 ink cartridges (HP) unopened, write me and I'll mail.

このアンサーは役に立ちましたか?

スコア 4
コメントを追加

I'm usually pretty handy but I gave up trying to fix this problem. However, I loved the cartridge cart on the 7510 (so easy to remove and clean) so I looked for other HP printers that used the same cartridges. Walmart had a sale on refurbished HP 5520. They were practically giving it away for around $50. Heck, the new cartridges alone were worth 20 to $25. I bought refillable cartridges and it has been running beautifully for the past 6 months.

このアンサーは役に立ちましたか?

スコア 3
コメントを追加

HP SUCKS! Same 7510 crap! Cleaned all parts at least 6 times! What a waste! Cheap plastic gears! Pick up does not turn when it comes down on the paper! Cleaning is a big waste of time! I have been using HP printers for years and they only last 2 years if your lucky! Never again! Now that this one has crapped out like the rest have, it's time to start looking at different company's for a printer! HP you can kiss my Butt! Never again!

このアンサーは役に立ちましたか?

スコア 2

1件のコメント:

There is a solution, so simple

さんによる

コメントを追加

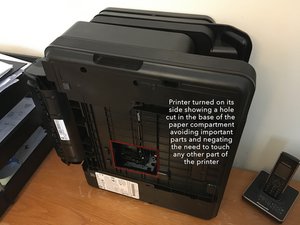
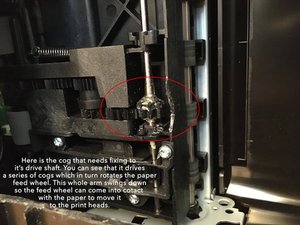
Hi George,

What better way to spend lockdown than to fix that printer.

Block Image

Block Image

I hope this helps and that you can see enough detail in the pics to see what’s going on.

Steve

このアンサーは役に立ちましたか?

スコア 2

2 件のコメント:

Thanks for the pics. They were super helpful. I knew about cutting a hole but didn't know exactly where. I was worried about cutting into something critical but thankfully, with the help of your pics, I made a perfect cut. The cheap plastic cog was cracked and slipped off the spline which of course rendered the printer useless. I tried sealing the crack on the cog with Crazy Glue but that stuff didn't adhere at all. I then used an A+B epoxy mix called Plast-Aid that I butted up against the cog. I also filled the crack in the cog with the same epoxy using a toothpick as a tool. It all worked out perfectly. Now my printer is working fine again. Anyone trying this should wipe the cog and shaft clean first with rubbing alcohol. The good thing about the hole is that it's hidden underneath the printer and I know that if I have to do a similar repair in the future, the hole is already made and I will be able to fix it in two minutes. Thanks, Steve!

さんによる

Thats the way, only use steelglue, this works for me with strong steelglue, picking up is solved

さんによる

コメントを追加

Hi everyone. FYI, the repair I made in 2016 (see comments above) still works. I still use the printer. For those who have the same issue, it is worth a try!

このアンサーは役に立ちましたか?

スコア 2
コメントを追加

I am having literally the exact same problem on my 7510 and came here looking for help. I've got it partially disassembled and hope to get the feeder assembly out but it looks like a pain in the @%^ to get to.

The rollers on the paper feeder turn but very weakly and I can hear crunching sounds but the exposed gears seem to be OK. I'll post more once I have done more of a thorough investigation.

Basically at this point it's fix it, or get a new printer so I have nothing to lose.

このアンサーは役に立ちましたか?

スコア 1

2 件のコメント:

Unfortunately I got very sick and was unable to spend any time to investigate this further. As I needed a working printer I just decided to purchase an HP AIO laser printer as a replacement. My last HP laser was basically indestructible and I'm hoping that this one will be more durable in the long run as laser printers are more "professional".

I absolutely hate how disposable these inkjet printers are. It's so wasteful to have to throw away printers that can't seem to last beyond a few years without something breaking due to their extremely cheap plastic internals. They are definitely not built to last. As someone mentioned in another fork it's the Gillette model. Printer manufacturers can build these printers at a loss with the cheapest components possible and make all their money back by selling ink at hugely inflated prices.

I was able to salvage some internals for future project use at least (the WiFi module and card reader) to prevent a bit of e-waste but the majority is plastic crap not worth saving.

さんによる

Same exact problem here. A 10 cent piece of plastic breaks and I need to replace the whole printer.

さんによる

コメントを追加

Hello, I have the same problem with mine (HP 7510).

Symptom: the feeder goes down on paper. It makes some noise, but the wheels barely rotate and do not push paper through to the second set of wheels. If I put my hand under the feeder to stop it from going down and then push the paper manually, the second set of gears catches the sheet and the printer works fine.

After inspection, I found out the culprit: all the gears within the feeder are working fine, but the first one, attached to the rotating axis, must be to old and it is not stuck onto the axis anymore. The axis turns fine, but it does not get the gear to rotate as soon as there is a slight resistance (which is the case when it has to push paper).

I do not know how to repair that. I may try to glue the gear on the axis, but my experience with this is not very good as the rotation is "brutal": it starts and stops violently, so the glue can only last a short time.

Would anyone have an idea? Do you think we can get spare parts?

It is the second HP printer I have where a small 2c plastic parts breaks after 2-3 years, which eventually causes the whole printer to be trashed. Honestly, that is a shame.

このアンサーは役に立ちましたか?

スコア 1

4 件のコメント:

I got it repaired! I tried with glue: no luck, the glue, as expected, works fine a few times but does not stay.

I tried something harder: like a modeling dough, two colored, that you mix and become hard as steel after a few minutes. I prepared a small amount of it and got the gear stuck to the axis with it. It is not easy to do as you need small fingers and make sure you don't put dough in the gears. But the next day, after it had dried, it was well in place. It's been 2 months now and the printer keeps printing!

さんによる

I am having this issue as well. I read about this fix on another site but wondering how do you access the gear?

さんによる

Thanks for the post, GFI. Our 3-yr. old printer was doing the exact same and sure enough the first plastic gear - on the steel axis (from the front of the printer) that drives the inline feeder gears, was losing it's grip on the steel axis. Under load, it wouldn't turn with the axis and it easily moved left or right by hand with the unit unplugged. So, we used just a few drops of Gorilla glue on the axis and slid the gear over it and let it set overnight. A small mirror setting on the bottom of the empty paper tray really helped. Next morning, we added some paper and printed a status report and no problems! Been printing ever since.

(We think using thicker stock photo paper on occasion stressed out that plastic drive gear causing it to finally slip under load.) While HP has "scored" the axis at this drive gear to help prevent this from happening in the first place, the slight glue application was the fix.

Thanks again for the tip. One less printer on the scrap heap!

さんによる

Hi. I had the exact same problem on my HP 7510 as described by GFi, and solved it in less than 15 minutes. I used an epoxy 5-minute glue (mix of 2 tubes) and, most importantly, PROCEEDED AS DESCRIBED IN THE FOLLOWING YOUTUBE VIDEO:

https://www.youtube.com/watch?v=1n5Fwn4h...

Thanks.

さんによる

コメントを追加

Hi Guys,

28th Jan 2018 - I have an HP Photosmart 7520 with the same small cog slipping problem. Glued it once but it only lasted a couple of weeks. So now I am trying a different approach. As the printer is basically scrap I am thinking there is no need to be gentle with the thing and as its vertually impossible to take apart with screw-drivers and tools. So lets look at it from a different angle. We need to gain access to the cog on its shaft to so that when glue is applied we can see how well it has stuck. My plan is to cut a hole in the base of the printer to gain access to the area around the drive shaft. Watch this space.

Steve - why should I dump the printer just because of one small cog!

29th Jan 2018 - So now I have cut a hole in the base of the printer to gain access to the cog that drives the paper tractor. Now I can see whats going on.

On close inspection of the cog I found that it has split so it will never clamp onto the splined area of the shaft so it will be totally reliant on the glue to get it to grip to the shaft.

What I have done now is to apply some epoxy glue to the shaft, sliding the cog over the glue and add more along the shaft after roughing it up to give the glue a better chance to stick. and because I have placed the printer on its side the glue will flow over the end of the cog and end up in the teeth. When the glue set I cut away the excess on the cog teeth but leaving as much there as possible.

I am now going to let the stuff set over night before I try to run the printer, but if that doesn't work at least now I have easy access to the area through the hole in the bottom of the printer where the paper sits.

このアンサーは役に立ちましたか?

スコア 1

4 件のコメント:

Curious if you had any luck?

さんによる

Hi Jayessi,

YES! it works. The great thing about this approach is that if the cog comes loose again you have instant access to the area without having to take the thing apart.

I find it amazing that such a small thing such as a slipping and split cog could turn the printer into a pile of useless plastic.

さんによる

Can you share a video of the steps that you did to fix this?

さんによる

Hi. I solved my HP 7510 problem using this video that would probably be also helpful to you:

https://www.youtube.com/watch?v=1n5Fwn4h...

さんによる

コメントを追加

I too had and repaired this nusence trouble with the HP Photosmart 7510 printer. Attached are pictures:

1. cut hole in bottom of printer below the "pickup roller gear set".

2. slide "slipping" gear off to side and clean with alchol.

3. apply epoxy to gear axis with long wooden q-tip (or similar tool), then reposition gear.

4. let dry and start printing.

https://drive.google.com/file/d/1zg0QbE4...

https://drive.google.com/file/d/1GjiEro_...

Hope this helps.

このアンサーは役に立ちましたか?

スコア 1

1件のコメント:

worked excellent i used jb weld

さんによる

コメントを追加

I got the gears fixed but printer still does not work. It’s as if the unit does not detect that there is any paper in the printer to process.

このアンサーは役に立ちましたか?

スコア 1

1件のコメント:

Thats is just what I discoverd too, last evening. Examining the gear, as discribed above, could see the cog. It wasn't fixed on the splines. Moving that cog to the right, it was possible to fix it on these splines again. So I thougt mission accomplished. But no!

I think there is another problem, concerning the detector of the presence of paper.

Can anyone tell us, me and the ohter interested people here?

Hope my English is good enough to discus in this item

Hans Visser from the Neterlands

さんによる

コメントを追加

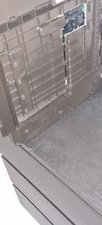
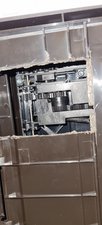
I cut out a piece of bottom above the feeding arm, there i saw the gear is from his place, put printer with bottom up offcourse.

I made a bit of steel glue, put a bit in the place for the gear, shove it on the place, and put some glue also on the side of the gear and drive shaft.

After a night drying i put is al together after good cleaning inside from the sawing the bottom.

And............started a printer diagnostic page, 1 error display "not good powered off, it runs and calibrate, and then YES it picks a A4 and prints perfect.

This is the only easy repair for this problem, perfect, no new parts needed

See the Grey glue

Thanks for the tips

Block Image

Block Image

このアンサーは役に立ちましたか?

スコア 1
コメントを追加

Figured it out!! Reach into the paper feed area from the front. Feel for the pick-up roller assembly (it has two rubber rollers on it). There is a small plastic piece on the bottom of the roller assembly that slides to the right (when facing the front). After sliding that piece to the right, the pick-up rollers are working fine again !!

このアンサーは役に立ちましたか?

スコア 0

2 件のコメント:

Tried that but failed to fix the problem.

さんによる

SORRY I thought I had it, but it didn't stay fixed.

I ended up tossing the printer and buying the HP 5520 on Walmart web site for $40 (refurbished). It uses the same HP 5640 ink cartridges. At this price it's like paying $25 for the cartridges that comes with it and $15 for the printer!!

さんによる

コメントを追加

Well it looks like we've all figured out this thing sucks.. I tore mine down to the bones but stopped once I was going to have to start disconnecting the tubes on the lower part of the cleaning trays under the ink cartridge holders and it got me no where closer to the inner part of the feeders other then an extra 1/2 to 1 inch of room but not in a very good way when your having to hold half of it, moral of the story don't screw with trying to pull it apart to get a better angle at the gear. I tried loctite and it literally lasted for about 15 prints so not much help there. What they should've done was had a square shaft on there or a double key pressed into the bar that way it had more grip instead of grinding out a hole in the gear. they wouldn't be throw away items if they put a little sense in lasting designs instead of "Hey it printed a page so it works, right?" HP's new model should be "Built to work, but not to last".

The only Solutions I can think of are

--drill a small hole directly threw the gear and rod and put a pin threw the hole and loctite it in place.

--move the gear to the side and clean off the rod where pieces of the gear still are and find a VERY good glue that bonds to plastic and metal and put it on and then slip the gear back on and glue the outside of the gear to the rod too (still looking for the glue but needs to be liquid).

--someone mentioned earlier about using a 2 part material to put on the sides to grind it and bond it but what might work instead is to move the gear over to the side and put that on the rod and pack it on the and rotate the rod so that is grabs the gear marks and essentially becomes a replacement gear, of your good enough it might just work .

--Else take the thing out back and blow it up...

このアンサーは役に立ちましたか?

スコア 0

5 件のコメント:

Hi,

I'm a few months later, and what I did still works (see my comment on Aug. 24 2016).

Good luck all!

さんによる

What is the two part you used? Epoxy repair, steel stick, epo putty, blue/yellow, ect.

さんによる

I'm désolé I can't tell you exactly. It's like a tube, blue outside, white inside. Mix it with my fingers for a minute so it gets "light blue". It dries hard as steel. Not epoxy in my opinion. If I can find the old box, I'll post it. Couldn't put my hands on it yet.

さんによる

I'm thinking that's loctite repair putty, I'll have to give it a try. Thank you!

さんによる

We used a few drops of Gorilla glue. Expands as it dries. Worked like a charm. Just too bad plastic gears can't handle the stresses of printing on their own!

さんによる

コメントを追加

The only positive detail I can add is that because HP is a publicly-held outfit, the senior folks can be found.

My complaint - by letter - NOT EMAIL - went to Meg Whitman who gets a lot of press and so far doesn't seem to have helped anyone.

My letter went to a special department which most big outfits have - I call it "The Crank Psycho Complaint Dept" where reasonable adult folks jump in to the fray to sidetrack the person with plastique strapped to his chest, standing in the lobby with a broken ink jet printer (for example.)

My dead machine stayed dead - but I got a replacement with numerous bells and whistles - for about 50% of retail. Not the answer that defines a mfr of integrity - but at least a stop gap. Meanwhile, I am reviewing other brands, ready to buy a replacement when this HP printer digests itself.

When a mfr competes in a commodity market, offers things which are not really unique, and sinks to fighting a battle of cost control and aggressive discount pricing, the war is lost. It just takes a while to notice. HP has been dead for a long time but nobody has held a mirror under its nose to check for breath.

このアンサーは役に立ちましたか?

スコア 0
コメントを追加

Hi, I have the same problem. Can anyone put photoes how to fix this printer? Previous pictures are not available. Thanks for help.

このアンサーは役に立ちましたか?

スコア 0
コメントを追加

The weakest part of this printer are the plastic gears, especially that one particular gear. It should have been made of steel. I had the same problem. I cut a piece of the bottom plate off to expose the gear. I used a dremel tool with a tiny saw blade attached but I suppose you can also use a multi-tool with a cutting blade. I immediately noticed the gear was cracked straight through to the shaft therefore slipping and making the gear useless. I cleaned the gear and the shaft with alcohol and used epoxy to fix the cracked gear and secure it to the shaft. I put a lot of epoxy on both sides of the gear to make sure it was well bonded. I also dabbed a little on the shaft where the gear seats. I let it dry for 24 hrs and then started using it . It's been working flawlessly since I repaired it and that was 2 years ago.

このアンサーは役に立ちましたか?

スコア 0
コメントを追加

Great solution, my 7510 prints again, thanks for the older idea on this topic

I know what to repair. But never think off cutting the bottom. I did see a complete disambling for me but cutting and repair was done in 20 minuts.

Bison steel glue 2 component will never let the gear go.... hard as steel

A luck i find this site

このアンサーは役に立ちましたか?

スコア 0

2 件のコメント:

I'm glad that you found this information helpful and that you were able to get your printer working again. Another tip is to buy generic ink cartridges. They are just as good and a lot less expensive than original HP. Amazon is a good place to get them or Ali Express is good too.

さんによる

After 40 prints the gear comes off, this needs more glue and cleaning, maybe the gear is broken and slips.

Have to do it better, and check for crack in gear, then i use more glue between gear and place on shaft, sides more glue.

Mayby make the metal next gear bit sanding

clean all with alcohol 70%.

Then i come back, bye

さんによる

コメントを追加

回答を追加する

George Simmers さん、ありがとうございました!
統計データ:

過去 24時間: 2

過去 7 日: 12

過去 30 日: 57

今までの合計 11,107