replacing heater core on 1997 jeep cherokee
wheres the heater core located
この質問は役に立ちましたか?
スコア
0

評価: 791.3千
![]() 1.1千
1.1千
![]() 899
899
![]() 2.4千
2.4千
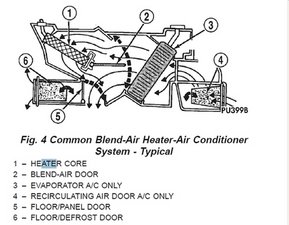
shawn, the heater core is located in the heater-A/C housing, under the instrument panel. It is a heat exchanger made of rows of tubes and fins.
If you want to replace it (your question did not ask for it ;-) follow the instructions from the Service Manual:
HEATER CORE
WARNING: ON VEHICLES EQUIPPED WITH AIRBAGS, REFER TO GROUP 8M - PASSIVE RESTRAINT SYSTEMS BEFORE ATTEMPTING ANY STEERING WHEEL, STEERING COLUMN, OR INSTRUMENT PANEL COMPONENT DIAGNOSIS OR SERVICE. FAILURE TO TAKE THE PROPER PRECAUTIONS COULD RESULT IN ACCIDENTAL AIRBAG DEPLOYMENT AND POSSIBLE PERSONAL INJURY.
(1) Remove and disassemble the heater-A/C housing. See Heater-A/C Housing in this group for the procedures.
(2) Lift the heater core out of the lower half of the heater-A/C housing (Fig. 48).
(3) Reverse the removal procedures to install. Be certain that the heater core foam insulator is reinstalled.
LIQUID LINE
Any kinks or sharp bends in the refrigerant plumbing will reduce the capacity of the entire air conditioning system. Kinks and sharp bends reduce the flow of refrigerant in the system. A good rule for the flexible hose refrigerant lines is to keep the radius of
all bends at least ten times the diameter of the hose.
In addition, the flexible hose refrigerant lines should be routed so they are at least 80 millimeters (3 inches) from the exhaust manifold.
High pressures are produced in the refrigerant system when the air conditioning compressor is operating.
Extreme care must be exercised to make sure that each of the refrigerant system connections is pressure-tight and leak free. It is a good practice to inspect all flexible hose refrigerant lines at least once a year to make sure they are in good condition and
properly routed.
WARNING: REVIEW THE WARNINGS AND CAUTIONS IN THE FRONT OF THIS GROUP BEFORE PERFORMING THE FOLLOWING OPERATION.
REMOVAL
(1) Disconnect and isolate the battery negative cable.
(2) Recover the refrigerant from the refrigerant system. See Refrigerant Recovery in this group for the procedures.
(3) Disconnect the liquid line refrigerant line couplers at the evaporator inlet and the condenser outlet (Fig. 49). See Refrigerant Line Coupler in this group for the procedures. Install plugs in, or tape over all of the opened refrigerant line fittings.
(4) Remove the liquid line from the vehicle.
HEATER-A/C HOUSING
The heater-A/C housing assembly must be removed from the vehicle and the two halves of the housing separated for service access of the heater core, evaporator
coil, blend-air door, and each of the various mode control doors.
WARNING: ON VEHICLES EQUIPPED WITH AIRBAGS, REFER TO GROUP 8M - PASSIVE RESTRAINT SYSTEMS BEFORE ATTEMPTING ANY STEERING WHEEL, STEERING COLUMN, OR INSTRUMENT PANEL COMPONENT DIAGNOSIS OR SERVICE. FAILURE TO TAKE THE PROPER PRECAUTIONS COULD RESULT IN ACCIDENTAL AIRBAG DEPLOYMENT AND POSSIBLE PERSONAL INJURY.
REMOVAL
(1) Disconnect and isolate the battery negative cable.
(2) Remove the instrument panel from the vehicle.
Refer to Instrument Panel Assembly in Group 8E -
Instrument Panel Systems for the procedures (3) If the vehicle is not equipped with air conditioning, go to Step 6. If the vehicle is equipped with air conditioning, recover the refrigerant from the refrigerant system. See Refrigerant Recovery in this group for the procedures.
(4) Disconnect the liquid line refrigerant line fitting from the evaporator inlet tube. See Refrigerant Line Coupler in this group for the procedures. Install plugs in, or tape over all of the opened refrigerant line fittings.
(5) Disconnect the accumulator inlet tube refrigerant line fitting from the evaporator outlet tube. See Refrigerant Line Coupler in this group for the procedures.
Install plugs in, or tape over all of the opened refrigerant line fittings.
(6) Drain the engine cooling system. Refer to Group 7 - Cooling System for the procedures.
(7) Disconnect the heater hoses from the heater core tubes. Refer to Group 7 - Cooling System for the procedures. Install plugs in, or tape over the opened
heater core tubes.
(8) Unplug the heater-A/C system vacuum supply line connector from the tee fitting near the heater core tubes.
(9) Unplug the heater-A/C unit wire harness connector, which is fastened to the heater-A/C housing next to the blower motor relay (Fig. 39).

(10) Remove the five nuts from the heater-A/C housing mounting studs on the engine compartment side of the dash panel (Fig. 40). Remove or reposition the evaporation canister for additional access, if required.

(11) Pull the heater-A/C housing rearward far enough for the mounting studs and the evaporator condensate drain tube to clear the dash panel holes.
(12) Remove the heater-A/C housing from the vehicle.
Hope this helps, good luck.
このアンサーは役に立ちましたか?
do i have to tear down the entire dash to get to this
このアンサーは役に立ちましたか?
sometimes you can get to the heater core through the duct work under the dash without pulling it but in most cases your further ahead to pull the dash out to make disassembly faster and easier. most heater cores take a long time to get to so expect it to take you the better part of a day to do . its not usually a job you can do in an evening
https://www.youtube.com/watch?v=z5Pipmcq...
https://www.youtube.com/watch?v=FojicmED...
this shows the process
過去 24時間: 1
過去 7 日: 2
過去 30 日: 23
今までの合計 19,703