
Hard Drive Replacement G4 1.25 GHz eMac
How do you replace the Hard Drive in a G4 1.25 Ghz Emac

評価: 791.3千
![]() 1.1千
1.1千
![]() 899
899
![]() 2.4千
2.4千
Tools
This procedure requires the following tools:
• Phillips #2
• Jeweler’s #1 screwdriver
Preliminary Steps
Before you begin, do the following:
• Place the computer face down on an ESD mat.
• Remove the user access door.
• Remove the feet.
• Remove the rear housing.
• Discharge the CRT.
• Remove the fan.
• Remove the Faraday cage.
• Remove the digital module assembly.
Procedure
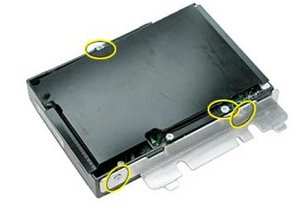
1. Remove the three screws along the back of the hard drive.

2. WIth a screwdriver or plastic tool, pry the hard drive out of the hard drive carrier to access the power and data cables.

3. Disconnect the hard drive power cable and the hard drive data cable. Remove the drive from the carrier. Notice there may be up to three thermal pads on the hard drive; two on the top and one along the side of the drive. You may discard the thermal pads on the top of the drive. If the pad along the side of the drive appears damaged, replace it.

4. Turn the hard drive over. WIth a jeweler’s screwdriver, remove the two screws on the black plastic cover and the two screws on the metal bracket.
Note: These two pieces need to be removed when returning the hard drive to Apple service.
CRT Discharge
Warning:
This product contains high voltage and a high-vacuum picture tube. To preventinjury, always review the Service Foundations: CRT Displays course for safety information.It can be found at: http://service.info.apple.com/service_tr.... Click on
Desktop Certification Courses and select the Service Foundations: CRT Displays link.
Warning:
Never use a grounding wriststrap until after discharging the CRT and setting up an ongoing ground connection.
Safety Guidelines:Whenever the rear housing of the computer is removed and before replacing a module,you must
1. Discharge the CRT (shown below) and remove the anode cap.
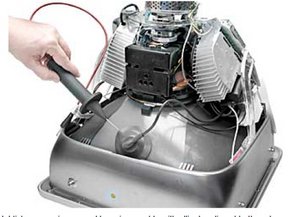
2. Establish an ongoing ground by using a cable with alligator clips at both ends.Connect one end to the anode aperture, and connect the other end to the metal CRT frame.
3. With the CRT discharged and the ongoing ground in place wear a grounding wriststrap to prevent equipment damage from static electricity.
Hope this helps, good luck.
このアンサーは役に立ちましたか?

評価: 739
![]() 3
3
Replacing the hard drive in the eMac is not easy at all and is not considered a CIP - "customer installable part". It has been years since Ive had to work on one of these but from what I remember you have to take the entire eMac apart. I do not recommend that you do this unless you have some experience working on them. Apple recommends discharging the CRT as it can shock you and/or implode and is dangerous to deal with.
Here is some info that I found:
http://www.everymac.com/systems/apple/em...
Hope this helps!
このアンサーは役に立ちましたか?
Scope of soft skills increase day by day and numbers of opportunities are available in market to use these skills.This is one of best forum for young generation to enhance their skills and avail these opportunities.buy old gmail accounts
このアンサーは役に立ちましたか?
Gmail PVA Accounts
Gmail has turned fifteen years recent. And that is no April Fool’s joke. It debuted on one April 2004 and currently has quite one.5 billion users. To celebrate this milestone, Google has declared some new Gmail options. This got the USA at Pocket-lint pondering Gmail and our favourite options. So, naturally, we’ve rounded them up. Here square measure Gmail’s best prospects, in no specific order.<a href="https://pvawork.com''">buy gmail pva accounts''</a>
このアンサーは役に立ちましたか?
過去 24時間: 0
過去 7 日: 1
過去 30 日: 10
今までの合計 10,977