メインコンテンツにスキップ

この分解は修理ガイドでは ありません。 お持ちのBMANI-VEAT00Lを修理する際は、iFixitの修理ガイドをご利用ください。

  1. Wireless Earbuds BMANI-VEAT00L Teardown, Introduction: 手順 1、 3の画像 1 Wireless Earbuds BMANI-VEAT00L Teardown, Introduction: 手順 1、 3の画像 2 Wireless Earbuds BMANI-VEAT00L Teardown, Introduction: 手順 1、 3の画像 3
    • Carrying case and two earbuds

  2. Wireless Earbuds BMANI-VEAT00L Teardown, Case Disassembly: 手順 2、 3の画像 1 Wireless Earbuds BMANI-VEAT00L Teardown, Case Disassembly: 手順 2、 3の画像 2 Wireless Earbuds BMANI-VEAT00L Teardown, Case Disassembly: 手順 2、 3の画像 3
    • Case shell is mounted to earbud holder with plastic clips

    • 4 plastic clips need to be released

  3. Wireless Earbuds BMANI-VEAT00L Teardown, Hinge mechanism: 手順 3、 2の画像 1 Wireless Earbuds BMANI-VEAT00L Teardown, Hinge mechanism: 手順 3、 2の画像 2
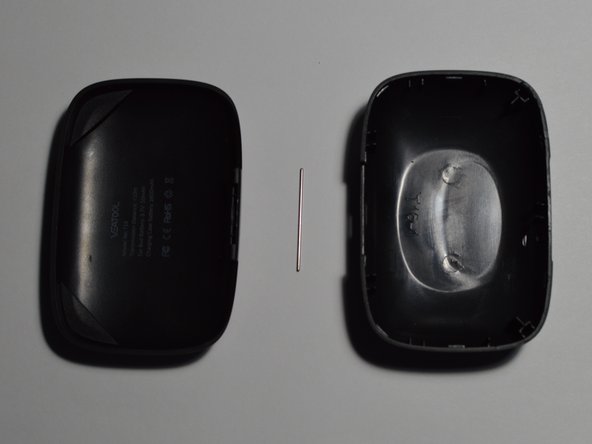
    • A pin through the lid attaches the top to the bottom of the case. It is held in place by the interior when it is latched in place.

  4. Wireless Earbuds BMANI-VEAT00L Teardown, Case Electronics Removal: 手順 4、 3の画像 1 Wireless Earbuds BMANI-VEAT00L Teardown, Case Electronics Removal: 手順 4、 3の画像 2 Wireless Earbuds BMANI-VEAT00L Teardown, Case Electronics Removal: 手順 4、 3の画像 3
    • Battery is secured with double sided tape.

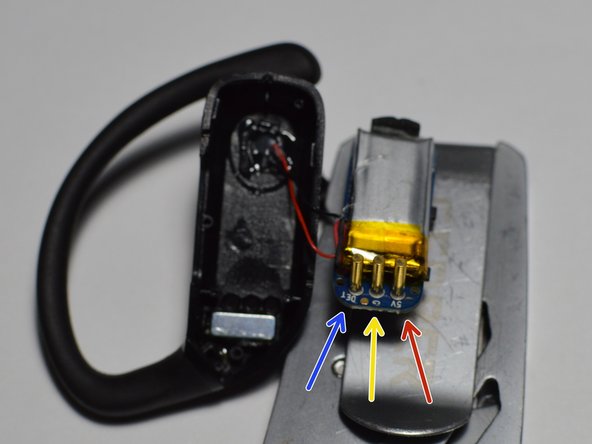
    • 3 #0 Phillips screws hold PCB to ear bud holder.

  5. Wireless Earbuds BMANI-VEAT00L Teardown, Case Dissembled: 手順 5、 2の画像 1 Wireless Earbuds BMANI-VEAT00L Teardown, Case Dissembled: 手順 5、 2の画像 2
    • All parts of case disassembled and detailed view of PCB.

  6. Wireless Earbuds BMANI-VEAT00L Teardown, Earbud Overview: 手順 6、 3の画像 1 Wireless Earbuds BMANI-VEAT00L Teardown, Earbud Overview: 手順 6、 3の画像 2 Wireless Earbuds BMANI-VEAT00L Teardown, Earbud Overview: 手順 6、 3の画像 3
    • Assembled ear bud

  7. Wireless Earbuds BMANI-VEAT00L Teardown: 手順 7、 2の画像 1 Wireless Earbuds BMANI-VEAT00L Teardown: 手順 7、 2の画像 2
    • Told lid is held in place with plastic clips.

    • Top has one button welded to it, two buttons for volume are on the side and can be removed, these have a pin in the middle to form a rotation point.

  8. Wireless Earbuds BMANI-VEAT00L Teardown, Electronics of Earbud: 手順 8、 1の画像 1
    • PCB can be lifted out of earbud. The speaker section is sealed in the end of the earbud.

  9. Wireless Earbuds BMANI-VEAT00L Teardown, Ear Bud Disassembled: 手順 9、 1の画像 1
    • All parts removed.

  10. Wireless Earbuds BMANI-VEAT00L Teardown, Connections: 手順 10、 3の画像 1 Wireless Earbuds BMANI-VEAT00L Teardown, Connections: 手順 10、 3の画像 2 Wireless Earbuds BMANI-VEAT00L Teardown, Connections: 手順 10、 3の画像 3
    • How the earbuds connect to the case to charge.

    • 5V

    • GND

    • DET

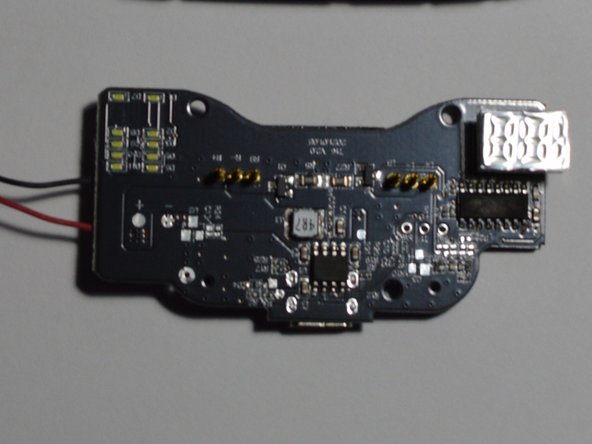
    • Case PCB has spring load pins on it

  11. Wireless Earbuds BMANI-VEAT00L Teardown, Earbud magnets: 手順 11、 2の画像 1 Wireless Earbuds BMANI-VEAT00L Teardown, Earbud magnets: 手順 11、 2の画像 2
    • Magnets hold earbuds securely in case.

  12. Wireless Earbuds BMANI-VEAT00L Teardown, Case Magnets: 手順 12、 2の画像 1 Wireless Earbuds BMANI-VEAT00L Teardown, Case Magnets: 手順 12、 2の画像 2
    • Lid is held shut by two magnets in the interior and two magnets hidden in the lid.

作成者

2人の作成者と共同で作成されました。

Wieli

メンバー登録日: 01/08/23

1,707 ポイント

10のガイドは作成済み

0 件のコメント

コメントを追加

統計データ:

過去 24時間: 0

過去 7 日: 4

過去 30 日: 26

今までの合計 204