メインコンテンツにスキップ

Velleman DVM850BL Digital Multimeter Teardown

必要な工具と部品

  1. Velleman DVM850BL Digital Multimeter Teardown, Removing Leads: 手順 1、 1の画像 1
    • Remove lead connectors from front panel.

  2. Velleman DVM850BL Digital Multimeter Teardown, Remove Back Casing Screws: 手順 2、 3の画像 1 Velleman DVM850BL Digital Multimeter Teardown, Remove Back Casing Screws: 手順 2、 3の画像 2 Velleman DVM850BL Digital Multimeter Teardown, Remove Back Casing Screws: 手順 2、 3の画像 3
    • Turn over the DVM and unscrew the two screws using a J1 bit.

  3. Velleman DVM850BL Digital Multimeter Teardown, Battery and PCB Screw Removal: 手順 3、 3の画像 1 Velleman DVM850BL Digital Multimeter Teardown, Battery and PCB Screw Removal: 手順 3、 3の画像 2 Velleman DVM850BL Digital Multimeter Teardown, Battery and PCB Screw Removal: 手順 3、 3の画像 3
    • Remove battery by gently disconnecting it from connector.

    • Remove three screws using J1 bit.

  4. Velleman DVM850BL Digital Multimeter Teardown, PCB Removal: 手順 4、 2の画像 1 Velleman DVM850BL Digital Multimeter Teardown, PCB Removal: 手順 4、 2の画像 2
    • Remove PCB by gently pulling it away from the back encasing.

    • Microprocessor

    • Continuity Check Speaker

    • Fuse

    • 9 V Battery Connector

  5. Velleman DVM850BL Digital Multimeter Teardown, Complete The Teardown: 手順 5、 3の画像 1 Velleman DVM850BL Digital Multimeter Teardown, Complete The Teardown: 手順 5、 3の画像 2 Velleman DVM850BL Digital Multimeter Teardown, Complete The Teardown: 手順 5、 3の画像 3
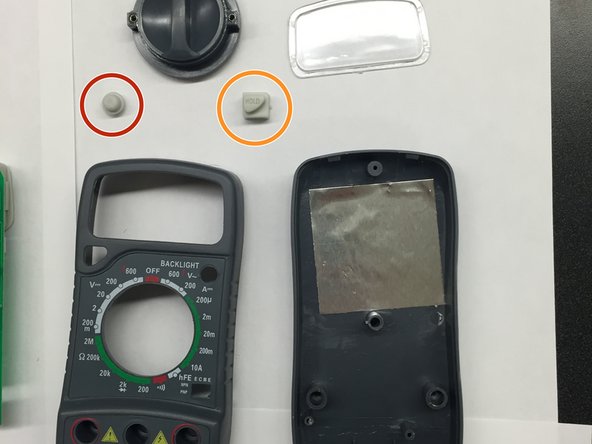
    • Remove the knob and buttons from the front grey casing.

    • The measurement knob uses two ball bearings that allows the knob to rotate. These bearings are small and easy to lose.

    • Backlight Toggle Button

    • Measurement Hold Button

    • LCD Plastic Cover

    • Measurement Select Knob

    • Measurement Select Knob Ball Bearings

    • Success! You have finished tearing down the multimeter.

ゴール

作成者

2人の作成者と共同で作成されました。

Michael

メンバー登録日: 01/23/14

362 ポイント

2のガイドは作成済み

チーム

Cal Poly, Team 10-32, Maness Winter 2014 Cal Poly, Team 10-32, Maness Winter 2014人のメンバー

CPSU-MANESS-W14S10G32

4 メンバー

6のガイドは作成済み

2 件のコメント

Don't take the contacts out of the rotary dial. It's very easy to forget where they go

Oliver Watson - 返信

This web page seems very helpful. However is it necessary to remove the micro processor or front knobs and buttons if all is working fine? What meter do you use to check the fuse? This one when the battery is changed? LOL And why does the print and photos change size when I try to scroll down the page after I reset it to 100 % ? Am I using Windows 10 wrong? Thanks

jaystuarthenderson - 返信

コメントを追加

統計データ:

過去 24時間: 0

過去 7 日: 0

過去 30 日: 7

今までの合計 2,427