はじめに
The device that makes walking look pedestrian: the much-blogged-about “hoverboard.” You may have seen those super cool kids, effortlessly gliding around the supermarket while you’re stuck walking the produce section—like a chump. You may have thought to yourself, “Should I get one of those highly advanced, futuristic wheeled-transport platforms? And if I do, will it spontaneously combust, as I’ve seen so many times on YouTube?” Only teardown will tell if this self-balancing scooter will be up to snuff on safety, and repairability.
Peek into the near future of tech by following us on Instagram, Twitter, and Facebook.
必要な工具と部品
-
-
Just how much "swag" does this Swagway pack? The specs are a good place to start looking:
-
Hard ABS outer body casing
-
Aluminum wheels with rubber tires
-
10 MPH top speed
-
23" x 7.3" x 7.3"
-
"Top Quality Brand" lithium battery
-
-
-
Phillips #2 screws secure the two bottom covers, so it's not long before we're well within the belly of the beast.
-
Things look… not bad! Given these boards' reputation, we weren't expecting clean insides.
-
Each foot pad has two infrared sensors. Stepping down on the pad pushes a peg between emitter and receiver; when all four sensors are blocked, you are ready to roll.
-
Those sensor switches live on the backs of the two gyro boards—one for each wheel. Each board is home to:
-
Invensense MPU6050 6-axis gyroscope+accelerometer
-
Changjiang Electronics Technology Co., LTD (JCET) CJ78M05 0.5 A / 5 V voltage regulator
-
-
-
-
The real star of the show here is the
firestarterlithium ion battery pack. -
Looks like we’ve got a “Shilly-car” lithium battery operating at 36 V with 4.4 Ah (that works out to 158 Wh—just over four times the capacity of an iPad Pro).
-
Inside, we find a tidy block of 20 LG ICR18650B4 batteries with their own protection board. We’re glad to see a reputable brand in here!
-
Their nominal voltage is much higher than the 158 Wh listed on the shrinkwrap. Li-ion batteries shouldn't be fully discharged, so the battery protection board probably limits the pack to the label's specs.
-
-
-
The motor power lines have some interesting (read: completely mismatched) color coordination going on—fixers take note.
-
Here's what we found on a quick tour of the main board:
-
GigaDevice GD32F103 ARM Cortex-M3
-
Six half-H bridge motor drivers, made up of two large MOSFETs each
-
Changjiang Electronics Technology Co., LTD CJ78M05 0.5A/5V voltage regulator
-
Two pairs of 0.007 ohm resistors by the power inlet (R007).
The motor wires might be mismatched from the ESC wires. But they are still in the same orientation. Just moved one over. So if the motor wires are connected to the same colors on the ESC the motor would still turn the right way
-
-
-
Saving the best for last(ish), we cracked open one of the mysteriously heavy wheels to get a look at the brushless DC motor.
-
Inside we find oodles of coiled copper wire, three large power leads (one for each of the three phases) and five leads for Hall effect sensors (for position tracking).
-
The motor control board will let the motor know when to switch across those wires, making for a nice smooth ride.
-
-
-
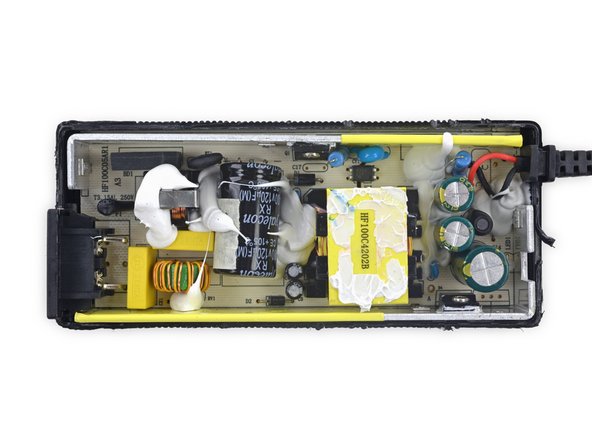
Real quick though, let's take a peek at the UL-certified charger. After all, house fires from charging hoverboards have been reported...
-
To be honest, it looks pretty messy, but we don't like to judge a charger by its... random epoxy? So we consulted charger guru Ken Shiriff of Righto.com, who said:
-
"Looks like a straightforward flyback switching power supply. I don’t see any cause for complaints...The charger looks solid. I don’t see any corners cut. The design is ‘unchallenging’—they didn’t try to make it as small as possible; Apple probably would have made it half the size."
-
So hey, as long as you have a real Swagway, with a real UL-certified charger, you should be fine? Probably.
-
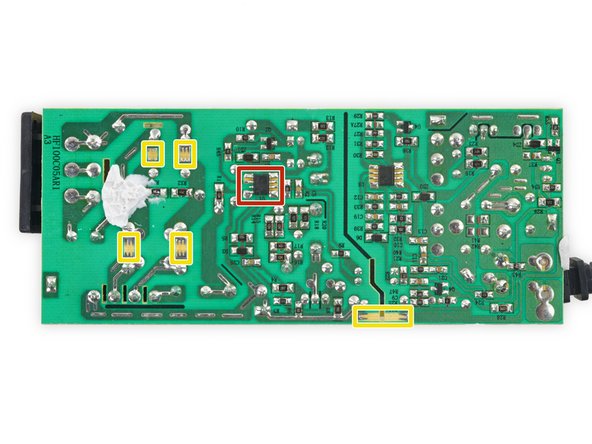
Board-wise, we note:
-
A Leadtrend LD7575 green-mode PWM controller
-
Jaw-like etches that are PCB spark gaps, which protect circuitry from voltage surges
-
- Modular design with good use of connectors means many components can be easily replaced.
- Only Phillips #2 screws are used—nothing proprietary.
- The battery is easy to replace.
- Inconsistent wire colors makes reassembly tricky.
- We couldn't get the tire off—replacing a worn-out tire will probably mean a new wheel and hub motor.


まとめ
リペアビリティのスコア


(10点が最も修理しやすい指標です)
10 件のコメント
Thank you for learn
My problem is I fix my swag way and I changed the sensor then it's start putting own Weel drive forword and ether own drove back side
I hope slovenly this problem with you
Thank you again
Does anyone have a scheme or a photo for the assembly of the whole device? I've got the electronics disassembled and am not sure if the parts are complete.
Sorry, I was too lazy to google on my self.. Found a set of videos here: http://hoverboards.repair/author/fix-hov...
i found this circuit diagram which is very similar to most of the single board swagtron controller.
http://vocke.tv/lib/exe/fetch.php?media=...
cheers to the guy who spent a weekend doing this ….
Can someone help me please my have a board doesn’t turn on anymore one time he just turned off and it never turned back on I already tried charging it didn’t work
AppleTopic - 返信
Do you know where I can get a wheel hub motor that is 24 volt. 200w to fix my hoverboard with?Not this hoverboard another hover board made by veeko I can't find anyone selling a 24 volt will motor anywhere in the 6 and 1/2 in