メインコンテンツにスキップ

必要な工具と部品

この分解は修理ガイドでは ありません。 お持ちのSony Vaio PCG-6J2Lを修理する際は、iFixitの修理ガイドをご利用ください。

  1. Sony Vaio VGN-SZ120P Teardown, Sony Vaio VGN-SZ120P Teardown: 手順 1、 2の画像 1 Sony Vaio VGN-SZ120P Teardown, Sony Vaio VGN-SZ120P Teardown: 手順 1、 2の画像 2
    • Turn the laptop upside down.

    • Locate the battery.

    • Unlock the battery by shifting the 'lock' slide to the 'unlock' position on the underside and back of the system.

    • Hold the release on the right side and remove the battery out carefully.

  2. Sony Vaio VGN-SZ120P Teardown: 手順 2、 3の画像 1 Sony Vaio VGN-SZ120P Teardown: 手順 2、 3の画像 2 Sony Vaio VGN-SZ120P Teardown: 手順 2、 3の画像 3
    • Remove the four screws from the heat sink panel with the phillips screwdriver.

    • Unscrew the two screws from the memory panel with the phillips screwdriver.

    • Remove both panels and set aside.

    • Be careful with the heatsink, as this can be messy if handled improperly. It is a copper heat pipe.

  3. Sony Vaio VGN-SZ120P Teardown: 手順 3、 3の画像 1 Sony Vaio VGN-SZ120P Teardown: 手順 3、 3の画像 2 Sony Vaio VGN-SZ120P Teardown: 手順 3、 3の画像 3
    • Lift the film covering to reveal the memory modules with the tweezers.

    • Pull the tabs on both sides of the RAM away from the module. The module will pop up.

    • Repeat these step for the other RAM module located above the RAM module previously removed and set aside.

  4. Sony Vaio VGN-SZ120P Teardown: 手順 4、 1の画像 1
    • Using a Philips screw driver, unscrew the rear keyboard screw from the bottom of the laptop.

  5. Sony Vaio VGN-SZ120P Teardown: 手順 5、 2の画像 1 Sony Vaio VGN-SZ120P Teardown: 手順 5、 2の画像 2
    • Push the tabs shown on both sides and the keyboard will pop up.

    • A small flat-head might help you push the tabs.

    • Move the keyboard toward the mouse pad and gently pull up.

  6. Sony Vaio VGN-SZ120P Teardown: 手順 6、 2の画像 1 Sony Vaio VGN-SZ120P Teardown: 手順 6、 2の画像 2
    • Caution: there is a ribbon cable attached to the keyboard. It will break easily.

    • Gently disconnect the ribbon cable by sliding down the tabs.

    • Gently take out the keyboard.

  7. Sony Vaio VGN-SZ120P Teardown: 手順 7、 2の画像 1 Sony Vaio VGN-SZ120P Teardown: 手順 7、 2の画像 2
    • Unscrew the two securing screws indicated.

    • Carefully lift the heatsink out of the system with the tweezers and set it aside.

  8. Sony Vaio VGN-SZ120P Teardown: 手順 8、 3の画像 1 Sony Vaio VGN-SZ120P Teardown: 手順 8、 3の画像 2 Sony Vaio VGN-SZ120P Teardown: 手順 8、 3の画像 3
    • Caution: DO NOT touch the gold connectors on the cpu, as this may damage your processor.

    • Turn the securing screw on top of the CPU housing bracket counter-clockwise on the unlock position.

    • Gently lift the CPU out of the system with tweezers and set aside in a safe place.

  9. Sony Vaio VGN-SZ120P Teardown: 手順 9、 3の画像 1 Sony Vaio VGN-SZ120P Teardown: 手順 9、 3の画像 2 Sony Vaio VGN-SZ120P Teardown: 手順 9、 3の画像 3
    • Remove the three screws from the front mouse panel.

    • Lift the mouse assembly just enough to access the connecting ribbon cable.

    • Lift the ribbon cable lock to remove the cable.

    • Carefully remove the mouse panel assembly and set aside.

  10. Sony Vaio VGN-SZ120P Teardown: 手順 10、 2の画像 1 Sony Vaio VGN-SZ120P Teardown: 手順 10、 2の画像 2
    • Remove the securing screw on the bottom left of the optical drive.

    • Carefully slide the optical drive to the right.

    • The IDE connector on the left will pop out.

  11. Sony Vaio VGN-SZ120P Teardown: 手順 11、 3の画像 1 Sony Vaio VGN-SZ120P Teardown: 手順 11、 3の画像 2 Sony Vaio VGN-SZ120P Teardown: 手順 11、 3の画像 3
    • Disconnect the antennae from the wireless card.

    • Pull back the tabs on the right of the wireless card until the card disconnects and pops up.

    • Remove the wireless card and set aside.

  12. Sony Vaio VGN-SZ120P Teardown: 手順 12、 3の画像 1 Sony Vaio VGN-SZ120P Teardown: 手順 12、 3の画像 2 Sony Vaio VGN-SZ120P Teardown: 手順 12、 3の画像 3
    • Remove the four screws from the underside of the computer. These screws are located underneath where the battery sits and secure the top keyboard panel.

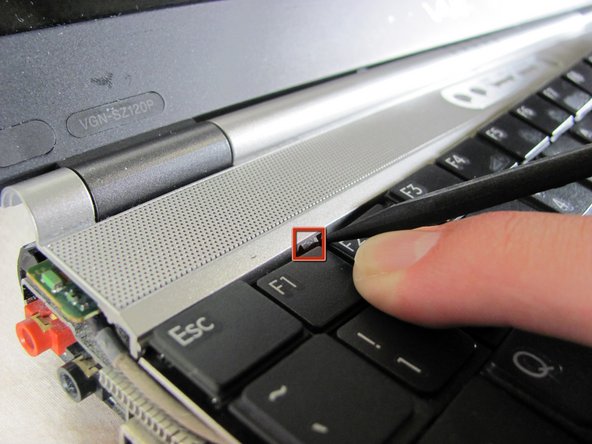
    • To remove the panel below the screen, press up on the two tabs holding the panel in and lift up. The panel should pop off.

    • Before proceeding, remove all black tape holding down wires and other cabling.

  13. Sony Vaio VGN-SZ120P Teardown: 手順 13、 2の画像 1 Sony Vaio VGN-SZ120P Teardown: 手順 13、 2の画像 2
    • First pop off the antenna using a pair of tweezers.

    • Use a Philips screw driver to unscrew the screw holding the board in place.

    • Remove the board using a pair of tweezers.

  14. Sony Vaio VGN-SZ120P Teardown: 手順 14、 1の画像 1
    • Remove the seven philips screws holding the speaker assembly in place.

    • Disconnect the ribbon cable located at the top left corner of the assembly.

  15. Sony Vaio VGN-SZ120P Teardown: 手順 15、 2の画像 1 Sony Vaio VGN-SZ120P Teardown: 手順 15、 2の画像 2
    • Caution: Be careful of snags when pulling up assembly and speakers.

    • To remove the VGA cable, lift up on the metal bracket and gently lift the connector off the logic board.

    • To remove the webcam cable, lift up the connector from the logic board gently.

  16. Sony Vaio VGN-SZ120P Teardown: 手順 16、 1の画像 1
    • This is where your Hard Drive is located.

    • Remove the three harddrive securing screws.

    • The Serial ATA (SATA) hard drive is located where the yellow box indicates in the picture.

  17. Sony Vaio VGN-SZ120P Teardown: 手順 17、 2の画像 1 Sony Vaio VGN-SZ120P Teardown: 手順 17、 2の画像 2
    • Remove all screws holding the keyboard tray to the laptop.

    • Lift the cover off the console and set aside.

  18. Sony Vaio VGN-SZ120P Teardown: 手順 18、 1の画像 1
    • Caution: Be careful of snags when pulling up assembly and speakers.

    • Remove bluetooth, speaker, webcam assembly. This is one unit and will come out together.

  19. Sony Vaio VGN-SZ120P Teardown: 手順 19、 3の画像 1 Sony Vaio VGN-SZ120P Teardown: 手順 19、 3の画像 2 Sony Vaio VGN-SZ120P Teardown: 手順 19、 3の画像 3
    • Unscrew the four securing screws, two on each side of the LCD.

    • Carefully remove the LCD

  20. Sony Vaio VGN-SZ120P Teardown: 手順 20、 1の画像 1
    • Remove all the screws securing the keyboard tray.

    • Remove keyboard tray.

  21. Sony Vaio VGN-SZ120P Teardown: 手順 21、 2の画像 1 Sony Vaio VGN-SZ120P Teardown: 手順 21、 2の画像 2
    • Caution: When removing the fan, be careful to not tear the attached ribbon cable.

    • Unscrew and remove the internal fan.

    • Unscrew and remove the logic board from the backing.

作成者

9人の作成者と共同で作成されました。

David Hoyt

メンバー登録日: 04/09/10

4,023 ポイント

43のガイドは作成済み

チーム

Cal Poly, Team 25-89, Amido Spring 2010 Cal Poly, Team 25-89, Amido Spring 2010人のメンバー

CPSU-AMIDO-S10S25G89

4 メンバー

63のガイドは作成済み

2 件のコメント

Does this work with the PCG 9J5L

frederick200147 - 返信

Extremely similar to PCG-6Q2L, one thing to note is that the HDD in this unit was glued to the SATA connector, it can be a little tricky to remove but can be done if you go slow enough.

Myles B - 返信

コメントを追加

統計データ:

過去 24時間: 2

過去 7 日: 6

過去 30 日: 30

今までの合計 39,088