メインコンテンツにスキップ

必要な工具と部品

この分解は修理ガイドでは ありません。 お持ちのSamsung Galaxy Note 3を修理する際は、iFixitの修理ガイドをご利用ください。

  1. Samsung Galaxy Note 3 Teardown, Samsung Galaxy Note 3 Teardown: 手順 1、 1の画像 1
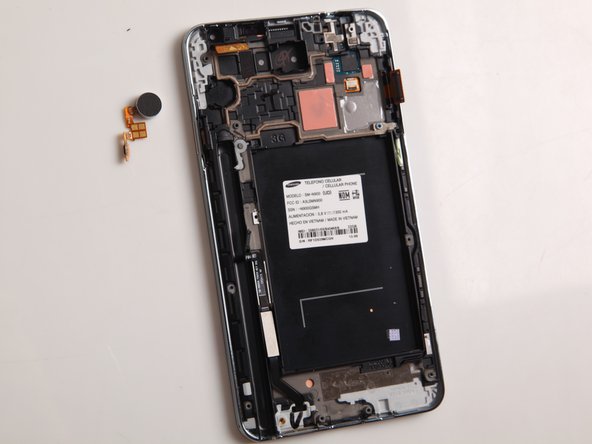
    • Turn the device off and use your finger to remove the back cover and battery. The Galaxy Note 3 battery is removable, making it easy to remove it without any tool.

  2. Samsung Galaxy Note 3 Teardown: 手順 2、 2の画像 1 Samsung Galaxy Note 3 Teardown: 手順 2、 2の画像 2
    • The back chassis is fastened by twelve Philips screws, so we have to undo the screws with the Philips screwdrivers.

  3. Samsung Galaxy Note 3 Teardown: 手順 3、 3の画像 1 Samsung Galaxy Note 3 Teardown: 手順 3、 3の画像 2 Samsung Galaxy Note 3 Teardown: 手順 3、 3の画像 3
    • Pull out the S pen and use spudger to release the back chassis. Then the chassis is separated from the rest of the device.

  4. Samsung Galaxy Note 3 Teardown: 手順 4、 3の画像 1 Samsung Galaxy Note 3 Teardown: 手順 4、 3の画像 2 Samsung Galaxy Note 3 Teardown: 手順 4、 3の画像 3
    • Disconnect seven cable connectors to remove the mainboard. Then the board is free.

  5. Samsung Galaxy Note 3 Teardown: 手順 5、 2の画像 1 Samsung Galaxy Note 3 Teardown: 手順 5、 2の画像 2
    • Take out the rear camera on the board.

  6. Samsung Galaxy Note 3 Teardown: 手順 6、 2の画像 1 Samsung Galaxy Note 3 Teardown: 手順 6、 2の画像 2
    • Use plastic case to release the antenna cable clips and remove the antenna cable.

  7. Samsung Galaxy Note 3 Teardown: 手順 7、 2の画像 1 Samsung Galaxy Note 3 Teardown: 手順 7、 2の画像 2
    • Use spudger to remove the USB board with proper strength because the USB board is stuck with glue.

  8. Samsung Galaxy Note 3 Teardown: 手順 8、 2の画像 1 Samsung Galaxy Note 3 Teardown: 手順 8、 2の画像 2
    • Undo the screw used to fasten the earphone jack and earphone and remove them.

  9. Samsung Galaxy Note 3 Teardown: 手順 9、 2の画像 1 Samsung Galaxy Note 3 Teardown: 手順 9、 2の画像 2
    • Remove the small metal bracket covering the front facing camera and sensor cable. Then remove the front camera and sensor cable.

  10. Samsung Galaxy Note 3 Teardown: 手順 10、 2の画像 1 Samsung Galaxy Note 3 Teardown: 手順 10、 2の画像 2
    • Use screwdriver to pry out the vibrating motor. Please be noted the motor is adhered to the front chassis and connected with the power button. Please lift it up carefully to avoid damaging the power button cable.

  11. Samsung Galaxy Note 3 Teardown: 手順 11、 1の画像 1
    • The Samsung Galaxy Note 3 teardown is complete.

作成者

9人の作成者と共同で作成されました。

matthew

メンバー登録日: 08/20/13

3,435 ポイント

1ガイドが承認済み

40 件のコメント

is it possible to use a Sprint Galaxy Note 3 USB port on a T-Mobile Galaxy Note 3?

Michael Paredes - 返信

It will fit, but the antenna are different. The phone will not work properly: the wireless reception will be worse.

Charles Hart -

I did exactly that and I haven't noticed any difference at all. My phone works and charges perfectly now, and all it took was 12 bucks and a little patience. Good luck!

Elizabeth Day -

I have a T-Mobile note 3 but can I use a sprint housing and lcd

john - 返信

If single sim it same

Hazrat Ishraaf -

コメントを追加

統計データ:

過去 24時間: 1

過去 7 日: 19

過去 30 日: 75

今までの合計 228,984