はじめに
Please note that this is not intended as a full teardown. But it should be enough to help you fix your device. After all, if you’re buying a desolder gun, I’d expect you to be handy enough to wield a screwdriver :)
必要な工具と部品
-
-
This is a partial teardown of the S-993A desolder gun, which is cheaply available from China.
-
It is not intended to be a full teardown, but it should be enough to indicate where all components go, and where all connections are. This should be enough for someone to fix this device.
-
-
-
There are three 18mm screws, locations are marked in the picture.
-
-
-
There are three 14mm screws, locations are marked in the picture.
-
-
-
-
Now the body can be opened. The pump tends to stick a little to the body, apply gentle pressure to keep it in place.
-
The earth wire is connected to the nozzle. The connection is marked in the picture.
-
-
-
Remove the two screws for the strain relief.
-
Remove the two tiny screws that hold the circuit board in place. Use a PH2 screwdriver for this so you don't molest the screws.
-
-
-
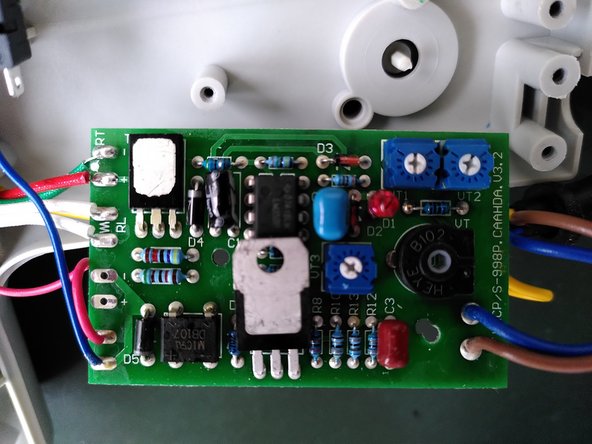
Gently pull back the circuit board in a straight manner. It's still kept in place by the temperature adjustment wheel in the handle. When pulled back straight, the wheel will pop out.
-


4 件のコメント
Thanks for the quick teardown… just wanted to let people know that if yours stops having suction, you need to take apart the diaphragm part and clean it out. As long as the motor turns, it should still be pulling air.
Mine got clogged with flux or something and stopped suction. Just be sure to note which opening the little snorkel connects to when taking apart the diaphragm.
A little rubbing alcohol and small toothpicks/lint-free sticks/ pipe cleaners should help clean any clogs or remove flux that might stick up the works. I thought as long as there were the little fabric filters, nothing would get through, but I was wrong as flux, or some gunk did get through. Once you clean it, work the rubber duct up and down to make sure you hear air moving. Good luck.
I replaced a faulty circuit board in one of these, and I am having some problems adjusting the temperature afterwards. Initially with the replacement circuit board the temperatures were WAY too high. I found some potentiometers to adjust, but I am not really sure how they operate. I might think one of them controls the minimum temperature and the other wound works like a k-factor for the temperature range.
If anyone has any knowledge to depart regarding this I would be eternally grateful.
I believe the two blue pots next to each other control your heating element,one is a high limit and one is a low limit temperature adjustment very small movements should be made when checking the actual temperature change,to do so you will need a soldering iron thermometer readily available on Amazon or ebay for around $15 they will get you in the ballpark.