メインコンテンツにスキップ

Rowenta silent force extreme RO5931 main brush Teardown

必要な工具と部品

  1. Rowenta silent force extreme RO5931 main brush Teardown, Unplug the vacuum cleaner: 手順 1、 1の画像 1
    • Turn off the vacuum and unplug it from the outlet.

    • Unmount the main brush head from the cleaner pipe.

  2. Rowenta silent force extreme RO5931 main brush Teardown, Remove the top cover: 手順 2、 3の画像 1 Rowenta silent force extreme RO5931 main brush Teardown, Remove the top cover: 手順 2、 3の画像 2 Rowenta silent force extreme RO5931 main brush Teardown, Remove the top cover: 手順 2、 3の画像 3
    • Unsnap the clips of the top cover with a small slot screwdriver.

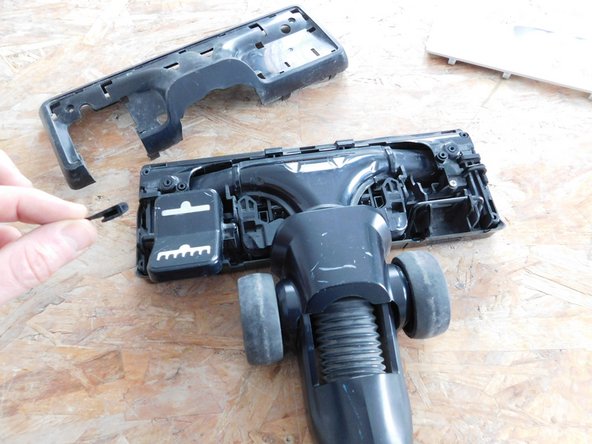
    • Remove the top cover of the brush.

  3. Rowenta silent force extreme RO5931 main brush Teardown, Unscrew the two top Philips screws: 手順 3、 2の画像 1 Rowenta silent force extreme RO5931 main brush Teardown, Unscrew the two top Philips screws: 手順 3、 2の画像 2
    • Unscrew both Philips screws from the top of the brush.

  4. Rowenta silent force extreme RO5931 main brush Teardown, Unscrew security torx screws: 手順 4、 2の画像 1 Rowenta silent force extreme RO5931 main brush Teardown, Unscrew security torx screws: 手順 4、 2の画像 2
    • Unscrew both security torx screws.

  5. Rowenta silent force extreme RO5931 main brush Teardown, Remove the top of the brush head: 手順 5、 3の画像 1 Rowenta silent force extreme RO5931 main brush Teardown, Remove the top of the brush head: 手順 5、 3の画像 2 Rowenta silent force extreme RO5931 main brush Teardown, Remove the top of the brush head: 手順 5、 3の画像 3
    • Smoothly and carefully take out the top of the brush head.

    • Take some time to search for the defect.

    • Remove broken pieces and repair if you can.

    • Clean up the inner parts of the brush with a smooth cloth. Remove dust, grains that could damage the inner parts of the brush.

  6. Rowenta silent force extreme RO5931 main brush Teardown, Check the handle of the brush retract is fixed: 手順 6、 2の画像 1 Rowenta silent force extreme RO5931 main brush Teardown, Check the handle of the brush retract is fixed: 手順 6、 2の画像 2
    • Push the retract button : the brush must be lowered.

ゴール

4 の人々がこのガイドを完成させました。

作成者

3人の作成者と共同で作成されました。

David

メンバー登録日: 05/23/14

1,523 ポイント

5のガイドは作成済み

2 件のコメント

My vacuum is similar to the one shown here. Only had it a few months, now the suction is not very good, and is not picking up. The cylinder is not spinning around. Any advice. Thanks in advance

vivaespana - 返信

I have a head the same and want to replace the joining hose and wish to know how to replace it as it has all holes in it and not sucking properly TIA

Toosje McWhirter - 返信

コメントを追加

統計データ:

過去 24時間: 0

過去 7 日: 6

過去 30 日: 26

今までの合計 1,613