必要な工具と部品
-
この手順は未翻訳です。 翻訳を手伝う。
-
The Power Mac G4 MDD: the last, and the fastest G4-based Mac. This computer boasted up to a Dual 1.42GHz PowerPC G4 CPU (though I have a single 1.25GHz).
-
Two USB 1.1 Ports
-
Assorted Audio
-
Video (ADC & DVI)
-
Networking (RJ-45 Ethernet/56k Modem)
-
Some later model MDD's (such as the dual 1.42GHz) Have a FireWire 800 Port Here:
-
-
この手順は未翻訳です。 翻訳を手伝う。
-
The AirPort card is located next to the graphics card.
-
If your computer has a FireWire 800 port between the FireWire 400 Ports and the Ethernet Ports then your computer uses an AirPort Extreme 802.11g Card (See Related Parts). If your computer has no firewire 800 port, then your computer uses an 802.11b AirPort PCMCIA Card (Also See Related Parts). Removal of both cards is pretty much the same.
-
First disconnect the antenna from the card, it may be helpful to use a spudger or flathead screwdriver.
-
Now, grasp the plastic tab on the back of the card and pull it out of the computer.
-
-
-
この手順は未翻訳です。 翻訳を手伝う。
-
Once the cables are free, set the drive cage aside.
-
To remove the hard drives from the cages, remove the four screws on the sides of the cage that are connected to the drives, then slide the drives out.
-
The two cages are cross compatible and can be put in either location.
-
The MDD does not have a 128GB drive limit like older Macs. My MDD has 3 drives (a 400GB Hitatchi Deskstar, 40GB Seagate Barracuda 7200.7, and a 30GB Quantum Fireball LCT).
-
Note the ID jumpers on the two drive set. One is set to Master, the other to slave. A single drive can be set to Cable Select.
Thanks - excellent tutorial!
Question: If you have a single internal drive, and a connected extrenal drive via firewire or usb, what jumper setting should be set for the internal drive and the external drive? Booting into Mac OS 9 natively (not via Classic) on the internal drive seems to be sensitive to the jumper settings and I’m having issues getting it to work.
LTG: The jumper settings on the internal drives make no difference for any external drives. The jumper settings are to distinguish between Master and Slave drives when there are two drives connected to one ATA/IDE ribbon cable. Since the ATA/IDE drive ribbon cables are purely internal to the Mac, they have no connection to any external drives.
I ran my MDD with 3-750GB IDE HD’s. When they got flakey I replaced them with 2TB SATA drives in the back cage with a cheap SATA to PATA adapter and they formatted out to 1.8TB. I then cloned (CCC) the boot drive to one of the 1.8TB drives. It boots to the new drive and every thing seems to operate like normal. I don’t know how big we can go but we know that a MDD will handle at least 2TB HD’s and I have 5TB in my iMac 15,1
Glenn: you might get some extra speed from those SATA drives if you install a SATA card into one of the PCI slots (if you can still find one), and connect the drives to it. I ran a couple SATA drives in my MDD this way for years, before the MDD’s power supply burned out.
This is an amazing blog. This is my computer, I think a 2004 model. I have a question though; I bought a 1 TB 3.5’ SATA WD Black Performance Hard Drive and have 2 weeks to return it. It appears I need a bridge adapter from the old IDE ATA to the newer SATA, will this adapter work? :
https://www.amazon.com/QNINE-Adapter-Dri...
My dilemma: My hard drive is clicking like crazy (freezing) and I use this machine paired to my old Digidesign DigiRack 001 recording system. It’s proprietary and not forward compatible to anything other than OS 10.3.2 and I need to desperately clone this old Toshiba 80g hard drive in order to keep functioning on this version of Protools.
Correction: My G4 must not be the MMD version. Doesn’t have all those peripherals in the rear. Wish I could add a photo. I’m thinking it was build in 2003.
-
-
この手順は未翻訳です。 翻訳を手伝う。
-
Using a flathead screwdriver, spudger, or your finger pull this tab towards you, and lift the card out.
-
The "excessively large" NVIDIA GeForce4 Titanium 128MB. This was one of the most powerful cards on the market when this computer was released, now, there are flashed cards such as the Radeon 9700 Mac, but this is the most powerful AGP ADC supporting card, great for gaming, Photoshop, and other 3D intensive applications.
-
-
この手順は未翻訳です。 翻訳を手伝う。
-
The DVI And ADC Ports.
Can the card be "shortened" aka modded/cut, safely without the card becoming unusable?
-
-
この手順は未翻訳です。 翻訳を手伝う。
-
The Power Mac G4 MDD Supports four PCI Cards, allowing for SCSI, sound, wireless networking (only AirPort compatible clones) USB, FireWire, etc. The PCI slots do not, however support PCI graphics.
-
Remove the screws for any occupied PCI bays.
I disagree with the info about PCI cards do not support Graphics... when my previous AGP card died (I too had the monster NVIDIA GeForce4 Titanium 128MB), I had an immediate need for any video card i could find, I was able to procure & use without issue an ATI Radeon 9200 Mac Edition 128MB DDR PCI video card. It has VGA, S-Video, & DVI ports. The card wasn't as fast as a dedicated AGP 4x video card but it did the trick as at the time I could not afford another AGP board.
-
-
この手順は未翻訳です。 翻訳を手伝う。
-
Once the screws are removed, pull each card straight up and out of the computer one at a time.
-
The Cards:
-
Adaptec SCSI 50-Pin
-
Adaptec SCSI 68-Pin
-
USB/FireWire Expander
-
M-Audio HD Sound Card
-
NVIDIA GeForce4 Titanium (Mac Edition) DVI & ADC
in 12/03 my bto PM Dual 1.25 G4 MDD, came with one of those monster Titanium 128MB video cards. One day I smelled something bad and discovered some of the wires on said card had melted! I was forced to swap it out for a ATI Radeon 9000 Mac edition 128MB Video Card. Which seemed to work better. I can't recall though if it was a PCI or AGP card.
-
-
この手順は未翻訳です。 翻訳を手伝う。
-
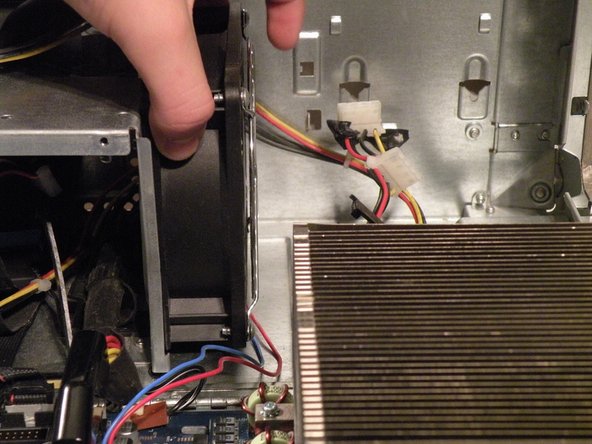
You may find removing the system fan is unnecessary to remove the power supply cable from behind it, but if you're unfamiliar with how the power supply cable is situated behind the fan, this step is useful in seeing this.
-
Disconnect the optical drive IDE/ATA-33 cable from the logic board.
-
Disconnect the system fan 2-wire power cable connector from the logic board.
-
-
この手順は未翻訳です。 翻訳を手伝う。
-
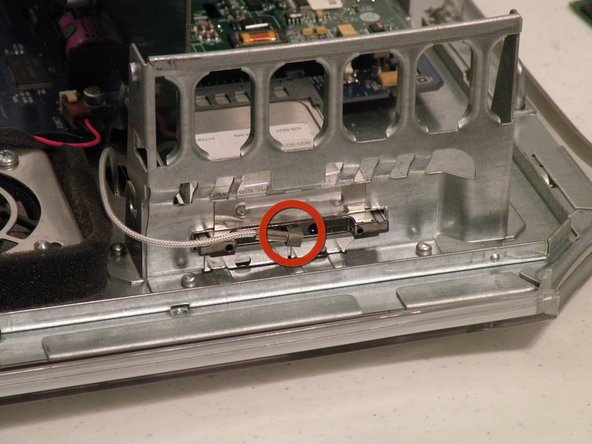
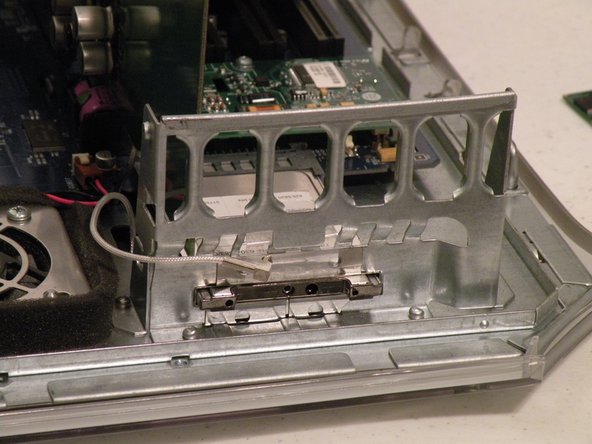
To remove the power supply connector from the motherboard, push the top end of this clip towards the power supply connector, and pull the connector up and off the motherboard. If the connector seems to be stuck, rock it back and forth a tiny bit to loosen up the connection, then pull up again.
-
-
この手順は未翻訳です。 翻訳を手伝う。
-
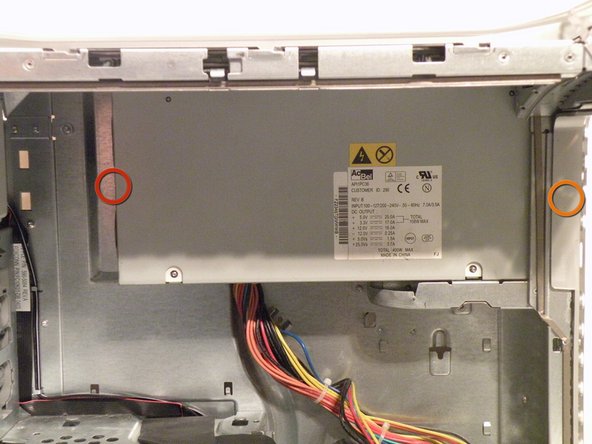
The power supply has a 24-pin connector with non-standard voltages, so dropping in a 24-pin ATX power supply without modification isn't a great idea.
-
The power supply connector has a 25V lead to drive Apple ADC displays, so though it is possible to modify an ATX power supply, it won't be able to drive ADC displays, just VGA, or DVI, though the computer will work fine (I've actually tried this).
-
It also has three 12V/5V rails to drive all six drives (four hard drives, two optical drives) simultaneously. This is the only Macintosh computer other than the Mac Pro to support six drives.
-
-
この手順は未翻訳です。 翻訳を手伝う。
-
This is also the notoriously loud AcBel 400W "Windtunnel" power supply
I had bought my custom bto PM Dual 1.25GHz G4 MDD in 12/03. I used that computer until 2012 (when I ended buying a Mac Mini). In those years the PSU died on me 4 different times. the 1st one was replaced via my AppleCare plan, the 2nd one I had to pay $90 via an ApplePro plan?, the 3rd one was some compatible Samsung PSU that cost me around $200, the 4th one was a modded PSU that a friend did for me. It's been over 10yrs since I attempted to boot up my old PMD125G4. Am Tempted to try and Revive it, but not sure if the PSU would give me trouble.
-
-
この手順は未翻訳です。 翻訳を手伝う。
-
The incredibly large heatsink, this thing is 5 Lbs of solid aluminum. Just like every other part in this, and many other Macs, the heatsink is made by: ...you guessed it, Foxconn.
-
Before reinstalling, ensure that you clean the old thermal paste off of the heatsink with alcohol.
-


チーム

7 件のコメント
Hi, thanks for the good job you do, I'm restoring my old G4 MDD and I wanted to know if it's possible for you to be able to install a 256gb ssd on this machine using a common sata - ide adapter. Does Leopard really run too? And how is the performance?
Hello, Carlo Sciarra. I'm sorry if this doesn't just respond to you directly. I am a little of an extreme apple fan, but I may be able to respond to you. As said, this is Apple's strongest Product in their G4 Line. If this is true, yes you can run Leopard on here. The 256GB SSD, you won't get your hands on a compatible SATA SSD for this because as far as I know there is no SATA Compatibility. I've never owned this product until today, so I don't know if it will run Leopard. It did release on August 31, 1999 after all. But, if that final picture is taken not being photoshopped or having the BIOS flashed in some way, it could very well work with Leopard. That's everything I have to say.
Not sure you should refer to yourself as "a little of an extreme apple fan" if you think the G4 Mac MDD came out in '99.
While it is true the first gen of the G4 Mac came out in 1999, this version, essentially the 3rd generation G4 Mac, known as the Mirrored Drive Doors model, most definitely did not. Not only was it not released on the 31st of August as you say, but more importantly, it wasn't even released in 1999.
It wouldn't be until a few years AFTER the close of the 20th Century that the G4 Mac MDD would make its way to the public. Almost 3 years after, to be more precise. It was on the 13th of August (not the 31st) and it was in 2002, so not 1999, that the G4 Mac MDD was released.
Just thought I'd point that out to you. After all...Knowing is half the battle! #themoreyouknow🌈
I have a Sonnet PCI card that has 2x SATA ports & 1x UltraATA100 port. Currently is installed in my classic PM Dual 1.25G4 MDD. AFAIK, it will drive any SATA III device, such as a SSD... At this time I have only tested it with two old 2.5" SATA 5400rpm HDD's I pulled from some old laptops (320GB, 500GB) and they seem to work fine for data drives. I think I shall test some SSD's I have on hand to see if the card will recognize them. Would be nice, as any SATA SSD, would be faster than an ATA66 HDD.
Hi there, I currently use my G4 MDD for scanning artwork and simple image restoration using Photoshop CS2. I also have 2 Apple displays, circa 2000 - 2003 with ADC connectors. How would I go about connecting both to create a dual display? Best, Ol
Ol Redding - 返信
What is the hardware for mounting the heatsink? Thread pitch, diameter, and length? Thank you!