メインコンテンツにスキップ

必要な工具と部品

この分解は修理ガイドでは ありません。 お持ちのPower Macintosh 8600(250)を修理する際は、iFixitの修理ガイドをご利用ください。

  1. Power Macintosh 8600(250) Teardown, Power Macintosh 8600(250) Teardown: 手順 1、 1の画像 1
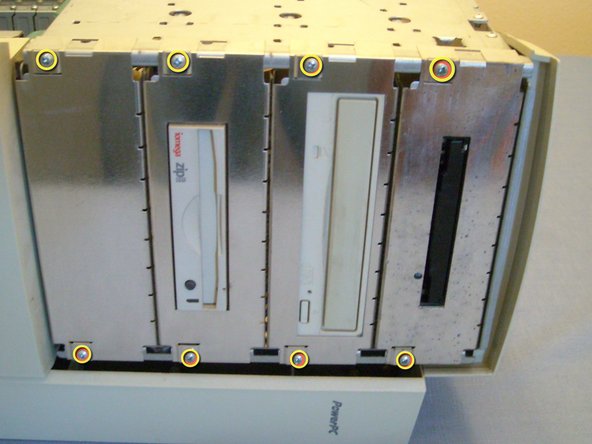
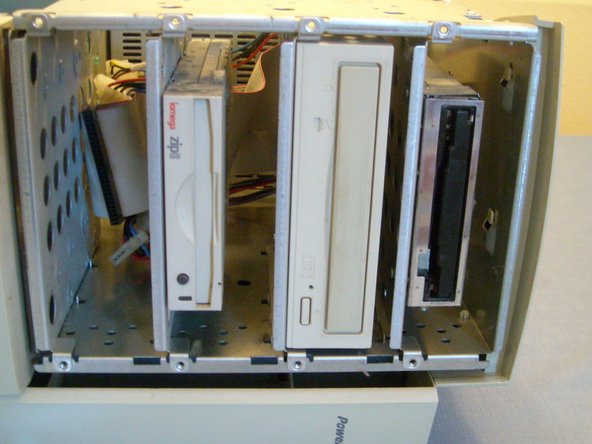
    • There she is! i'm missing the bezel around the floppy drive :(

  2. Power Macintosh 8600(250) Teardown: 手順 2、 3の画像 1 Power Macintosh 8600(250) Teardown: 手順 2、 3の画像 2 Power Macintosh 8600(250) Teardown: 手順 2、 3の画像 3
    • Start by pressing the big green button. And pulling the door away and up from the computer.

    • And on the Back of the door is the fan.

  3. Power Macintosh 8600(250) Teardown: 手順 3、 3の画像 1 Power Macintosh 8600(250) Teardown: 手順 3、 3の画像 2 Power Macintosh 8600(250) Teardown: 手順 3、 3の画像 3
    • Now it's best to lay the computer flat.

    • And to flip up the tabs, grab the handle and open.

  4. Power Macintosh 8600(250) Teardown: 手順 4、 1の画像 1
    • The innards, motherboard, daughter board, RAM and so fourth.

  5. Power Macintosh 8600(250) Teardown: 手順 5、 3の画像 1 Power Macintosh 8600(250) Teardown: 手順 5、 3の画像 2 Power Macintosh 8600(250) Teardown: 手順 5、 3の画像 3
    • Now the speaker

    • Remove the speaker wires

    • And the fan wires from the motherboard

    • Push in the two plastic tabs on either side and lift the speaker up and out.

  6. Power Macintosh 8600(250) Teardown: 手順 6、 2の画像 1 Power Macintosh 8600(250) Teardown: 手順 6、 2の画像 2
    • The PRAM battery!

    • Remove the housing by pulling it out and then take the battery out.

  7. Power Macintosh 8600(250) Teardown: 手順 7、 3の画像 1 Power Macintosh 8600(250) Teardown: 手順 7、 3の画像 2 Power Macintosh 8600(250) Teardown: 手順 7、 3の画像 3
    • The processor, firmly grasp and pull out.

    • Remove the 4 #1 Phillips screws

    • And push the 4 tabs off of the board

  8. Power Macintosh 8600(250) Teardown: 手順 8、 1の画像 1
    • Any video card or usb card, mine happens to be an ethernet 10/100 card.

    • Unfortunately there are 6 spaces but only 3 slots on the motherboard :(

    • Remove the #1 Phillips screw and pull the card out.

  9. Power Macintosh 8600(250) Teardown: 手順 9、 1の画像 1
    • RAM and VRAM slots!

  10. Power Macintosh 8600(250) Teardown: 手順 10、 3の画像 1 Power Macintosh 8600(250) Teardown: 手順 10、 3の画像 2 Power Macintosh 8600(250) Teardown: 手順 10、 3の画像 3
    • Moving on to the CD, ZIP, and Floppy drives (best to close computer now)

    • Remove the bezels and if I had the top one remove that too.

    • Remove the 6 phillips screws and pull the metal frames out.

  11. Power Macintosh 8600(250) Teardown: 手順 11、 3の画像 1 Power Macintosh 8600(250) Teardown: 手順 11、 3の画像 2 Power Macintosh 8600(250) Teardown: 手順 11、 3の画像 3
    • Remove the data and power cables

    • Pay special attention to this one, it has a clip on it, it helps to use a flathead or a spudger.

    • Pull the drives out of the bay.

  12. Power Macintosh 8600(250) Teardown: 手順 12、 2の画像 1 Power Macintosh 8600(250) Teardown: 手順 12、 2の画像 2
    • Now the hard drive.

    • Remove the two phillips screws

    • And the data and power cables (might help to remove them as you pull the drive out)

  13. Power Macintosh 8600(250) Teardown: 手順 13、 3の画像 1 Power Macintosh 8600(250) Teardown: 手順 13、 3の画像 2 Power Macintosh 8600(250) Teardown: 手順 13、 3の画像 3
    • The power source

    • Remove the two connectors

    • There is a clip holding the wires in place. Separate and remove the wires. (both sets)

  14. Power Macintosh 8600(250) Teardown: 手順 14、 3の画像 1 Power Macintosh 8600(250) Teardown: 手順 14、 3の画像 2 Power Macintosh 8600(250) Teardown: 手順 14、 3の画像 3
    • Now remove the 4 phillips screws (it's best to start with the bottom two)

    • And pull it out while de-threading the wires.

作成者

1人の作成者と共同作成されました。

Plague

メンバー登録日: 06/14/10

181 ポイント

1ガイドが承認済み

コメント 1 件

Nice. I got a beige G3 300 Mhz, the case is similar. Maybe I could also make a teardown.

Nicolas Zbinden - 返信

コメントを追加

統計データ:

過去 24時間: 1

過去 7 日: 8

過去 30 日: 29

今までの合計 15,276