メインコンテンツにスキップ

必要な工具と部品

ビデオの概要

この分解は修理ガイドでは ありません。 お持ちのPlayStation 3 Super Slimを修理する際は、iFixitの修理ガイドをご利用ください。

  1. PlayStation 3 Super Slim Teardown - Video tutorial, PlayStation 3 Super Slim Teardown - Video tutorial: 手順 1、 3の画像 1 PlayStation 3 Super Slim Teardown - Video tutorial, PlayStation 3 Super Slim Teardown - Video tutorial: 手順 1、 3の画像 2 PlayStation 3 Super Slim Teardown - Video tutorial, PlayStation 3 Super Slim Teardown - Video tutorial: 手順 1、 3の画像 3
    • Remove the three rubber feet, warranty sticker and four screws.

    • Gently pull up on the bottom cover to remove it.

  2. PlayStation 3 Super Slim Teardown - Video tutorial: 手順 2、 3の画像 1 PlayStation 3 Super Slim Teardown - Video tutorial: 手順 2、 3の画像 2 PlayStation 3 Super Slim Teardown - Video tutorial: 手順 2、 3の画像 3
    • Slide the HDD cover toward the rear of the device to remove it.

    • Remove the blue screw shown to remove the HDD caddy with a #1 Phillips.

    • Remove the 3 chassis screws with a TR8 Bit.

  3. PlayStation 3 Super Slim Teardown - Video tutorial: 手順 3、 3の画像 1 PlayStation 3 Super Slim Teardown - Video tutorial: 手順 3、 3の画像 2 PlayStation 3 Super Slim Teardown - Video tutorial: 手順 3、 3の画像 3
    • Use a metal spudger to push the tab on the rear top finisher, and lift up to remove it.

  4. PlayStation 3 Super Slim Teardown - Video tutorial: 手順 4、 3の画像 1 PlayStation 3 Super Slim Teardown - Video tutorial: 手順 4、 3の画像 2 PlayStation 3 Super Slim Teardown - Video tutorial: 手順 4、 3の画像 3
    • Repeat step 3 for the front top finisher.

  5. PlayStation 3 Super Slim Teardown - Video tutorial: 手順 5、 3の画像 1 PlayStation 3 Super Slim Teardown - Video tutorial: 手順 5、 3の画像 2 PlayStation 3 Super Slim Teardown - Video tutorial: 手順 5、 3の画像 3
    • Remove the two TR8 screws indicated in the disk reader.

    • Remove the five Phillips #1 screws shown around the edge of the top cover.

    • Lift the top cover up to remove it.

  6. PlayStation 3 Super Slim Teardown - Video tutorial: 手順 6、 3の画像 1 PlayStation 3 Super Slim Teardown - Video tutorial: 手順 6、 3の画像 2 PlayStation 3 Super Slim Teardown - Video tutorial: 手順 6、 3の画像 3
    • Move the optical disk reader assembly to the left to expose one of the screws holding the power supply in.

    • Remove the two Phillip #1 screws indicated and carefully disconnect the cable on the right side of the power supply.

    • Lift the power supply straight up to remove it.

    • The left side has a board connector underneath, so there will be some resistance when lifting.

  7. PlayStation 3 Super Slim Teardown - Video tutorial: 手順 7、 3の画像 1 PlayStation 3 Super Slim Teardown - Video tutorial: 手順 7、 3の画像 2 PlayStation 3 Super Slim Teardown - Video tutorial: 手順 7、 3の画像 3
    • Carefully disconnect the ribbon cables indicated.

    • Lift the optical disk reader up to remove it.

    • Disconnect and remove the white cable and ribbon cable indicated.

  8. PlayStation 3 Super Slim Teardown - Video tutorial: 手順 8、 3の画像 1 PlayStation 3 Super Slim Teardown - Video tutorial: 手順 8、 3の画像 2 PlayStation 3 Super Slim Teardown - Video tutorial: 手順 8、 3の画像 3
    • Remove the seven Phillips #1 screws indicated.

    • Lift the motherboard assembly up out of the lower half of the case to remove it.

    • Carefully disconnect the Wi-Fi antenna cables and fan connector indicated by red arrows.

  9. PlayStation 3 Super Slim Teardown - Video tutorial: 手順 9、 3の画像 1 PlayStation 3 Super Slim Teardown - Video tutorial: 手順 9、 3の画像 2 PlayStation 3 Super Slim Teardown - Video tutorial: 手順 9、 3の画像 3
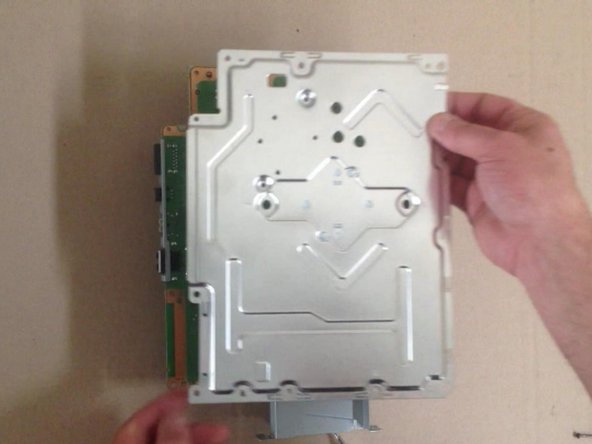
    • Remove the six Phillip #1 screws indicated to separate the heatsink and shield from the motherboard.

  10. PlayStation 3 Super Slim Teardown - Video tutorial: 手順 10、 1の画像 1
    • Congrats!

作成者

7人の作成者と共同で作成されました。

ZFix

メンバー登録日: 12/09/13

191,182 ポイント

330のガイドは作成済み

チーム

Master Techs Master Techs人のメンバー

Community

322 メンバー

2,520のガイドは作成済み

13 件のコメント

What's the name of the screwdriver that undo's the star shaped screws?

themasterassassin8787 - 返信

It is a T8 Torx screwdriver! I'll add the tools to this guide =)

Sam Goldheart -

i took apart my ps3 super slim and put it back together but there is no power what so ever no red light at all

pastorjon.m - 返信

Same here did you fix it?

Kriss -

One thing to pay attention to: The T8 Torx screws (at least on my 500GB model) are Tamper Proof TR8 screws, meaning you need a special screwdriver to undo them. A normal T8 wont work.

Wesley V - 返信

コメントを追加

統計データ:

過去 24時間: 34

過去 7 日: 224

過去 30 日: 1,085

今までの合計 95,176