メインコンテンツにスキップ

この分解は修理ガイドでは ありません。 お持ちのPlayStation 3を修理する際は、iFixitの修理ガイドをご利用ください。

  1. PlayStation 3 Fat 4 USB Teardown, The console case: 手順 1、 1の画像 1
    • Inserir instruções aqui.

  2. PlayStation 3 Fat 4 USB Teardown, Remove the screws: 手順 2、 3の画像 1 PlayStation 3 Fat 4 USB Teardown, Remove the screws: 手順 2、 3の画像 2 PlayStation 3 Fat 4 USB Teardown, Remove the screws: 手順 2、 3の画像 3
    • Inserir instruções aqui.

  3. PlayStation 3 Fat 4 USB Teardown, Open the console: 手順 3、 1の画像 1
    • Inserir instruções aqui.

  4. PlayStation 3 Fat 4 USB Teardown, Remove the power supply: 手順 4、 2の画像 1 PlayStation 3 Fat 4 USB Teardown, Remove the power supply: 手順 4、 2の画像 2
    • Inserir instruções aqui.

  5. PlayStation 3 Fat 4 USB Teardown, The power supply board: 手順 5、 3の画像 1 PlayStation 3 Fat 4 USB Teardown, The power supply board: 手順 5、 3の画像 2 PlayStation 3 Fat 4 USB Teardown, The power supply board: 手順 5、 3の画像 3
    • Inserir instruções aqui.

  6. PlayStation 3 Fat 4 USB Teardown, Remove the bluray driver: 手順 6、 3の画像 1 PlayStation 3 Fat 4 USB Teardown, Remove the bluray driver: 手順 6、 3の画像 2 PlayStation 3 Fat 4 USB Teardown, Remove the bluray driver: 手順 6、 3の画像 3
    • Be very careful to do not break the data connector because it is very fragile.

  7. PlayStation 3 Fat 4 USB Teardown, Remove the SD card slot: 手順 7、 3の画像 1 PlayStation 3 Fat 4 USB Teardown, Remove the SD card slot: 手順 7、 3の画像 2 PlayStation 3 Fat 4 USB Teardown, Remove the SD card slot: 手順 7、 3の画像 3
    • Inserir instruções aqui.

  8. PlayStation 3 Fat 4 USB Teardown, Remove the bluethoot board: 手順 8、 2の画像 1 PlayStation 3 Fat 4 USB Teardown, Remove the bluethoot board: 手順 8、 2の画像 2
    • Inserir instruções aqui.

  9. PlayStation 3 Fat 4 USB Teardown, Remove the intire motherboard from the case: 手順 9、 3の画像 1 PlayStation 3 Fat 4 USB Teardown, Remove the intire motherboard from the case: 手順 9、 3の画像 2 PlayStation 3 Fat 4 USB Teardown, Remove the intire motherboard from the case: 手順 9、 3の画像 3
    • Inserir instruções aqui.

  10. PlayStation 3 Fat 4 USB Teardown, Remove the coller and mother board shield: 手順 10、 3の画像 1 PlayStation 3 Fat 4 USB Teardown, Remove the coller and mother board shield: 手順 10、 3の画像 2 PlayStation 3 Fat 4 USB Teardown, Remove the coller and mother board shield: 手順 10、 3の画像 3
    • Inserir instruções aqui.

  11. PlayStation 3 Fat 4 USB Teardown, The cooler specifications and ball bearing: 手順 11、 2の画像 1 PlayStation 3 Fat 4 USB Teardown, The cooler specifications and ball bearing: 手順 11、 2の画像 2
    • Inserir instruções aqui.

  12. PlayStation 3 Fat 4 USB Teardown, The gigantic and unefective cooler: 手順 12、 3の画像 1 PlayStation 3 Fat 4 USB Teardown, The gigantic and unefective cooler: 手順 12、 3の画像 2 PlayStation 3 Fat 4 USB Teardown, The gigantic and unefective cooler: 手順 12、 3の画像 3
    • Inserir instruções aqui.

  13. PlayStation 3 Fat 4 USB Teardown, The mother board: 手順 13、 3の画像 1 PlayStation 3 Fat 4 USB Teardown, The mother board: 手順 13、 3の画像 2 PlayStation 3 Fat 4 USB Teardown, The mother board: 手順 13、 3の画像 3
    • Inserir instruções aqui.

  14. PlayStation 3 Fat 4 USB Teardown, The processors: 手順 14、 3の画像 1 PlayStation 3 Fat 4 USB Teardown, The processors: 手順 14、 3の画像 2 PlayStation 3 Fat 4 USB Teardown, The processors: 手順 14、 3の画像 3
    • Inserir instruções aqui.

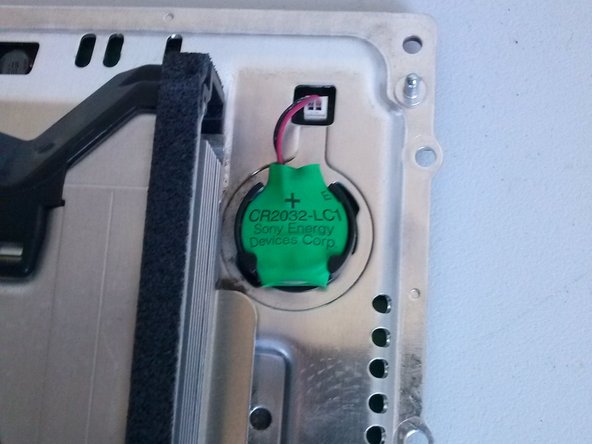
  15. PlayStation 3 Fat 4 USB Teardown, Some details: 手順 15、 3の画像 1 PlayStation 3 Fat 4 USB Teardown, Some details: 手順 15、 3の画像 2 PlayStation 3 Fat 4 USB Teardown, Some details: 手順 15、 3の画像 3
    • Bios battery

    • Power on and eject sensors

    • Main AC power conector and ground conector

  16. PlayStation 3 Fat 4 USB Teardown, Some details: 手順 16、 2の画像 1 PlayStation 3 Fat 4 USB Teardown, Some details: 手順 16、 2の画像 2
    • HD Slot

    • HD case screw

作成者

1人の作成者と共同作成されました。

Vinicius Rodrigues Bellini

メンバー登録日: 12/12/22

956 ポイント

6のガイドは作成済み

0 件のコメント

コメントを追加

統計データ:

過去 24時間: 4

過去 7 日: 52

過去 30 日: 322

今までの合計 5,313