必要な工具と部品
-
-
The first thing you want to do is to turn over the XBox controller and locate the 4 screws on the back. Next you want to unscrew the screws and set them together off to the side.
-
-
-
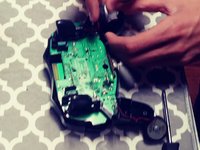
You will be looking at the controllers circuit board. There will be another screw in the middle of the board that you would want to take out as well. It's a different type of screw from the ones on the back cover, so separate that screw and the ones from the back cover.
-
-
-
-
In the back, you will see the vibrator motors (Red) in the controller handles. You will also see the shoulder buttons (Blue) and the controllers central "Hub" where all the power is stored (Orange).
-
-
-
After you are done looking around inside the XBox controller, you can start to put it back together.
-
Put the screw back in that you took out from the circuit board, and put back any buttons or anything else that you took out.
-
Then you want to put the back cover back on the controller and put the 4 screws back in.
-
And now your done!
-