メインコンテンツにスキップ

必要な工具と部品

この分解は修理ガイドでは ありません。 お持ちのNokia Asha 200を修理する際は、iFixitの修理ガイドをご利用ください。

  1. Nokia Asha 200 Teardown, Nokia Asha 200 Teardown: 手順 1、 1の画像 1
    • Take the back cover off and remove the battery. (Not shown)

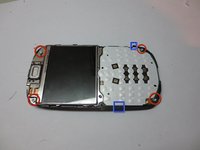
    • Remove the two screws located with red circles

  2. Nokia Asha 200 Teardown: 手順 2、 3の画像 1 Nokia Asha 200 Teardown: 手順 2、 3の画像 2 Nokia Asha 200 Teardown: 手順 2、 3の画像 3
    • Insert spudger between the front/back case and lever untill you hear a click.

    • Slowly work your way around until the bottom end is separated. Then with the bottom end facing your body, try to pull the back case towards yourself.

    • Make sure not to loose Sim2 and Micro SD covers as they easily fall out. Also when re-assembling make sure they are pulled out otherwise you will have trouble putting things back together

  3. Nokia Asha 200 Teardown: 手順 3、 3の画像 1 Nokia Asha 200 Teardown: 手順 3、 3の画像 2 Nokia Asha 200 Teardown: 手順 3、 3の画像 3
    • Remove the 4 screws marked with red circles

    • There are two clips now holding the circuit board in place. Maneuver the circuit board over one and then pull towards the released clip to release the opposite one.

  4. Nokia Asha 200 Teardown: 手順 4、 2の画像 1 Nokia Asha 200 Teardown: 手順 4、 2の画像 2
    • The lcd screen is held in by a steel bracket. This bracket is held in place by the clips marked with red squares. The easit way to release it is by levering the one on the right (as pictured) and the bracket should come off.

    • When re-assembling make sure the studs marked with blue circles line up properly.

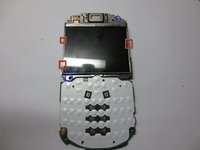
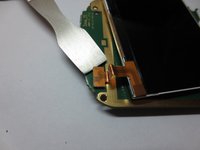
    • Using a spudger disconnect the LCD cable.

  5. Nokia Asha 200 Teardown: 手順 5、 1の画像 1
    • Congratulations you have successfully dis-assembled the phone. I hope you had as much fun tearing it apart as I did helping you along the way.

作成者

2人の作成者と共同で作成されました。

Joel

メンバー登録日: 10/24/12

207 ポイント

1ガイドが承認済み

0 件のコメント

コメントを追加

統計データ:

過去 24時間: 1

過去 7 日: 6

過去 30 日: 12

今までの合計 5,206