必要な工具と部品
-
-
First remove the back part of the wii remote and the batteries. Then use the tri wing screw to unscrew the four small screws.
-
Next use a flathead screwdriver or maybe even your finger nails to pry apart the two pieces. There is a clip on either side of the d-pad which require the base piece to be squeezed inwards.
-
BE CAREFUL TAKING THE TWO PIECES APART! IF NOT DONE CAREFULLY YOU MIGHT END UP WITH ALL THE INNER PIECES FLYING EVERYWHERE!
-
-
-
You’re going to have two pieces and the sensor might be stuck on the motherboard side or the top side, but you still do the same thing no matter what side it’s on.
-
All you have to do to remove the sensor is just grab it and pull a small bit and it should come right out.
-
-
-
Remove the “+” button covering. You also are going to want to do the same with all the other button coverings.
-
Not a step, just extra info The way the buttons would work is that you’d press down on the buttons which would then send a signal through the motherboard, and either the lights at the bottom would turn on or signals would be sent to the sensor which would then sync up with the sensor you would have up by your tv
-
-
-
Remove the coverings, all you have to do is just pick them up with your fingers or you can use tweezers as well to do this.
-
-
-
-
Use tweezers to remove the speaker. To do this, grab the little tabs on the side and CAREFULLY start to pull it out of the slot so you don’t damage the tabs. After a couple of seconds of pulling, the speaker should pop right out.
-
-
-
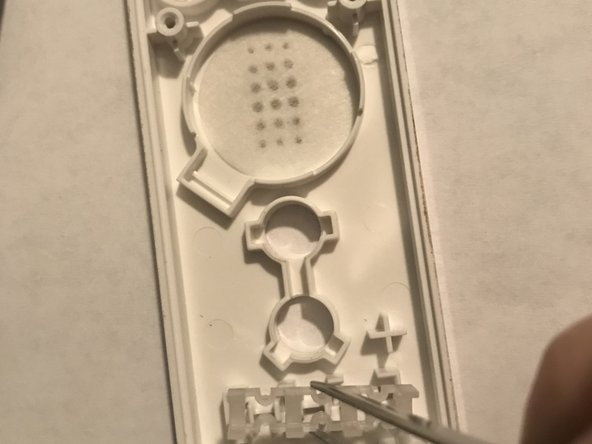
To remove the buttons all you have to do is get some tweezers and use the little ridges that pop up as something to grab and pop them out. You’ll want to take out the “1” “2” “-“ “+” the home button, the “A” button and the d-pad button
-
-
-
Before moving on, make sure you have all your parts and that you haven’t dropped anything.
-
-
-
To remove the “B” button, just push upward on it so the little pegs can pop out from the wall. You can also just get tweezer and use it to pop the pegs out.
-
-
-
To have this be a complete teardown, there’s also this small piece at the bottom where the four lights would light up telling you if you’re player 1,2,3 or 4. You don’t realllly need to remove this piece but if you want to be thorough then go ahead.
-
-
-
All your pieces have been removed! If you would like to put the wii remote together just follow this guide in reverse.
-


11 件のコメント
Thanks Ashley! Easy to understand and most helpful! Looking forward to discovering other teardowns you may have!
What about the battery contacts in the back casing? How do you get those out?
for the battery contact in the remote where the b trigger is, how do i remove it? the 2 i have are corroded there and i want to clean them
Its only in place with a bent back piece of metal. Best thing I've found to get in there and bend the metal back and pull it out slowly is with a penknife.
I have bumped at the same issue. It seems you can't take it apart; I couldn't, at least. So, since I also had badly corroded contacts and the controller wasn't working anyways, I decided to give it a shot. Believe me, I've tested before posting here.
Try this: Disassemble the whole controller as normal. Remove the B button.
Now, you just have the back w/ contacts. Take a cup and pour alcohol vinegar in. Yeah, that one for salads. Sink the controller in the solution. I recommend doing so vertically, to not soak the black thingies. Inevitably, you will soak one of them, but it'll be ok.
You should notice bubbles coming out. That's the oxygen from reaction, means it’s working. Leave it for about 30-45 minutes.
[Continue…]