メインコンテンツにスキップ

必要な工具と部品

この分解は修理ガイドでは ありません。 お持ちのNintendo GameCube Controllerを修理する際は、iFixitの修理ガイドをご利用ください。

  1. Nintendo GameCube Controller (Official) Teardown, Removing the back: 手順 1、 2の画像 1 Nintendo GameCube Controller (Official) Teardown, Removing the back: 手順 1、 2の画像 2
    この手順で使用する道具:
    Plastic Cards
    $2.99
    購入する
    • Locate and remove six (6) tri-point screws.

    • If you are unable to get a tri-point screwdriver into the hole (specifically the two in the bottom of the grips), a very small tip flathead may be used. Be very slow and cautious not to strip out the screws.

    • Gently pry the two halves of the controller apart using plastic cards or tools.

  2. Nintendo GameCube Controller (Official) Teardown, Disassembling the triggers: 手順 2、 3の画像 1 Nintendo GameCube Controller (Official) Teardown, Disassembling the triggers: 手順 2、 3の画像 2 Nintendo GameCube Controller (Official) Teardown, Disassembling the triggers: 手順 2、 3の画像 3
    • Remove four (4) phillips head screws from the interior trigger guards. Pull the trigger guards straight out to access the interior triggers.

    • The screws are interchangeable, but the guards are not.

    • Push up on the trigger base and pull it up and out of the slot it's sitting in. Pull the trigger assembly down and out of the case back. Left side shown, right side similar.

    • The trigger is pushed up by a spring which will send your pieces flying if not restrained.

    • Separate the trigger base from the trigger itself by popping the retention bar out of the bottom of the trigger (purple circle)

    • A flathead screwdriver may be used to gently pry the bar down. Do not bend the bar or break the plastic.

  3. Nintendo GameCube Controller (Official) Teardown, Removing the Circuit Board: 手順 3、 3の画像 1 Nintendo GameCube Controller (Official) Teardown, Removing the Circuit Board: 手順 3、 3の画像 2 Nintendo GameCube Controller (Official) Teardown, Removing the Circuit Board: 手順 3、 3の画像 3
    • Buttons and button pads will fall out in the next steps.

    • Gently pull the circuit board up and out of the front case and set aside.

    • There's nothing holding either the pads to your board or the buttons into your front case, so take a moment to make sure you didn't drop any.

    • Remove any buttons you need from the front case. The Z button is the only one of note; there is a metal lever that sits in a groove and a post on the back side of it that sits in a hole to align the trigger.

  4. Nintendo GameCube Controller (Official) Teardown, Circuit Board Disassembly: 手順 4、 3の画像 1 Nintendo GameCube Controller (Official) Teardown, Circuit Board Disassembly: 手順 4、 3の画像 2 Nintendo GameCube Controller (Official) Teardown, Circuit Board Disassembly: 手順 4、 3の画像 3
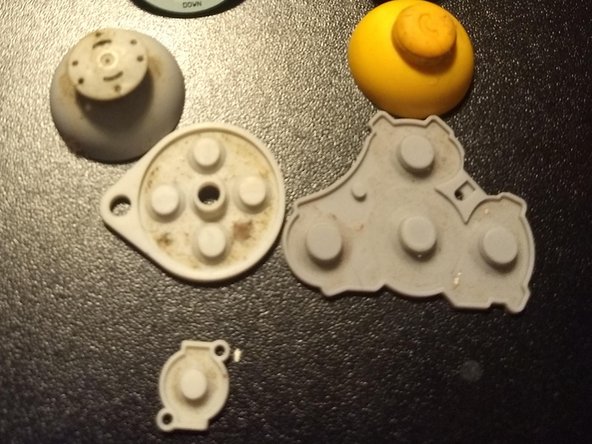
    • Gently pull the analog stick, C-Pad stick, and the pads for the D-Pad and face buttons.

    • Most everything else in here can get a nice soak in mild detergent and water, but the board doesn't want soap or water. A soft toothbrush, Q-tips, and alcohol got her looking much better.

    • Reassemble is opposite of disassembly. Most pieces only fit one way.

  5. Nintendo GameCube Controller (Official) Teardown: 手順 5、 1の画像 1
    • Full IC Identification:

    • You may need to enlarge it to view the text.

作成者

4人の作成者と共同で作成されました。

Skeletwing

メンバー登録日: 11/18/18

127 ポイント

1ガイドが承認済み

コメント 1 件

i cannot find any replacement screws for the controller online. at all. please any equivalent screws if not oem? for the shell not internals.

samm07 - 返信

コメントを追加

統計データ:

過去 24時間: 5

過去 7 日: 49

過去 30 日: 339

今までの合計 25,223