メインコンテンツにスキップ

必要な工具と部品

この分解は修理ガイドでは ありません。 お持ちのNintendo 64 Controllerを修理する際は、iFixitの修理ガイドをご利用ください。

  1. Nintendo 64 Controller Teardown, Nintendo 64 Controller Teardown: 手順 1、 3の画像 1 Nintendo 64 Controller Teardown, Nintendo 64 Controller Teardown: 手順 1、 3の画像 2 Nintendo 64 Controller Teardown, Nintendo 64 Controller Teardown: 手順 1、 3の画像 3
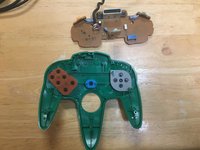
    • Behold the glorious retro controller face, then forget about it because you will flip the controller for the rest of the teardown.

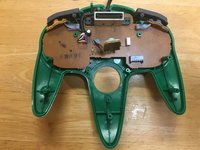
    • Use the size #1 Philips to remove the 7 screws on the back of the controller.

    • Use the size #0 Philips to remove the smaller screws in the controller pak slot.

  2. Nintendo 64 Controller Teardown: 手順 2、 1の画像 1
    • Remove the back plate. You can now see the:

    • Power Input

    • Game Pak Slot

    • Trigger Button Assemblies

    • Z Button Assembly

    • Joystick Module

  3. Nintendo 64 Controller Teardown: 手順 3、 1の画像 1
    • Using a spudger or similar tool, carefully pry the Z button assembly from the joystick module.

    • Remove the 3 size #0 screws holding in the joystick module.

    • Remove the joystick cable from the main board.

  4. Nintendo 64 Controller Teardown: 手順 4、 2の画像 1 Nintendo 64 Controller Teardown: 手順 4、 2の画像 2
    • Remove the joystick module.

    • This particular module is a third party replacement. Yours may look different.

  5. Nintendo 64 Controller Teardown: 手順 5、 2の画像 1 Nintendo 64 Controller Teardown: 手順 5、 2の画像 2
    • Remove the main board and trigger assemblies.

    • Your controller is now fully disassembled!

  6. Nintendo 64 Controller Teardown: 手順 6、 1の画像 1
    • Full IC Identification:

    • You may need to enlarge it to view the text.

作成者

2人の作成者と共同で作成されました。

Ian

メンバー登録日: 12/07/18

1,474 ポイント

2のガイドは作成済み

チーム

Kid fixers Kid fixers人のメンバー

Community

154 メンバー

291のガイドは作成済み

0 件のコメント

コメントを追加

統計データ:

過去 24時間: 6

過去 7 日: 51

過去 30 日: 260

今までの合計 13,327