はじめに
The Nexus 4 landed in our inbox just in time for a Friday teardown-a-rama. Questions that linger in our minds:
- Is it good as a phone? No idea. We dove right in to the Nexus 4—for science!
- Will it blend? We'll let Tom answer that one.
- How repairable is it? Only time will tell. Look below for the freshiest of the fresh information on the Nexus 4's innards.
We'll love you forever* if you follow us on Twitter, like us on Facebook, or subscribe to our YouTube channel.
*But only if you're kind to us.
必要な工具と部品
-
-
Google unveiled its 4th generation phone in the Nexus line and it's called—wait for it—the Nexus 4! Let's see what's inside número cuatro.
-
4.7" 1280 x 768 pixel touchscreen LCD with IPS
-
Qualcomm Snapdragon S4 Pro system on a chip (SoC) with 1.5 GHz CPU
-
2 GB RAM
-
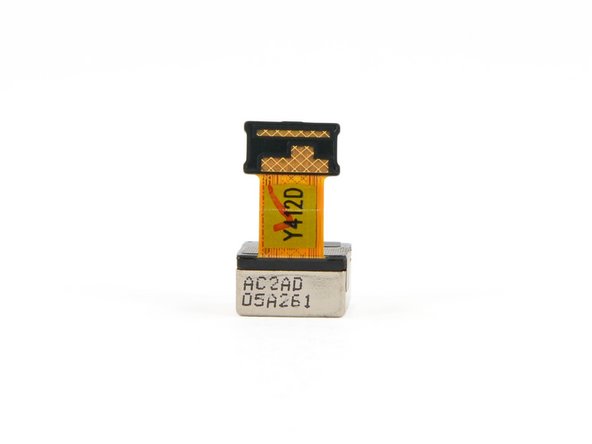
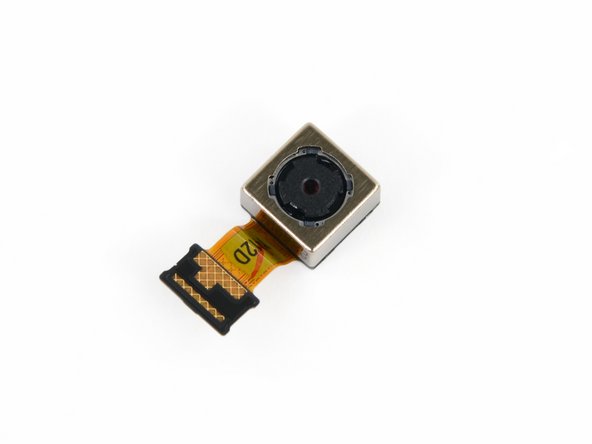
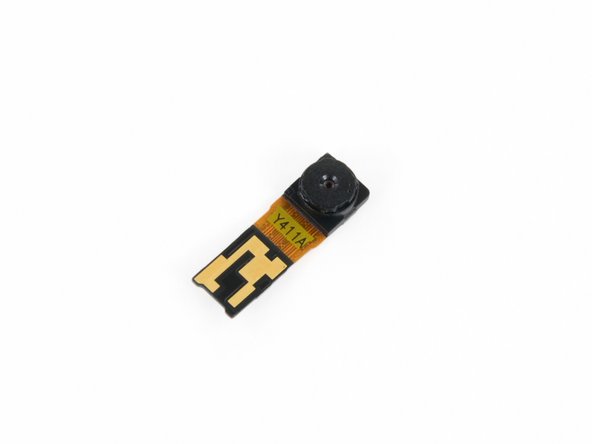
8 megapixel rear-facing and 1.3 megapixel front-facing cameras
-
Near field communication (NFC)
-
Android 4.2 (Jelly Bean)
-
-
-
At first glimpse, the Nexus 4 doesn't jump out and grab your attention, but its clean, sleek design makes it anything but an eyesore.
-
Google chose LG as its design partner to manufacture the newest Nexus phone. For all of their hard work, LG gets their logo on the back of the phone (and probably a decent boost in sales revenue).
-
Perhaps we spoke too soon about the Nexus 4 not clamoring for attention. Upon closer inspection, the back of the phone shows off one of our favorite features: sparkles!
-
-
-
Left to right: iPhone 4S, iPhone 5, Samsung Galaxy Nexus, Samsung Galaxy SIII, LG Nexus 4.
-
We wanted to add a Galaxy Note II to the mix, but this iPad Mini was the closest thing we had (size-wise).
-
Despite the minor variation in appearance, not all black rectangles are created equal. Compared to the Galaxy Nexus—the phone it succeeds—the Nexus 4 is a hair heavier (139 g vs 135 g), thicker (9.1 mm vs 8.9 mm), and wider (68.7 mm vs 67.9 mm).
-
-
-
Whenever a new Android device hits the stage, we feel obligated to see how it measures up to the latest iPhone. Let's have a look-see.
-
Both phones have their main I/O connector on the bottom, flanked by two screws. For the iPhone, it's the Lightning connector (Apple proprietary) and two Pentalobe screws (also proprietary). The Nexus 4, on the other hand, wields a micro-USB/SlimPort HDMI port (universal) and two Torx screws (quite common).
-
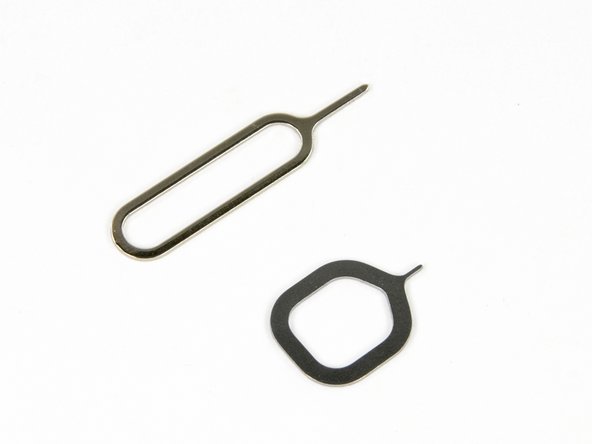
Rather than hide the Micro SIM card underneath the battery—a common practice in many phones—LG pushed the Micro SIM slot to the side and included their own stubby SIM eject tool. Very Cupertino.
-
-
-
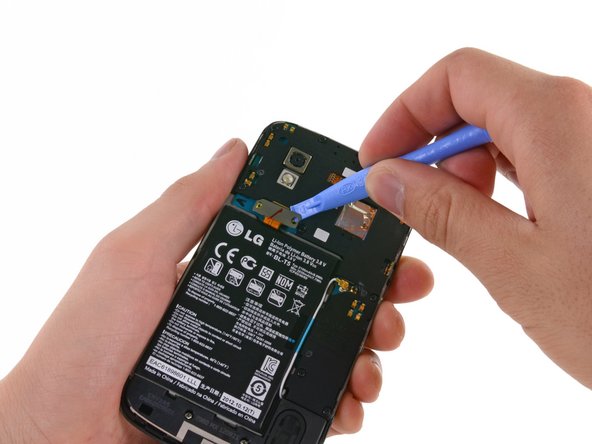
After liberating the two T5 Torx screws from their imprisonment, it took a few minutes of diligent work with a plastic opening tool to remove the back cover.
-
It wasn't particularly difficult to open this device, but anyone attempting it without the proper prying tool will face a lot of frustration.
-
Right off the bat we notice that the battery is much harder to replace than in the earlier Galaxy Nexus. This could hurt its repairability score, but it's still early!
-
-
-
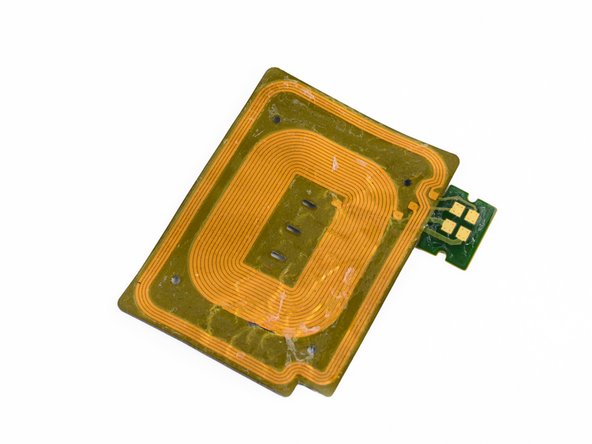
The rear cover of most phones is a ho-hum piece of plastic that serves no real purpose other than covering the battery. That is not the case here.
-
A number of pressure contacts power the NFC antenna and connect the induction coil needed for wireless charging to the motherboard.
-
With "wireless charging" listed as an official tech spec for the Nexus 4, we were anxious to try it out on our device. Alas, the phone doesn't ship with a wireless charger. Boo.
-
Two years ago, Google brought NFC to the smartphone realm with the Nexus S. It's been a long road, but the technology seems to finally be catching on.
-
-
-
-
Screws hold the battery connector in place.
-
We make it look easy, but the battery is secured to the case with quite a bit of adhesive, requiring a lot of prying.
-
-
-
Eventually, we're able to pull out the 3.8 V, 2100 mAh battery.
-
Just like Apple did with the iPhone 5, LG is utilizing a 3.8 V battery to power the Nexus 4.
-
Strangely enough, Google doesn't list any specifications for the battery on their product page. We'll have to rely on real-world tests to see what kind of battery life users can expect to achieve.
-
-
-
The speaker enclosure is held in place with two screws and no cables—spring contacts connect it to the rest of the phone, making its removal a snap.
-
Bonus points for repairability!
The speaker assembly is easier to remove/replace if you loosen the bottom motherboard cover screw first, because there's a little curved tab that slots underneath it.
-
-
-
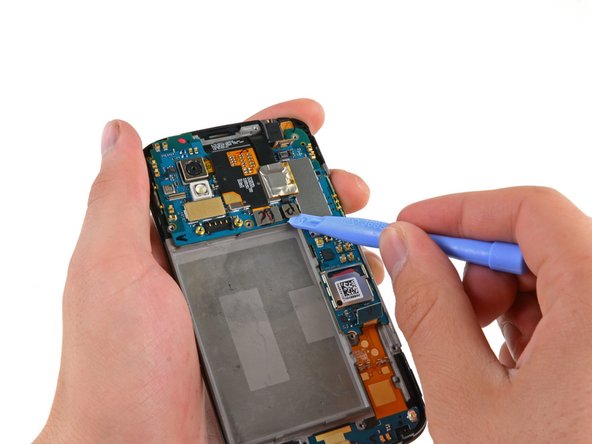
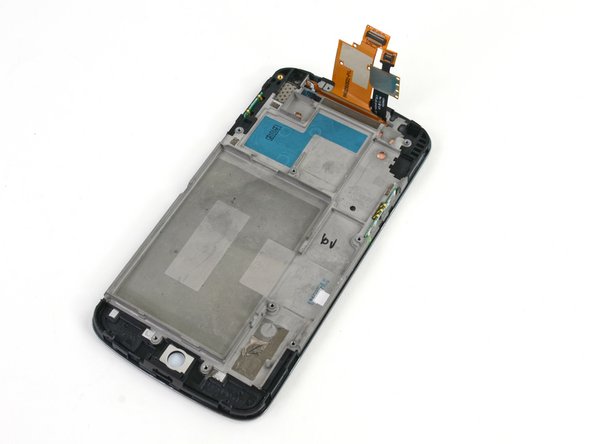
Next up is the obtrusive plastic frame covering the motherboard.
-
With the frame screws removed, the Nexus 4 is officially screw-less. That brings us to a total of only 4 different screw lengths, and 15 screws in total. Here's how they break down on our Magnetic Project Mat.
-
-
-
In addition to providing some support and stability, this frame houses the earpiece speaker and vibrator motor, both of which attach to the motherboard via pressure contacts.
-
The Nexus 4 uses a linear-oscillating vibrator motor as opposed to the counterweighted rotational vibrator in the iPhone 5.
-
-
-
The front of the motherboard :
-
Toshiba THGBM5G6A2JBAIR 8GB Flash
-
SlimPort ANX7808 SlimPort Transmitter (HDMI output converter)
-
Invensense MPU-6050 Six-Axis (Gyro + Accelerometer)
-
Qualcomm WTR1605L Seven-Band 4G LTE chip
-
Avago ACPM-7251 Quad-Band GSM/EDGE and Dual-Band UMTS Power Amplifier
-
Murata SS2908001 802.11 a/b/g/n Wi‐Fi and Bluetooth module
-
Avago 3012 Ultra Low-Noise GNSS Front-End Module
Google Translator = Is it possible to replace the flash memory to a larger memory or solder a sd card on the flash memory contacts on it?
German: Kann man den Flash speicher auf einen gröseren speicher austauschen oder eine sd karte auf die flash speicher kontakte drauf löten?
Would you be kind to please tell me how Nexus 4 gets Detected to the PC using USB , Coz. my nexus 4 Is Not getting Detected and I tried almost every possible way to fix it . i even tried to change the MicroUSB part as well in Nexus 4 , but still its not able to detect my Nexus 4 Device .
PLease Help
-
-
-
Back o' mobo:
-
Samsung K3PE0E00A 2GB RAM. We suspect the Snapdragon S4 Pro (APQ8064) 1.5 GHz CPU lies underneath.
-
Qualcomm MDM9215M 4G GSM/UMTS/LTE modem
-
Qualcomm PM8921 Power Management
-
Broadcom 20793S NFC Controller
-
Avago A5702, A5704, A5505
-
Qualcomm WCD9310 audio codec
-
Qualcomm PM8821 Power Management
Wifi :)
Hi,
is there a possibility to upload a high resolution picture from the Avago A5702, A5704, A5505 Section? I have to find the magnetic field sensor, so maybe you can help me?
Thank you very much!
Have you ever seen LG optimus G mobo ? I think they are the same.
-
-
-
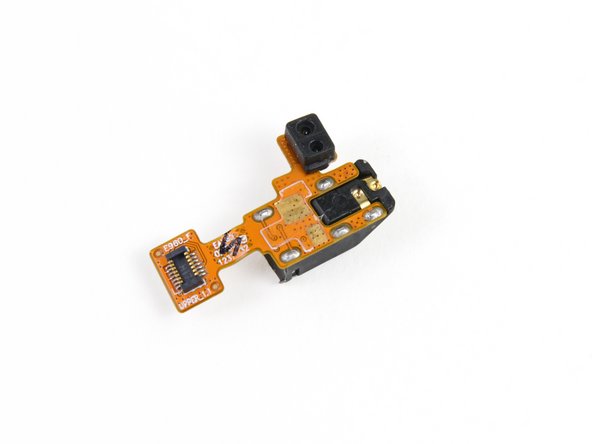
Turning our attention back to the front panel, we pull off the standard 3.5 mm headphone jack, which also houses the dual ambient light sensors.
-
It's getting late, and Walter tired after teardown all day…
FYI, just replaced my screen assembly and ran into an issue where the proximity sensor is always blocked. After scouring hours unsuccessfully for a solution, a YouTube comment mentioned swapping the orientation of the rubber gasket so that the big hole surrounds the little proximity sensor. That solved it!
-
-
-
Front panel—fused LCD, glass, and frame.
-
A Synaptics S7020A touchscreen controller ensures your fingers morph into super-accurate pig-killing machines.
-
The 4.7", 1280 x 768 , WXGA IPS display is manufactured by LG Display.
-
The display is labeled as LH467WX1.
The description for removing the digitizer/screen aren't descriptive enough to get the job done right without frustration. Any clarification would be appreciated.
Could someone tell me what kind of EMI shielding tape should be used on the digitizer ribbon?
-
-
-
Nexus 4 Repairability Score: 7 out of 10 (10 is easiest to repair).
-
Removing the back cover requires nothing more than a common screwdriver, a plastic opening tool, and some patience.
-
The entire device only contains four different length screws—all common screw types—for a total of only 15 screws.
-
Once the back cover and inner frame are removed, pressure contacts make all of the inner components a breeze to replace.
-
The battery is stuck to the frame with a lot of adhesive, so removing it without puncturing the battery can be difficult.
-
The glass is fused to both the display and the display frame. So don't crack the glass unless you're good with a heat gun, or you're fond of replacing the glass, display, and frame together ($$$).
I just broke the screen of my nexus 4 today, bummer! Any idea how I can get it repaired beside calling LG?
Thanks
Hahaha LG tiene buen hardware pero lo de la bateria deja mucho que desear, ademas con las últimas actualizaciones caparon la opción de LTE
-


38 件のコメント
Can the LTE chip somehow be activated/unlocked?
user772288 - 返信
Do not think it would be possible because it would make no sense to sell it without LTE having a possible working LTE functionality.
Can you use the LTE functionality of the nexus 4?....not out of the box, you have to unlock the bootloader and modify the nexus 4's software...in short yes when it's modded
While taking this phone apart (Nexus 4), was there a special place where a microSD slot could have been if Google would have wanted one put on there?
Maybe LG wanted to allow the users to expand the storage but later dropped the plan for some reasons.
Anyway, I am looking forward for the Wii U teardown
Where is the application processor located? Is it the APQ8064?
Awesome teardown. I really wonder why they didn't include the LTE function. Maybe they didn't have time before Christmas for doing it?
Would it be possible to swap the 8gb flash module (or 16gb in the 16gb version) to a 32gb module? I'm guessing the 16gb version would use a Toshiba THGBM5G7A2JBAIM module, which has the same package and power requirements as the THGBM5G8A4JBAIM (32gb module). Could this be as simple as a straight swap? I tried to get a closer look at the IC in your pic on step 17, but the red outline makes it hard to get a good look at the surface mount soldering on the chip. But seeing as you guys have actually seen it, would it be at all possible to make this modification by hand?
is the hardware of the nexus 4 able to use USB OTG?? can it provide voltage to an usb device? cose i really need it :C and maybe with a software update it can be fixed
Hey... Why is one of Walter's arms much bigger than the other one?
Reminds me of this - http://www.youtube.com/watch?v=4ZHBUMldz...
How accessible are the SIM pins with the mobo out? I've bent one and it's nearly impossible to correct the bend through the tiny SIM hole with the case on. But I don't want to rip the entire phone apart and risk breaking it further if I won't gain an advantage in SIM pin access by doing so (I will just continue to try and straighten it out through repetitive "massaging" :)
How accessible are the SIM pins with the motherboard out? I have a bent one, but don't want to tear the whole phone apart if it doesn't give me an advantage in re-shaping the bent pin by doing so. Help!
Tech specs (www.google.com/nexus/4/) list compass and barometer as features. Are these MEMS on the board?
Omg,last day i drop my nexus 4 in the water,when i was stay at the glow sticks midnight party,that's time to till its have no any power,any idea?how to i fix this?
Easiest way to take of the front screen: start at the simcard slot, and make sure the tool is snugly in place, then slide it left and right to loosen the side, until you hear a click, which means the screen has separated from that side. Once one side is fully released, the other sides are much easier to loosen. leave the top of the phone last, and use a guitar pick or some other shorter device to take that part off completely.
I used this tear-down to change the the lcd/glass/touch/frame assembly. I had the right tools and was very careful. But the battery gave me problems, the glue held up a good fight. I didn't know that there was a small control board in the upper part where the connector sits. So i lifted the battery all the way around, and it got a little bent while doing this. When i put everything back together, it wouldn't start. I plugged it in the charger and the LED blinks red. The battery was fully charged before i took it apart.
I suspect that i broke the battery, trying to get it out. Would you agree?
I tried to take the connector of the battery and reconnecting, no change. When i plug the charger in, while the battery is disconnected, the screen shows the battery logo. I can even turn it on for a few seconds, it vibrates and shows the google logo. then turns back off. I guess because of the missing battery?
Do you think it's safe to order a new battery, and that it will work again?
Yes, it's the battery. Same thing happened to me.
alexei -
Can you replace the notification LED without having to change any other parts?
i know its a little late but it's on the daughter board along with the charge port i believe(taken my n4 apart a few times to replace screen three times)
Hello , someone can help me for a problem of battery? The phone not start. I remove battery and i saw with multimeter is 2,5 volts (so is very down). Now i try to charge with a external charger (very slow for now), however on the nexus there 4 pin. Someone can tell me the right voltage when plug the usb?? Because i dont understand if the phone charge fine or not
Your writing concept is very delighted about the Iphone. That is able to compare Iphone between Macbooks, iMacs, iPads, iPhones, iPods and iPod Touches. I hope your writing concept is able to give us a useful look about the Iphone.http://www.amazon.co.uk/dp/B00FPFM4AY
I can't figure out where is GPS antenna? I think it's broken on my Nexus 4.
I bought a Torx T5 screwdriver to open my Nexus 4 (bought my Nexus in the Netherlands) but it doesn't fit. I think I need a T4 screwdriver (as mentioned here http://www.anandtech.com/show/6440/googl... )
Jan de Man - 返信
While I was replacing my nexus 4 battery , I accidentally broke the white wire/cable pasted on the old battery. I could reconnect it to a certain level, but not well connected. You can see that cable is removed in Step 11 to 12 in this article.
1) What is that cable
2) I guess it is wifi antenna cable. If that is the case, is my phone un harmed given that wifi still works
3) Does it affect phone calls, I can not test it since I am out of the country where my SIM card does not work
The 4G LTE radio/modem in the Nexus 4 can be activated. You have to be rooted and have a custom recovery. A special zip file has to be flashed via custom recovery to activated 4G LTE. Google search "LTE Nexus 4 xda" open link(s) and follow directions. I got LTE on my Nexus 4 right now as I'm typing this. Oh yeah, your carrier APN needs to be corrected in settings and make sure your carrier has 4g LTE activated by default cause some, like AT&T turn LTE off when they detect you are using a non LTE phone like the Nexus 4.
I was trying to take mine apart and i shattered the back glass while taking the back off, im so stupid!