メインコンテンツにスキップ

この分解は進行中です。 – 最新版を見るには定期的に再読み込みします。

必要な工具と部品

  1. Nextbook Ares 8 - 16gb QUADCORE Android Tablet Nxa8qc116b Blue Teardown, Nextbook Ares 8 - 16gb QUADCORE Android Tablet Nxa8qc116b Blue Teardown: 手順 1、 3の画像 1 Nextbook Ares 8 - 16gb QUADCORE Android Tablet Nxa8qc116b Blue Teardown, Nextbook Ares 8 - 16gb QUADCORE Android Tablet Nxa8qc116b Blue Teardown: 手順 1、 3の画像 2 Nextbook Ares 8 - 16gb QUADCORE Android Tablet Nxa8qc116b Blue Teardown, Nextbook Ares 8 - 16gb QUADCORE Android Tablet Nxa8qc116b Blue Teardown: 手順 1、 3の画像 3
    • Start by prying off the back cover, startling front a corner. If you don't want to damage it use plastic tools for this, I used my thumb nail.

  2. Nextbook Ares 8 - 16gb QUADCORE Android Tablet Nxa8qc116b Blue Teardown: 手順 2、 2の画像 1 Nextbook Ares 8 - 16gb QUADCORE Android Tablet Nxa8qc116b Blue Teardown: 手順 2、 2の画像 2
    • Start by Ramon removing the yellow transparent film. (This protects the electronics from shorts.)

    • WARNING: Slowly remove black form socket (this helps keep things from rattling). Be Carful not to hurry the battery

  3. Nextbook Ares 8 - 16gb QUADCORE Android Tablet Nxa8qc116b Blue Teardown: 手順 3、 3の画像 1 Nextbook Ares 8 - 16gb QUADCORE Android Tablet Nxa8qc116b Blue Teardown: 手順 3、 3の画像 2 Nextbook Ares 8 - 16gb QUADCORE Android Tablet Nxa8qc116b Blue Teardown: 手順 3、 3の画像 3
    • After you remove the sticker undo the ribbon cable. Lift the black latch with your finger nail or a soft tool.

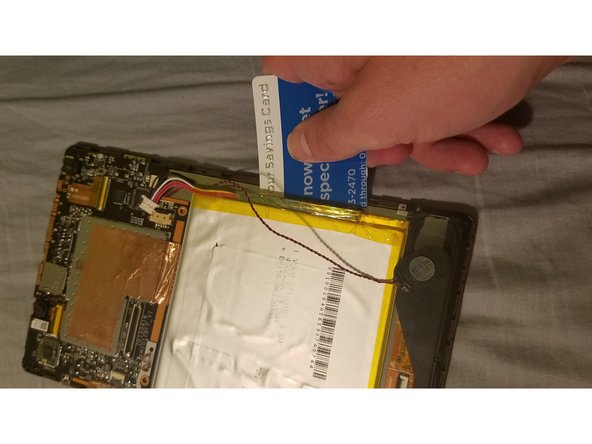
    • Then gently peel the ribbon, and remove the battery the yellow stuff can stay. Use a a wide flat tool or a spectrum savings card.

    • BE CAREFUL do not bend the battery, for it can cause a short and burst in flames, seriously.

  4. Nextbook Ares 8 - 16gb QUADCORE Android Tablet Nxa8qc116b Blue Teardown: 手順 4、 3の画像 1 Nextbook Ares 8 - 16gb QUADCORE Android Tablet Nxa8qc116b Blue Teardown: 手順 4、 3の画像 2 Nextbook Ares 8 - 16gb QUADCORE Android Tablet Nxa8qc116b Blue Teardown: 手順 4、 3の画像 3
    • Remove the five screws from the holding down the circuitboard then cut the court take be sure to add more or some tape to connect the two pieces age resembling. (For cooling purposes)

    • Remove all ribbon cables and others unpluggables

    • Now remove the logic board.

    • Now remove all 6 sescrews holding down brackets holding down the screen

    • Now you're done.

  5. Nextbook Ares 8 - 16gb QUADCORE Android Tablet Nxa8qc116b Blue Teardown: 手順 5、 3の画像 1 Nextbook Ares 8 - 16gb QUADCORE Android Tablet Nxa8qc116b Blue Teardown: 手順 5、 3の画像 2 Nextbook Ares 8 - 16gb QUADCORE Android Tablet Nxa8qc116b Blue Teardown: 手順 5、 3の画像 3
    • Here's all the parts

    • I removed the metal cover on the logic board so your can see I'm taking it anyway. it anyway

    • The screen and the digitizer, I didn't try to remove the buttons of the digitizer but it looks removable.

  6. Nextbook Ares 8 - 16gb QUADCORE Android Tablet Nxa8qc116b Blue Teardown: 手順 6、 3の画像 1 Nextbook Ares 8 - 16gb QUADCORE Android Tablet Nxa8qc116b Blue Teardown: 手順 6、 3の画像 2 Nextbook Ares 8 - 16gb QUADCORE Android Tablet Nxa8qc116b Blue Teardown: 手順 6、 3の画像 3
    • The screen and the digitizer, I didn't try to remove the buttons of the digitizer but it looks removable.

    • All done bye

作成者

2人の作成者と共同で作成されました。

Tony

メンバー登録日: 09/19/12

121 ポイント

1ガイドが承認済み

0 件のコメント

コメントを追加

統計データ:

過去 24時間: 0

過去 7 日: 0

過去 30 日: 1

今までの合計 344