メインコンテンツにスキップ

必要な工具と部品

ビデオの概要

この分解は修理ガイドでは ありません。 お持ちのMotorola Moto G 2nd Generationを修理する際は、iFixitの修理ガイドをご利用ください。

  1. Motorola Moto G 2nd Generation Teardown, Motorola Moto G 2nd Generation Teardown: 手順 1、 2の画像 1 Motorola Moto G 2nd Generation Teardown, Motorola Moto G 2nd Generation Teardown: 手順 1、 2の画像 2
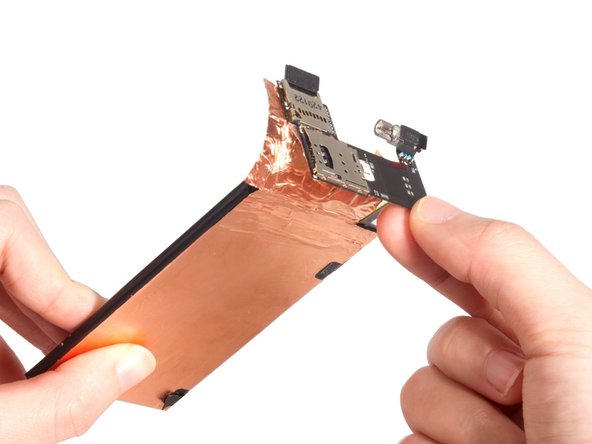
    • Remove back cover. It's easy, no adhesive and no screws.

  2. Motorola Moto G 2nd Generation Teardown: 手順 2、 3の画像 1 Motorola Moto G 2nd Generation Teardown: 手順 2、 3の画像 2 Motorola Moto G 2nd Generation Teardown: 手順 2、 3の画像 3
    • Twist off all 14 screws together and remove the back frame easily. But the screws feature different lengths, you'd better remember their positions.

  3. Motorola Moto G 2nd Generation Teardown: 手順 3、 2の画像 1 Motorola Moto G 2nd Generation Teardown: 手順 3、 2の画像 2
    • Take away the volume button and power button.

  4. Motorola Moto G 2nd Generation Teardown: 手順 4、 3の画像 1 Motorola Moto G 2nd Generation Teardown: 手順 4、 3の画像 2 Motorola Moto G 2nd Generation Teardown: 手順 4、 3の画像 3
    • Release SIM&SD card reader connector and battery connector. And get the vibrator motor free from adhesive.

  5. Motorola Moto G 2nd Generation Teardown: 手順 5、 3の画像 1 Motorola Moto G 2nd Generation Teardown: 手順 5、 3の画像 2 Motorola Moto G 2nd Generation Teardown: 手順 5、 3の画像 3
    • Loosen the platinum foil under SIM & SD card reader from plate. And then drag the stickers out which fix the battery.

  6. Motorola Moto G 2nd Generation Teardown: 手順 6、 1の画像 1
    • At that time, remove the battery with SIM & SD card reader assembly together.

  7. Motorola Moto G 2nd Generation Teardown: 手順 7、 3の画像 1 Motorola Moto G 2nd Generation Teardown: 手順 7、 3の画像 2 Motorola Moto G 2nd Generation Teardown: 手順 7、 3の画像 3
    • Separate battery and SIM & SD card reader assembly.

  8. Motorola Moto G 2nd Generation Teardown: 手順 8、 3の画像 1 Motorola Moto G 2nd Generation Teardown: 手順 8、 3の画像 2 Motorola Moto G 2nd Generation Teardown: 手順 8、 3の画像 3
    • Release LCD screen connector from motherboard.

  9. Motorola Moto G 2nd Generation Teardown: 手順 9、 2の画像 1 Motorola Moto G 2nd Generation Teardown: 手順 9、 2の画像 2
    • Release sensor flex connector and front camera connector respectively.

  10. Motorola Moto G 2nd Generation Teardown: 手順 10、 3の画像 1 Motorola Moto G 2nd Generation Teardown: 手順 10、 3の画像 2 Motorola Moto G 2nd Generation Teardown: 手順 10、 3の画像 3
    • Remove screws on the motherboard and the motherboard can be removed easily.

  11. Motorola Moto G 2nd Generation Teardown: 手順 11、 3の画像 1 Motorola Moto G 2nd Generation Teardown: 手順 11、 3の画像 2 Motorola Moto G 2nd Generation Teardown: 手順 11、 3の画像 3
    • Remove rear camera.

  12. Motorola Moto G 2nd Generation Teardown: 手順 12、 3の画像 1 Motorola Moto G 2nd Generation Teardown: 手順 12、 3の画像 2 Motorola Moto G 2nd Generation Teardown: 手順 12、 3の画像 3
    • Remove front camera and sensor cable.

  13. Motorola Moto G 2nd Generation Teardown: 手順 13、 2の画像 1 Motorola Moto G 2nd Generation Teardown: 手順 13、 2の画像 2
    • Remove earpiece and loudspeaker.

  14. Motorola Moto G 2nd Generation Teardown: 手順 14、 1の画像 1
    • Done.

作成者

2人の作成者と共同で作成されました。

Sophia

メンバー登録日: 03/25/14

43,810 ポイント

62のガイドは作成済み

13 件のコメント

Nice work!

REQUEST: Next time you do a cell phone would you also shoot a straight down on top shot. The 3/4 is nice but I want to look straight down !

TY

Top View - 返信

P.S. Or just do a single TOP VIEW at the END like this one from Dillon ! Pretty Please!

T-Mobile Huawei Prism U8651T Teardown

Top View -

Can anyone please tell me where I can get the details of the Antenna used for the GSM connection in this phone? Like the drawing or schematic.

Please I really need this as this phone has poor cell reception.

Amol - 返信

My Moto G just burned with 12 V from a cheap auto-recharger. But I lost very important data on the 8 GB memory. Is there a possible way to save the data?

mihaibanditu - 返信

Where can I get more information about GPS module and its antenna?

Paulo Abner - 返信

コメントを追加

統計データ:

過去 24時間: 1

過去 7 日: 6

過去 30 日: 11

今までの合計 53,697