はじめに
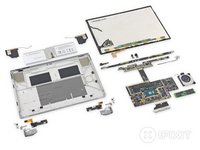
Just last week we tore down the Surface Pro 4, the tablet that can allegedly replace your laptop. Today we've got the Surface Book, a laptop that can, ehrm, replace the tablet that replaced your laptop. It's the first ever notebook from Microsoft, and with its trick detachable display and pressure-sensitive Surface Pen, it defies categorization—but not teardownification. Join us as we dismantle the Surface Book!
Teardown season is heating up—follow us on Instagram, Twitter, or Facebook for all the latest!
必要な工具と部品
ビデオの概要
-
-
Just what is a "surface book"? We check the specs for clues:
-
13.5” PixelSense multitouch display, with 3000 x 2000 resolution (267 PPI)
-
6th Gen Intel Core i5 with dedicated NVIDIA GPU
-
8 GB RAM
-
128 GB solid-state drive
-
802.11ac Wi-Fi + Bluetooth 4.0
-
8.0 megapixel rear-facing camera with 1080p video + 5.0 megapixel front-facing camera
-
Surface Pen with 1,024 levels of pressure sensitivity
-
-
-
"Lift-off in T-minus 3...2... oh wait—the battery's low."
-
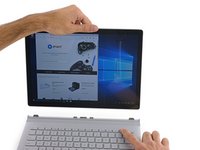
What separates the Surface Book from the competition is the fact that (usually) you can separate it quickly, with minimal disruption to your work. Other devices tend to require you to power down every time.
-
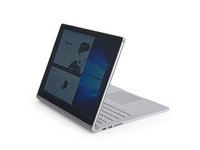
Now that we've achieved separation, we might as well reconnect it, but backwards!
-
-
-
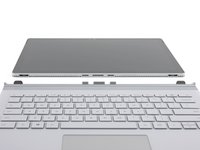
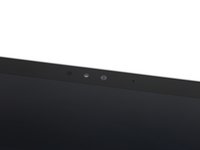
Glancing over the top of the display, we're greeted by a familiar face.
-
Like the Surface Pro 4, the Book's forward sensor array features an IR sensor, 5 MP camera, microphone, and ambient light sensor.
-
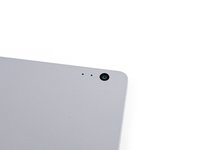
Likewise, we find an 8 MP, 1080p camera and microphone combo on the rear of the display, matching the hardware on the back of the Surface Pro 4.
-
-
-
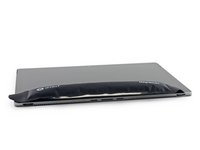
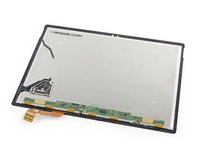
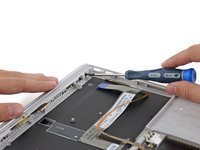
We know our way past this display. It may be a bigger (and seemingly more flexible) pane of glass than we saw in the Surface Pro 4 teardown, but it opens with the same password: iOpener.
-
The glass thickness measures in at 0.4 mm, the same as on the Surface Pro 4.
-
-
-
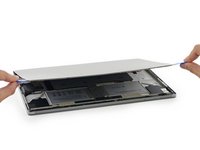
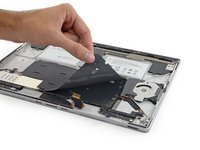
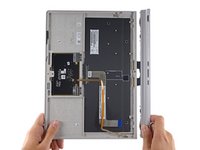
Never one to judge a Book by its cover, we're glad for a chance to peek under the, um, lid.
-
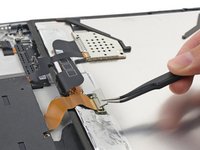
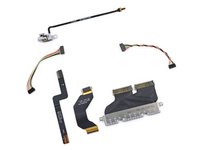
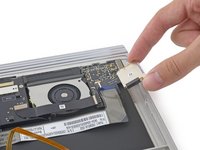
Right away, we notice two cables tethering the display to the motherboard. Fortunately, they're conveniently located along one edge—meaning we really can flip this thing open like a book—and we easily dispatch their press-on connectors.
-
Unfortunately, these cables lead directly under the motherboard, which looks to be upside-down.
-
We do get a look at a small fan channel, which pairs with matching foam on the back of the display to direct the air just so.
-
-
-
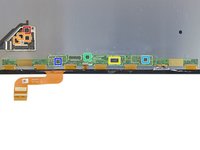
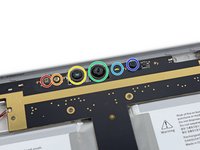
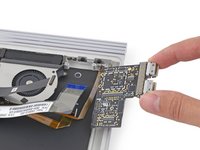
Peeking out from beneath protective shielding, we find a chipset similar to that of the Surface Pro 4 display:
-
N-trig DS-D5000 touchscreen row driver (likely)
-
N-trig DS-A5048 touchscreen line driver (likely)
-
Novatek NT71394MBG timing controller
-
Macronix MX25U4033E 1.8 V 4.0 Mb multi-in, multi-out serial NOR flash memory
-
Rohm BD81028 LCD gamma voltage generator
-
Rohm BD8184MUV LCD power supply
-
-
-
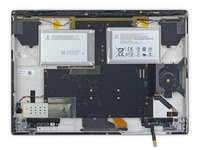
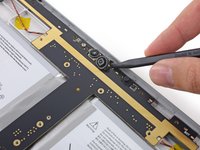
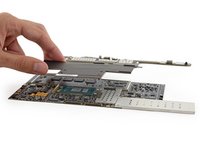
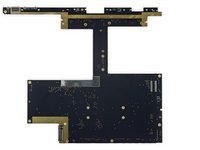
Peeling up a thin foam layer confirms our suspicions—the motherboard is indeed upside down—smooth back up top, connectors and chips on the bottom.
-
Surprisingly, said motherboard also sprawls throughout the entire chassis, resembling some kind of nightmarish Tetris piece.
-
What's more, there's no sign of connectors for any of the peripheral components.
-
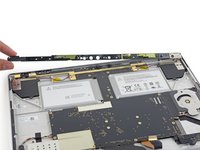
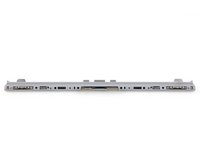
At least the camera bar comes up without any trouble. Maybe we'll find some tasty treasure below.
-
-
-
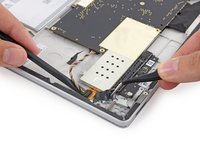
It's time to begin some Surface excavation!
-
The front-facing camera and IR sensor are glued to the chassis and trapped beneath the motherboard assembly, which makes for some tricky prying.
-
Next, we tackle tons of troublesome tape and deftly disconnect a tangle of connectors.
-
We arrive at the headphone jack, only to find that it's connected to the underside of the motherboard assembly by a lengthy cable.
-
-
-
-
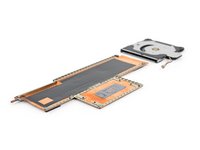
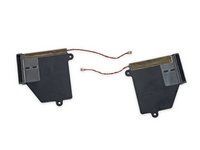
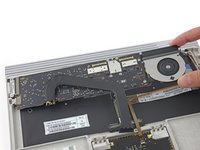
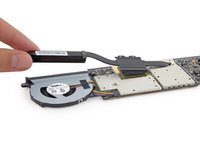
With the motherboard sunny side up, we take a moment to pull out its brushless, 0.5 Amp fan.
-
Eager to get a taste of that sweet, sweet silicon, we also relieve the motherboard of its sprawling heat sink.
-
The cooling system in the Surface Book bears a passing resemblance to the large copper plate tucked against the battery of the Surface Pro 4, but covers silicon instead of Li-ion.
-
-
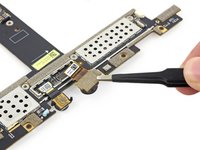
この手順で使用する道具:Tweezers$4.99
-
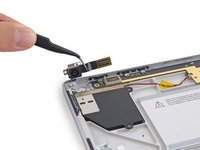
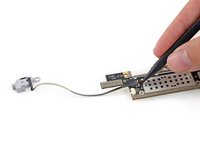
Having done their time, the front-facing and infrared cameras are plucked from their prison by a pair of our favorite tweezers.
-
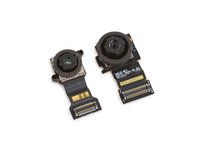
Grateful for our assistance, they agree to pose for a couple of shots.
-
The infrared camera (on the left) is used for facial recognition for Windows Hello.
-
The 5 MP camera to the right is perfect for your everyday selfie needs.
-
-
-
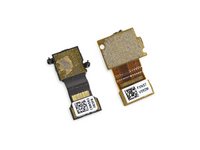
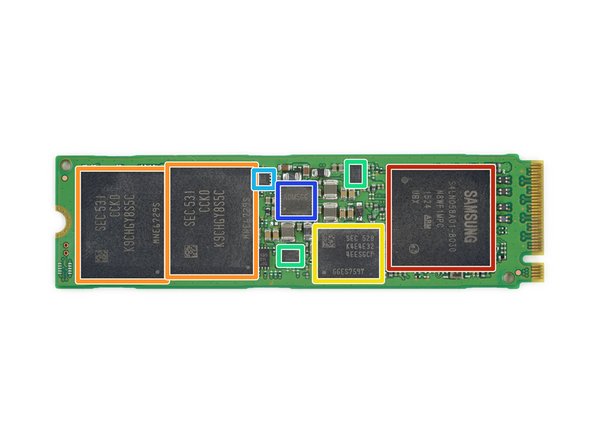
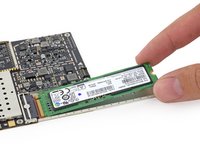
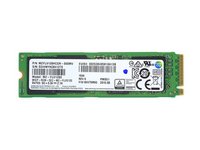
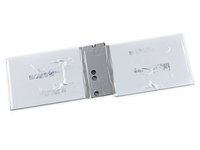
We're on the home stretch—all that stands between us and total motherboard liberation is the 128 GB Samsung PM951 SSD.
-
This memory module is giving us feelings of déjà vu—it's identical to the one we found in the Surface Pro 4 (although, unlike in the Pro, this aluminum SSD tray is literally just taped to the back of the motherboard):
-
Samsung S4LN058A01-8030 PCIe 3.0 x4 NVMe flash controller
-
Samsung K9CHGY8S5C-CCK0 64 GB NAND Flash
-
Samsung K4E4E324EE-SGCF 4 Gb (512 MB) DRAM
-
Texas Instruments TPS22966 5.5V, 6A, 16mΩ, 2-Channel Load Switch
-
Texas Instruments TPS22965 5.7 V, 6 A Load Switch
-
Silergy Power Management (likely)
-
-
-
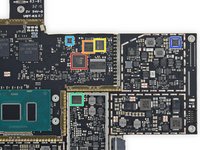
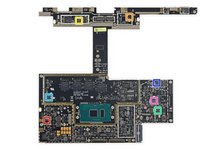
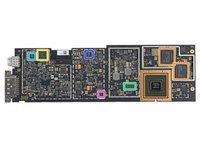
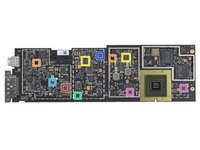
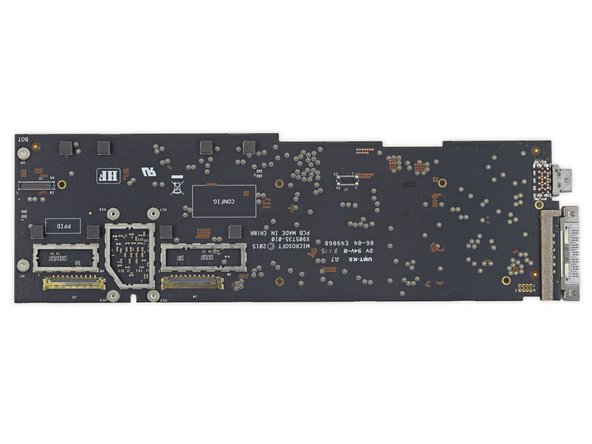
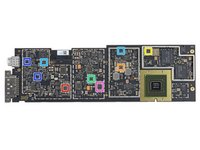
Finally a bare logic—err, motherboard. That black PCB à la Steve Jobs had us confused for a second.
-
Intel SR2F0 Core i5-6300U Processor (3M Cache, up to 3.00 GHz)
-
Samsung K4E6E304EE-EGCF 16 Gb LPDDR3 1867 MHz SDRAM (4 chips for a total of 8 GB)
-
Marvell Avastar W8897, likely Wi-Fi/Bluetooth combo chip
-
Freescale Kinetis KL17 MKL17Z256VFM4 48 MHz ARM Cortex-M0+ microcontroller
-
Realtek ALC3269 Audio Codec
-
Infineon Technologies SLB9665TT20 Trusted Platform Module
-
Intersil ISL95857 1+2+1 Voltage Regulator for Intel IMVP8 CPUs
-
-
-
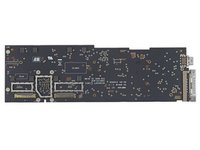
But wait, there's more!
-
ITE Tech, Inc. IT8528VG embedded controller
-
Winbond W25X40CL serial flash memory
-
Macronix MX25L4006E 3V, 4 Mb [x 1/x 2] CMOS serial flash memory
-
Winbond W25Q128FV 128 Mb serial flash memory
-
Bosch Sensortec BMI160 3-axis accelerometer/gyroscope
-
Texas Instruments BQ24780S battery charge controller
-
-
-
IC Identification, pt. 2:
-
STMicroelectronics STTS751-1DP3F temperature sensor
-
Rohm BR24T16NUX-W 16 Kb serial EEPROM
-
Monolithic Power Systems MP2370DGT white LED driver
-
Texas Instruments TPS51285A dual-synchronous buck controller
-
Texas Instruments TPS51367 12A synchronous buck converter
-
Texas Instruments TPS62140 2A step-down converter
-
Analog Devices (formerly Linear Technology) LTC4412 low loss PowerPath controller
-
-
-
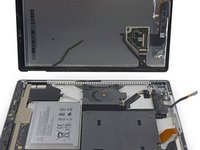
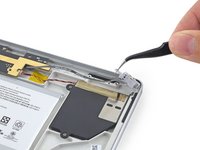
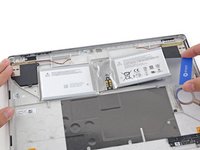
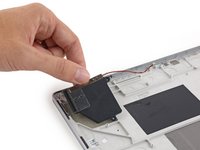
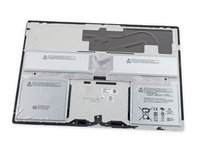
The Book's display battery is actually easier to remove than the cell in the Surface Pro 4.
-
While the Surface Book is intended to be used while docked, its display packs a 18.0 Wh, 7.5 V, 2387 mAh battery and an alleged four hours of battery life.
-
Judging by the Surface Pro 4's 38.2 Wh battery, and the iPad Air 2's 27.62 Wh, we expect to find a decent cell in this Book's base to meet the spec'd 12 hour battery life.
-
-
-
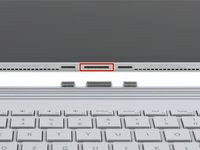
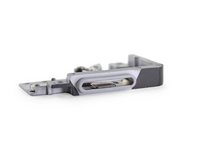
The Surface Book features a "Muscle Wire Lock," that will keep your display securely fastened to the base, until it's time to undock and get more mobile.
-
In this case, electricity is run through the wire, heating it up and causing it to contract. This pulls the black pulley inward, against the spring, lifting the lower arm of the linkage.
-
That lower arm holds a very tiny rod captive. The rod serves as the grip, that holds onto the base unit's metal tab. When the linkage is retracted, the rod rolls out of the way and lets the base go.
-
-
この手順で使用する道具:iOpener$17.99
-
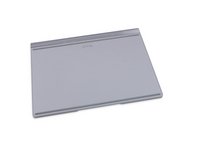
Enough fun with the top bit, let's get back to basics, and tear into this base.
-
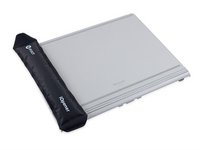
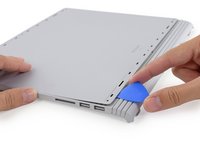
The lower case sits smooth and flush, with a very thin gap. We know what that means—time to warm the iOpener back up and get ready to pry.
-
While we wait for the iOpener to do it's thing, we do our due diligence and peel up those two wide rubber feet. And find channels for wide rubber feet. Alas, no screws.
-
-
-
After some intense heating and very arduous prying, we finally get past the hefty adhesive holding the lower panel.
-
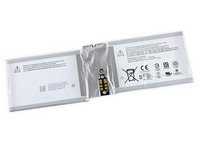
Surprise! The battery comes right off with the lower panel à la Retina MacBook.
-
With the power disconnected, let's get a closer look at this, the real power behind the Surface Book. With 51 Wh (6800 mAh at 7.5 V), the base battery provides nearly 3 times the juice as the tablet.
-
Both batteries combined give us 69 Wh, just a mite shy of the 74.9 Wh you'd get in this year's 13" Retina MacBook Pro.
-
-
-
First out of this tiny
MacBookbase is an SD reader, blocking access to the I/O board. -
Well, that and a nest of cables.
-
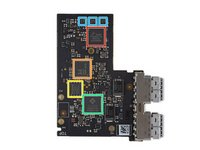
At last the board is free. Here's what it's packing:
-
Freescale SC667334DC (maybe a custom microcontroller)
-
Realtek RTS5314 SD card reader controller
-
Winbond W25X40CLIG serial flash memory
-
Genesys Logic GL3520 USB 3.1 hub controller
-
Texas Instruments TPS75105 LED driver
-
-
-
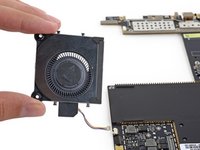
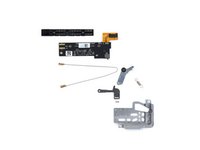
Appetite whetted, we pluck out the Book's GPU board assembly and its attached fan.
-
We find a suspiciously Mac-like heat sink mounted to the base's GPU.
-
We've always said we could use a few more fans. With the heat sink out of the picture, the base's 0.30 Amp model is ours for the taking.
-
That would have been a lot of work just to clean a dusty fan. Let's hope that never happens.
-
-
-
Finally we reach the bottom of the stack and get a look at that fancy dedicated GeForce GPU. This is a custom job, that the internet has deduced is about on par with a GeForce 940M.
-
Nvidia N16S-LG custom GeForce GPU
-
Samsung K4G41325FC 512 MB GDDR5 graphics RAM (1 GB total)
-
Parade PS8330B dual-mode DisplayPort version 1.2 repeater
-
Pericom PI3PCIE PCIe switch/multiplexer
-
NXP Semiconductor CBTL06GP213EE six-channel multiplexer for DisplayPort, HDMI and PCI Express
-
Freescale Kinetis KL17 48 MHz ARM Cortex-M0+ microcontroller
-
STMicroelectronics STTS751-1DP3F temperature sensor
-
-
-
GPU IC Identification, pt. 2:
-
Texas Instruments BQ24780S battery charge controller
-
Maxim Integrated MAX34407 SMBus 4-ch. wide dynamic range power accumulator
-
Winbond W25X40CL and W25X20CL 4 Mb and 2 Mb serial NOR flash memory
-
Texas Instruments TUSB211 480-Mbps USB 2.0 signal conditioner
-
Analog Devices (formerly Linear Technology) LTC4412 low loss PowerPath controller
-
NXP Semiconductor PCAL6416A 16-Bit I/O expander
-
Diodes Incorporated (formerly Pericom) PI3DBS3224 2:4 differential multiplexer/demultiplexer
-
-
-
GPU IC Identification, pt. 3:
-
Texas Instruments TPS51285A dual-synchronous buck controller
-
uPI Semi uP1658P PWM controller
-
Texas Instruments TPS54620 6A synchronous buck converter
-
Texas Instruments TPS54218 2A synchronous step-down converter
-
Texas Instruments TPS62175 0.5A/28V synchronous step-down converter
-
ON Semiconductor NCP380HMUAJAATBG adjustable current‐limiting power‐distribution switch
-
ON Semiconductor LP2951A 100mA adjustable LDO regulator
-
-
-
For those of you keeping track at home, we have a touchdown!
-
Our screwdriver has scored six points of entry on either side of this Synaptics trackpad—er, five points? It looks like there is an empty space where a screw should be on either side. Interesting...
-
We make a beeline to tackle the single remaining screw on the bottom of the trackpad, punt the trackpad connector, and head for the goal (or at least a place with fewer sports metaphors).
-
On the way to the goal, we spot a Synaptics S9101 touchpad controller.
-
-
-
Now it's time to get twisted and unhinged.
-
We spin a handy Torx precision driver to free the segmented hinge from the base.
-
The cables slide free of their basic home fairly easily, but then disappear into the spine of the hinge...
-
The segments are secured with various screws, so hinge, spine, and cables are likely replaceable, should they wear out.
-
-
-
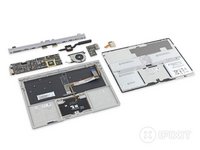
All your base are belong to us. But don't worry you get a cool layout out of it!
-
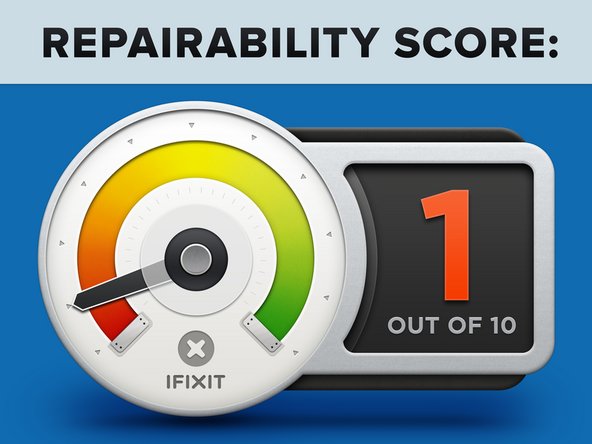
The Microsoft Surface Book (as a whole) earns a reparability score of 1 out of 10 (10 is easiest to repair).
-
After the difficult opening procedure, the SSD can be replaced. So too the glued battery in the display. However, the base battery is very heavily glued.
-
The display assembly consists of a fused glass panel and LCD, and is difficult to remove and replace.
-
The processor and RAM are soldered to the motherboard.
-
Strong adhesive holds many components in place, including the display, base cover, and both batteries.
-
Many components are on the backs of their respective boards, requiring motherboard removal to replace simple components.
-


54 件のコメント
Absolutely insane that an up to $2700 device that is being advertised as a laptop replacement requires so much to even get to the SSD. What in the world were they thinking even gluing the cover on the BASE!?! They should have at least made the base openable via screws and put a second m.2 slot in the base for storage upgrades. Since the screen release is already software based, making it a hot-swap drive would have been easy.
This device just gets more and more disappointing. The price is absolutely insane compared to even macs, the battery life pathetic without the base making the tablet mostly useless itself, now you can't even realistically upgrade the SSD. Wow microsoft, just wow.
Please keep in mind that Microsoft (and Apple) use smaller & lighter components and glue, to save space, weight and cost. Screws are bigger, heavier, and are more expensive during the manufacturing process. Hatches that provide easy component upgrades also add to size and weight, not to mention, potentially, disturbing the "design aesthetic".
Also remember that the companies don't want you to upgrade it easily... If you could remove a screw and double your SSD from 128 to 256, for about $80, how could they get you to pay $200 more for the 256 version (which they make more profit on)?
In the end, easy upgradeability comes with sacrifices in the form of extra size, weight & other design trade-offs. Unfortunately, the market has spoken, and they want thinner, lighter, & "more eligent" devices like the Surface Book.
Until there are enough people willing to vote with their wallets to get upgradeablity over "thinner, lighter & prettier", nothing will change...
Atricius -
No. The price is on par with its direct competitor, the 13" Retina MacBook. For about the same price you get a device with slightly less weight, a larger and higher-res screen, similar battery life, a newer CPU (though with comparable performance for most tasks), a touch screen, and the ability to detach the screen and use it as a "clipboard". And for a price premium, you can add a dedicated GPU (which brings the weight up to be identical to the rMBP).
Seems like a reasonable offering. As for the 3-4 hour battery life of the screen on its own, that is 3-4 more hours than any MacBook's screen gets when it is detached.
Right now i just got so !#^&@@ im tempted to buy the most bulky device like a Toughbook device, Panasonic, Thinkpad, whatever. Those devices comes with who knows how many upgrades?? what? 3 batteries? yes. More storage? !&&* yeah. GPU Upgrades? You got it
basically “you name it we got it” kind of modular computers. They have smart card readers etc
AND THE BEST? They are Plainrock124 proof kinda (and you can probably run over them with a car and it will survive)
LMH -
It is to bad companies are not making it easy to upgrade one, if not both, memory dimm(s), the video card and the m.2 ssd. I have not purchased a new macbook pro since I can no longer upgrade it. I would purchase a new one, for the upgraded cpu, but it isn't worth the price since if I can't upgrade the storage and the memory.