メインコンテンツにスキップ

必要な工具と部品

この分解は修理ガイドでは ありません。 お持ちのLG VX8350 Repairを修理する際は、iFixitの修理ガイドをご利用ください。

  1. LG VX8350 Teardown, Battery: 手順 1、 2の画像 1 LG VX8350 Teardown, Battery: 手順 1、 2の画像 2
    • Locate the horizontal grip located on the back cover of the phone.

    • Slide the back cover down and off of the phone.

  2. LG VX8350 Teardown: 手順 2、 2の画像 1 LG VX8350 Teardown: 手順 2、 2の画像 2
    • Insert a plastic opening tool into the battery release point located above the battery.

    • Pull outwards in order to release the battery.

  3. LG VX8350 Teardown, Circuit Board Housing: 手順 3、 3の画像 1 LG VX8350 Teardown, Circuit Board Housing: 手順 3、 3の画像 2 LG VX8350 Teardown, Circuit Board Housing: 手順 3、 3の画像 3
    • Locate the 5 screws holding the body of the phone together.

    • The top screw will have a plastic cover, remove it using tweezers.

    • Using a Philips head screwdriver, twist counterclockwise to remove the screws.

    • Take special care with the screw located at the top of the phone. It is smaller and more likely to be damaged or improperly attached.

  4. LG VX8350 Teardown: 手順 4、 2の画像 1 LG VX8350 Teardown: 手順 4、 2の画像 2
    • Lift the back cover starting at the bottom of the phone.

  5. LG VX8350 Teardown: 手順 5、 2の画像 1 LG VX8350 Teardown: 手順 5、 2の画像 2
    • Remove the back cover completely from the phone.

  6. LG VX8350 Teardown, Circuit Board: 手順 6、 1の画像 1
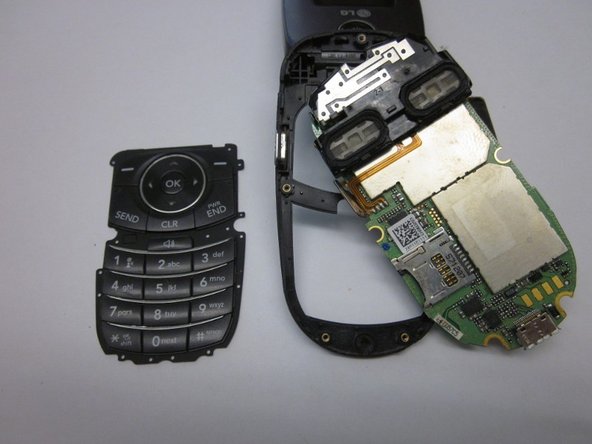
    • Locate the clamp at bottom right side of the Circuit Board.

    • Pull the circuit board from the phone being cautious to pull out underneath the clamp.

  7. LG VX8350 Teardown: 手順 7、 2の画像 1 LG VX8350 Teardown: 手順 7、 2の画像 2
    • Locate the ribbon connecting the circuit board to the phone display.

    • Using the spudger, disconnect the ribbon connecting the phone's display and the circuit board.

    • Remove the circuit board

  8. LG VX8350 Teardown, Keypad: 手順 8、 2の画像 1 LG VX8350 Teardown, Keypad: 手順 8、 2の画像 2
    • Lift the keyboard and remove it from the phone.

  9. LG VX8350 Teardown, Screen Cover: 手順 9、 3の画像 1 LG VX8350 Teardown, Screen Cover: 手順 9、 3の画像 2 LG VX8350 Teardown, Screen Cover: 手順 9、 3の画像 3
    • Locate the two rubber circles covering the screws.

    • Remove the rubber covers using tweezers.

    • Using the Phillips head screwdriver, unscrew and remove the two screws.

  10. LG VX8350 Teardown: 手順 10、 3の画像 1 LG VX8350 Teardown: 手順 10、 3の画像 2 LG VX8350 Teardown: 手順 10、 3の画像 3
    • Close the phone and gently pull outwards from the bottom left portion of the phone cover.

    • Take care not to do this with too much force, as it could crack the cover.

    • Completely remove the cover from the phone.

  11. LG VX8350 Teardown, LG VX8350 Teardown: 手順 11、 1の画像 1
    • You have now performed a complete teardown of the LG VX8350.

作成者

3人の作成者と共同で作成されました。

Jonathan Flowers

メンバー登録日: 10/18/13

607 ポイント

6のガイドは作成済み

チーム

Clemson, Team 14-7, Benson Fall 2013 Clemson, Team 14-7, Benson Fall 2013人のメンバー

CLEM-BENSON-F13S14G7

3 メンバー

16のガイドは作成済み

0 件のコメント

コメントを追加

統計データ:

過去 24時間: 0

過去 7 日: 1

過去 30 日: 2

今までの合計 1,512