必要な工具と部品
-
-
Kyocera Brigadier Teardown
-
Tools needed: Y0 screwdriver, P00 screwdriver, various metal pry tools including a small flathead screwdriver, precision tweezers
-
This phone has a lot of sturdy clips holding it together, as well as some fairly tough adhesive.
-
The earpiece is hardwired into the screen and the microphone is surface mounted onto the motherboard. About the only things that can be done to this phone are battery replacement, full screen replacement, and button, charging, or memory/sim card cover replacement.
-
The charging door replacement is relatively easy, everything else is extremely difficult.
-
The more drastic the teardown, the less water resistance you will have upon reassembly.
-
-
-
Remove the bottom button cover.
-
You should be able to pry this up with your fingernails.
-
-
-
Pry the top cover up just like the bottom button array.
-
Skip this step if all you are doing is a charging cover replacement.
-
-
-
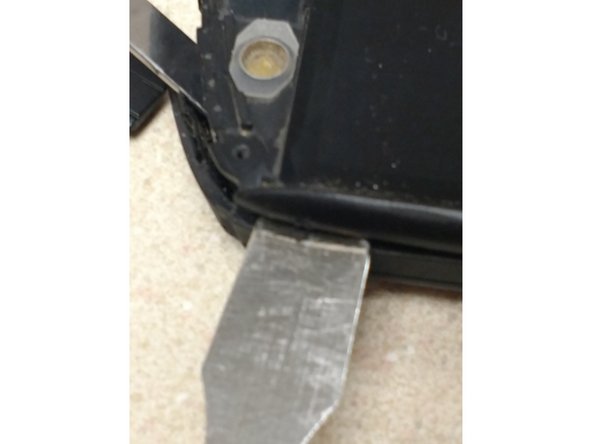
The two silver screws at the bottom of the back plate are decorative and cannot be removed from here.
-
-
-
Pry open the bottom and lift out the charging door.
-
In this case, the door was already broken, but you still need to remove the tab.
-
If you are harvesting a charging port door from another phone, repeat the previous steps on the other phone, insert the functional charging door, and reverse the steps to reassemble.
-
-
-
Insert a small pry tool in the bottom right side of the phone between the frame and screen and pry a bit out.
-
Insert a larger pry tool around the right corner of the phone and twist to release the outer frame clips.
-
Remove buttons and port covers as you go along.
-
-
-
Each button has a rubber grommet over the inside to keep it water resistant. Be sure to remove those if they don't pop out with the buttons, setting them aside together for reassembly.
-
-
-
-
There is some adhesive on the top of the phone. It shouldn't take much force to remove.
-
-
-
Remove any other buttons, grommets, etc that didn't fall out as you removed the back plate.
-
The cover to the camera flash will probably fall out as you remove the back plate.
-
-
-
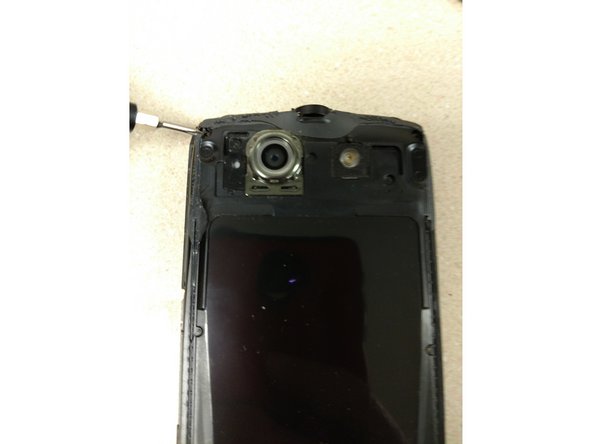
There are four small black screws in the corners and two large silver screws above the bottom pair of black screws.
-
These are Phillips P00 size.
-
You may have some sealant goo to work around.
-
-
-
There are about 7 clips like this. They look like clips from an OtterBox Defender case.
-
Use a small flathead screwdriver to pry them open. You're probably going to break one or two.
-
Start at the top and work your way down.
-
There is some pretty strong sealant here and the clips are small and tight. This takes some force.
-
Be careful not to break the frame when you get to the bottom of the phone.
-
-
-
Finish removing and lifting away the mid frame
-
Remove the battery as well
-
If you are replacing the battery only, insert a new battery and reassemble by reversing the steps.
-
-
-
Remove the two Phillips screws on the motherboard at the top and one at the bottom.
-
-
-
Remove the speakerphone button by lifting it up and out.
-
Metal tools seem to work better, just be careful not to cut any of the flex cable.
-
There is a gasket that covers this piece. Set this aside for reassembly.
-
-
-
Remove the motherboard top cover.
-
There may be some adhesive around where my thumb is.
-
-
-
Remove the bottom cover for the motherboard between the two speakers.
-
-
-
Flip open the cable cover door and remove the camera.
-
This isn't required, but it does make getting to the rest of the cables easier.
-
-
-
Open the cable doors and remove the cables for the digitizer and touch screen connections.
-
Small metal tweezers are the easiest to use here, but be careful not to break the cables.
-
Reversing this step is rather challenging.
-
-
-
Use tweezers to open the earpiece flex cable cover and lift out the cable.
-
The earpiece is part of the glass screen and cannot be replaced.
-
Again, metal tweezers work best, but be careful.
-
-
-
Remove the side buttons with tweezers (carefully)
-
The headphone jack can be lifted out by hand
-
-
-
Make sure your sim card is removed
-
Begin lifting the motherboard out.
-
There is some adhesive in the bottom left of the phone, use a plastic spudger to cut through it.
-
-
-
Lift the motherboard out.
-
Attaching a new screen is about all you can do at this point.
-
To reassemble, reverse the directions.
-
Having a handy clamp or "third hand" may be useful in holding apart some of the ribbon cables.
-


3 件のコメント
Thanks again for this!
Thank-you! A life saver. I was determined to keep my Brigadier.
Thank you for the detailed instructions. I’ve had my E6782 for 5 years, ever since they came out. The battery life has noticeably deteriorated in the last year even though the rest of the phone still works great (although I was never happy with the camera). Still deciding if it’s worth it to attempt the battery replacement, or just get the newest version of this phone (two generations newer, at this point).