はじめに
Google Pixel 3 XLも、近頃の最新スマートフォンが身にまとう”背面ケースがガラス製、正面にはノッチ”という流行のユニホームを付けています。しかし私たちはこの輝く新しい外観だけでなく、内部を詳細に見る使命があります。そして内部まで到達するには、たった一つの方法しかありませんーそれは分解です!
新製品が放つ輝きと最新の分解情報をお探しですか?
iFixitのFacebook、Instagramや Twitter、Twitter日本語版をフォローしてください。またあなたのメール受信箱に直接ニュースを届けて欲しい方はニュースレターを購読してください。(英語での発信)
必要な工具と部品
-
-
まず、新しくノッチが付けられた外観の下に搭載されたPixel 3 XLのテクノロジーを確認してみましょう。
-
6.3インチ OLED ディスプレイ、QHD+ 1440 × 2960解像度 (523 ppi)と Gorilla Glass 5
-
Octa-core、64ビットQualcomm Snapdragon 845プロセッサ (2.5 GHz + 1.6 GHz)、 4 GB LPDDR4x RAM
-
背面カメラ 12.2 MP、ƒ/1.8、OIS (光学式手ぶれ補正)、デュアルピクセル位相差検出 ; 前面デュアルカメラ 8.1 MP
-
容量64 GB もしくは 128 GB
-
Qiによるワイヤレス充電
-
IP68防水防塵性能
-
Android 9.0 Pie
-
-
-
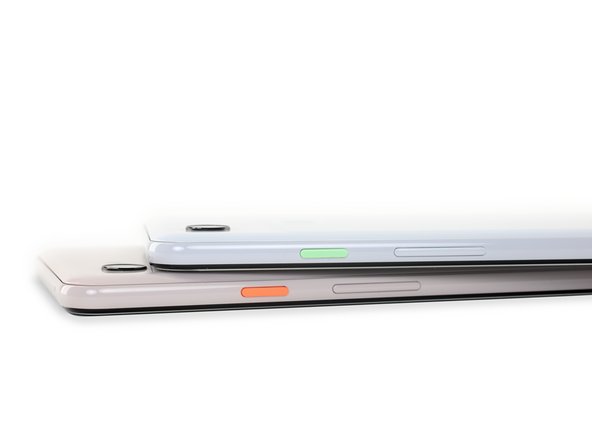
分解を始める前に、スモールサイズのPixel 3と3 XLを並べて、この美しい外観を見てみましょう。
-
まるでこれらの新しい背面カバーは前2世代モデルから取り入れたハイブリットのように見えます。ついにこのモデルで1枚のガラス(一部分はマット仕上げ)が採用されました。
-
さて正面に裏返します。両モデルのディスプレイ上部に搭載されたもう一つのカメラを確認できます。
-
そうなんですー最新スマートフォンの傾向として背面側にデュアルカメラが搭載されていますが、Googleはこのトレンドに背を向け、正面側に既存のワイドアングルカメラ (約28 mm相当)、そしてその隣にウルトラワイドカメラ(約19 mm相当)を搭載しました。
-
-
-
このモデルは前面型デュアルスピーカーで、アルミ製フレームにスピーカーグリルがありません。
-
2つのモデルを重ねてみると、XLの方が若干大きいだけで、他には大した違いはありません。
-
USB-C充電ポート、SIMカード用スロット、それに80年代をテーマにしたネオンカラーのパワーボタンが両モデルに付けられています。
-
-
-
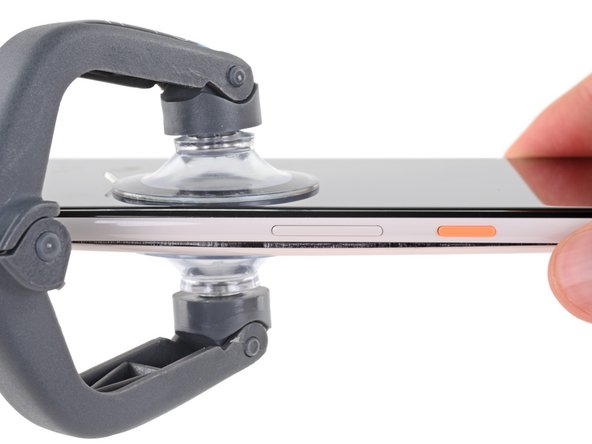
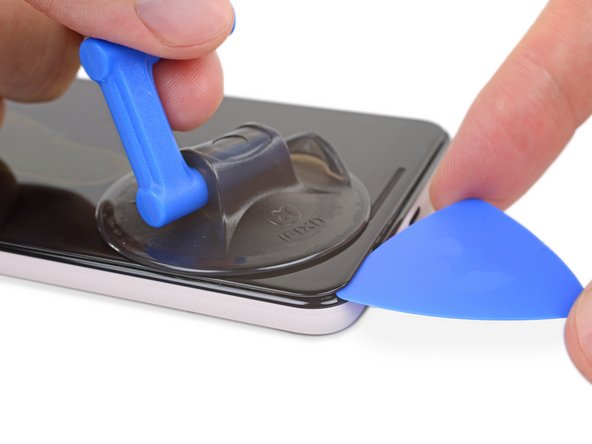
想像以上の接着剤が多量に付けられているためかなり格闘しましたが、内部侵入成功です!
-
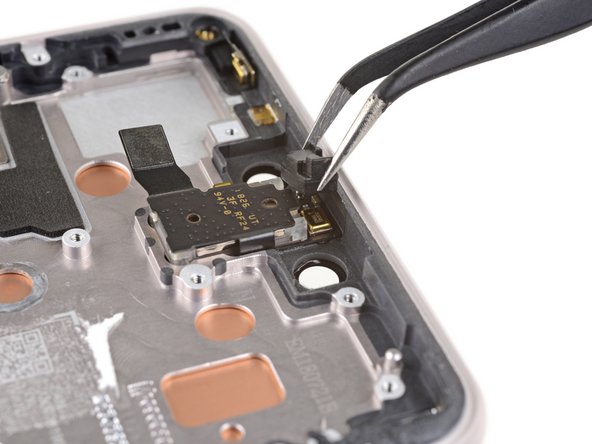
ありがたいことに、指紋認証センサのケーブルは開口用オープナーによって切断を免れるぐらいの十分な長さがあります。
-
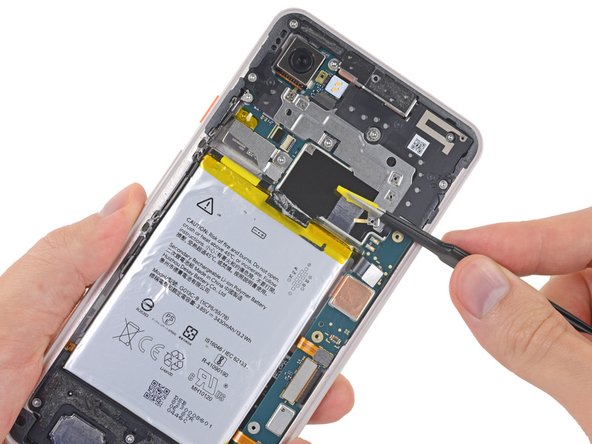
内部の様子は予想通りです。リアカバー上に新品の新ワイヤレス充電パッド、バッテリー、基板、そしてカメラが数個に指紋認証センサが取り付けられています。
-
予想外だったのは、マザーボードを覆うメタル製カバーとスピーカーアセンブリの下にSIMトレイがあることです。
-
Googleは、私たちがネジを幾つか取り外せないと仕掛けてきたのでしょうか?ところが、使われているネジはトルクスネジだと予想して、ビットを用意していました。もしもの時のため、111個のビットも準備万端です。
-
-
-
強力な接着剤の道はまだまだ続きます。バッテリーに固定されたワイヤレス充電コイルから接着剤を剥がさなけれなばりません。でも根気よく頑張りました!
-
バッテリーは比較的剥がしやすく、伸縮性ある接着剤で固定されています。そのため、やり方が正しければ少なくとも1回は簡単にバッテリーが外せます!
-
デンタル用フロスを使ってバッテリーを取り出しましたが、アクシデントで下に隠れていたリボンケーブルを切断しました!備えあれば憂いなしです。こんな時、修理マニュアルがあればよかったのですが。
-
接着剤との格闘はさておき、バッテリーを取り出せました。Pixel 3 XLの容量は13.2 Whです。これは Pixel 2 XLで搭載されていた13.6 Whバッテリーと比べると若干小さくなりました。オリジナルの Pixel XLは13.28 Whだったので、ほぼ同じサイズです。
-
それでもPixel 3 XLは12.08 WhのiPhone XS Maxよりは大きい容量でGalaxy S9+ (13.48 Wh)のサイズに一歩近づきました。
-
-
-
-
バッテリーが搭載されていた場所のすぐ上からマザーボードを覆っているアンテナが取り出せます。
-
デバイス本体下側端にもある別のシールドのようなものを取り出しますが、ここでも接着剤が付けられています。
-
ここにも罠があります!このシールドはスピーカー用ハウジングで、下に搭載されたコンポーネントにアクセスしようとして真っ二つに切断してしまいました。
-
-
-
シールドを取り出すと、ついにPixelの最新マザーボードにアクセスできます。
-
ボードを取り出すと、底面に付けられた放熱グリスが見えないところで絶大な働きをしていることに気づきます。フル稼働するチップから放出される熱をメタルフレームに移す役割です。
Step 7 shows an antenna plastic near the top of the phone and Step 8 shows the two coax that run to the bottom of the handset. Looks like part of that plastic antenna shown in Step 7 near the top is for BT/Wifi on the button side of the PCB, then there are 4 antennas on the other side of the board (two coax, two gold contacts up to that plastic antenna part). I’m wondering if there is any indicators what antennas are used for what inside the handset. Thoughts?
-
-
-
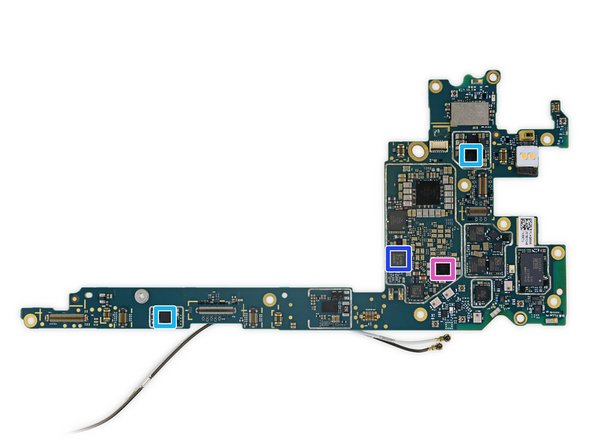
すでに接着剤との格闘によって疲弊していますが、ここで落ち着いてチップの確認をしましょう。
-
Qualcomm Snapdragon 845に積層されたMicron MT53D1024M32D4DT-046 AIT:D 4 GB LPDDR4X DRAM l
-
Skhynix H28S7Q302BMR 64 GB NANDフラッシュ (ユニバーサルフラッシュストレージ)
-
Google SR3HXPixel Visual Core (Pixel 2 XLでも搭載)
-
Qualcomm SDR845 RFトランシーバー
-
Qualcomm QPM2622とQPM2642 低&高バンドパワーアンプモジュール(PAMiD)
-
Qualcomm QET410040MHzエンベロープトラッカー
-
Qualcomm PMI8998PMIC
-
-
-
そして他にもまだあります…
-
IDT P9221 Qi ワイヤレス充電レシーバー
-
Qualcomm WCD9340Aqsticオーディオコディック
-
QualcommQDM3620, QDM3670, QDM3671Diversity Receive Modules
-
Qualcomm PM845 パワーマネージメントIC
-
村田製作所 1QB SS8601001、おそらくWiFiモジュール
-
Qualcomm QPM2635、おそらくミッドバンドパワーアンプモジュール
Can you identify which audio amplifiers they use?
Can any one tell where i get wifi ic
-
-
-
フレームに少量の接着剤で固定されている
左側の眼球ワイドアングルカメラを慎重に取り出します。 -
裏側に回ると、Googleはこのモデルでも再びAI(人工知能)によってシングルセンサでも二つの役割を果たすことができる機能を持たせました。
-
初期のレビューによると、シングルカメラでもデュアルカメラとほぼ同様の効果があります。ある情報源によると、このカメラセンサーは前回から若干アップグレードされたSony IMX363センサーで、もう一つは Pixel Visual Coreです。
-
筐体の上部中央にはKnowles製のMEMSマイクロフォンも確認できます。
What is that component that’s left in the middle? Looks like there’s a flex on it, too, so wouldn’t that also need to be removed?
-
-
-
副基板はすんなりと外れます。一緒にUSB-C ポート、SIMトレイと幾つかのアンテナハードウェアが付いてきます。
-
振動モーターはケースから出たくないようですが、iFixit特製ハルベルトスパッジャーを使えば取り出せます。
-
ひずみゲージは前回モデルよりももっと歪曲するように見えます。(デバイスの横を握ると起動する”Active Edge"用)
-
-
-
サイエンスという名の下で、どこのメーカーが製造したのか知るためにディスプレイを解体します。この防衛力は強大ですが、ヒートと忍耐力そして、意思あるところに道は開けるという気持ちがあれば成功します。
-
さてここでドラムロール音楽を…メーカーはSamsungです! 噂は至るところで流れていましたが、どうやらGoogleはSamsungのAMOLEDパネルを採用したようです。
-
Samsungのパネルは昨年のパネルと比べると少しでも品質向上しているはずですが、残念なことは、Samsungの修理プロセスに倣わなければなりません。
-
最後に、といってもまだありますが、ディスプレイのチップがディスプレイケーブル上に搭載されています。
-
Samsung S6SY761X タッチコントローラー (S9+と同じ)
-
GigaDevice GD25LQ80 8 Mbシリアルフラッシュメモリ
-
-
-
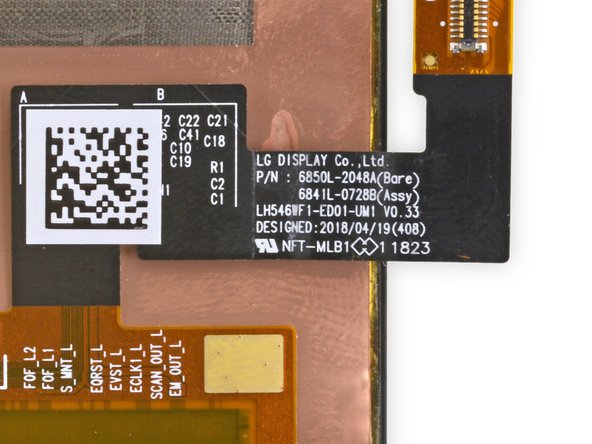
分解アップデート:リクエストに応えて、小さいモデルのPixel 3のディスプレイも同様に分解してみました。製造メーカーはどこでしょうか?こちらはLG製ディスプレイでした!
-
噂によるとLGはOLEDモバイルテクノロジーを向上させようと努力しているようです。ーこの新ディスプレイの命運はどうなるのか興味深いところです。
That mesh speaker cover looks like a major weak point. Not a lot of extra material or glue holding it in place.
-
-
-
この
GalaxyPixelに詰め込まれていた素晴らしい全パーツを並べてみました! -
もっと分解スイーツが食べたいですか?ビデオチームがPixel 3の分解ビデオを製作しました!
-
Pixel はアンテナアセンブリ、強固な接着剤、交換作業が難しいディスプレイなどトラブルメーカーのGalaxyラインと大変よく似ており、あたかも連れ添っているようです。ーしかも実際にディスプレイ自体はSamsungが製造しています!
-
ひび割れたスクリーンを交換するにはデバイスのアセンブリ全体を交換する必要があります。その上、リアケースについても考えなければなりません。Pixel 2 XLのリアガラスはデバイス全体の20%を占めていましたが、Pixel 3 XLのリアパネルはひび割れを免れないガラスで100%覆われています。これは修理難易度を評価する際にマイナスポイントとなってしまいます…
-
- 唯一使用されている標準型ネジはT3トルクスファスナーネジです。
- 修理しやすい伸縮性のある接着剤がバッテリーを固定しています。
- Oリングと防水用接着剤の使用によって修理作業が複雑になります。同時に、液体ダメージが発生する可能性が低くなります。
- ディスプレイ修理は前モデルよりも難易度が増しました。デバイス全体の解体が必要です。
- コンポーネントを交換するには、ガラス製リアパネルに付けられた接着剤を剥がさなければなりません。(そして修理後、接着剤を付ける作業が待っています)
- 正面と背面をガラスで覆われているということは、落下した際にダメージが入る可能性が高くなることを意味します。


まとめ
リペアビリティのスコア


(10点が最も修理しやすい指標です)
以下の翻訳者の皆さんにお礼を申し上げます:
100%

Midori Doiさんは世界中で修理する私たちを助けてくれています! あなたも貢献してみませんか?
翻訳を始める ›
43 件のコメント
It’s been rumored that the front stereo speakers are louder and more crisp than the 2XL. Is there a visual size difference in the speakers themselves?
The new speaker housing looks a little bigger and might be sealed better than the old one. I’m no speaker expert though, so I’m not sure how much of a difference the new design makes, or if the driver is just better.
To be clear, are BOTH the Pixel 3 and 3XL using Samsung screens? Please say yes.
I came to ask the same question, so I'm subscribing to hear the answer!
Surprise: it’s a LG panel! We’ve added step 14 to reflect this. Thank you for all your patience!
FingerprintCard FPC 1075 fingerprintsensor in a Crucialtec modul…No chance to get a Goodix sensor in a Pixel mobil.
is there a notification led?
Unfortunately, no.
Parker, are you with ifixit? I was hoping to hear from the horses mouth so to speak, since there have been conflicting reports. Some reported around the 10th that people from google said there was, then as of the 14th everyone has been saying no. this is our best chance of getting a reliable answer.
There's no LED. Been using it for a few days now, no sign at all of any LED indicators. I'd really suggest using the always on display for notifications.
Are both front facing speakers the same size on the Pixel 3 XL?
It definitely doesn't feel like it based on normal usage. The bottom one is more bass heavy/responsive and louder, while the top one is quieter and sounds different. Definitely not the same speaker.
NFC comments are completely wrong
-step 6: this is not a NFC antenna, but wireless charging
-step 5: you can see NFC antenna on upper part with two pins connection to motherboard, around “swiss cross”
-step 10: NFC IC NXP PN81B03, between yellow and red IC
Tom,
You are totally right! We definitely bungled that. Thank you for catching the mistake!
Can you tell which audio amplifiers are used?
There is no mention of eSIM MCU as in Pixel 2 or in iPhone Xs whereas the tech spec mentions eSIM support?
Yup, there's esim support because Google wants to support their own Project Fi service.
Got my xl last Friday was working good, I wasn’t having the problems others are. So last night I decided to charge it using a wireless charger that I used on my Samsung S9+ , It showed charging and was working fine wake up and my pixel is now dead! WTF plugged it into charger that comes with it nothing, try reset process nothing. Anyone else with this problem?
I can’t answer to your troubles with it not coming on, but while the Samsung chargers show it’s charging, they do not in fact actually charge the device to my disappointment, and probably many others that are switching from Samsung. Best guess is that the Qi chips are requiring something specific found in the Google Pixel Stand and without it, it doesn’t charge correctly. I tried my Samsung Wireless Charger with the same indication of charging that you got but the device was still losing power so I just set up the Pixel stand for charging. I would recommend, if you haven’t yet, just leave it plugged in for an hour and see if you can get it to turn on, if not, take it back to the store you got it from and replace it.
Does the pixel have video out via USB c?
Yup! You'll need a compatible adapter though.
is the pin hole on the top of the phone a mic? and could I have done damage if they put the sim card tray pin into that hole or is the mic off set from the hole?
The pinhole on top is a mic. I actually did the same thing and stuck the SIM tool inside!! Embarrassing to admit… The microphone seems to still function, however when I look into the hole it looks like I tore the foam dust shield.
Would be great to know how much damage we did, anyone have info on this? It's hard to see what the microphone design is from the teardown.
I did exactly the same looking for a clue on here as to what I have damaged. All seems to be working fine, but there was a definite pop sound as the tool went in
Thanks! I've been curious what's going on inside my phone
My top speaker grill is dented. Based on the teardown, does a dented speaker grill affect the IP rating?
It depends on if the seal around the speaker grille is torn. As a reality precaution, the older the phone gets, the less it’s likely to retain its IP rating.
Dear all, would it be possible to have a higher resolution picture on the Murata chipset (Murata 1QB SS8601001)? Is this the part number or the serial number? I have been trying to look up the specs but I could not find them in the Murata web site. If there are someone that could help me find a brochure or web page with the specs it would be very much appreciated. Best
Wallpaper for 3 XL?
The earpiece speaker is affixed in place with adhesive, but is removable.
Any chance you all would be able to identify the fpc connector on the motherboard for the fingerprint sensor?
Hi Benjamin,
This is the FPC connector for the fingerprint sensor. It’s actually a ZIF socket. Also, Pixel 3 XL guides are in progress and will be available within the next few weeks!
how you dismantle the display of pix 3xl? it has aa thick adhesive on the back?
Hi Kevin,
We have a guide for the display—you can find it here.