はじめに
Google is looking to bring the robot assistants of the future to the world today. Equipped with Google Assistant, the Google Home is raring to work with smart home devices, support Google services, and answer your everyday questions. Does it have what it takes to fulfill your futuristic fantasies and smart home dreams? Time to tear down the house Home!
We don't want you to miss a thing as the future becomes the present. Follow us on Instagram, Facebook, or Twitter to stay caught up.
必要な工具と部品
-
-
Ok, Google. Let's look at your Home's specifications:
-
High excursion speaker with 2” driver + dual 2” passive radiators
-
Far-field microphones
-
Customizable base
-
802.11ac (2.4GHz/5Ghz) Wi-Fi
-
"Touch surface" controls
-
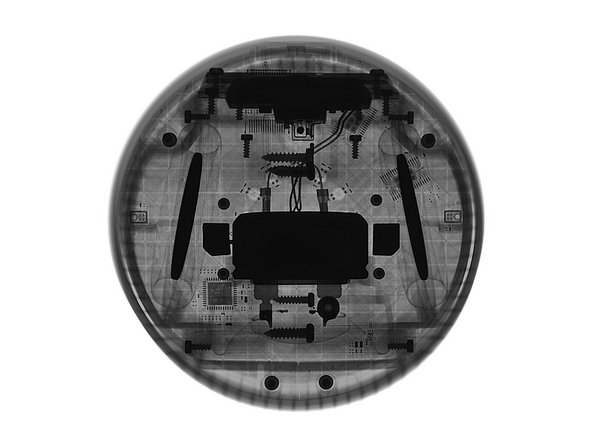
Armed with some X-ray reconnaissance from Creative Electron, we stand ready to begin this Home invasion.
-
-
-
No neat smell from this
air freshenerunit (so far), but we do find a "standby" button for Home's microphones, along with a status LED. -
The foot features the A/C power port, model number, and various certifications.
-
With a diameter of 3.79 inches and a height of 5.62 inches, this rounder, gentler, speaker comes in just over half the height of the Amazon Echo.
Your dimensions are totally wrong. The GH is about 3.5" in diameter, and 5.5" tall.
We revisited this step after seeing your comment and noticed that we worded this step poorly. Thank you for the heads up! We have since gone in and edited. For those that are curious, here are the specs from Google.
I'm not sure "charging port" is appropriate here since there is no battery inside to charge.
Good catch! We updated the wording there to make it more accurate. Thanks :)
-
-
-
Removing the base gives us our first look at that high-excursion speaker and a hidden micro-USB debug/programming port.
-
To pull out the four Torx screws hiding deep in the speaker recess, we pull out our set of fixed-blade screwdrivers for a little extra reach.
-
Once they're out, we pop the top. The lid separates with ease, and finally the capsule is open.
-
-
-
Here we see the Home's tiny telegraph machine. Just kidding. Its an arm that goes between the mute button and its switch on the board, to give it just the right amount of springy resistance.
-
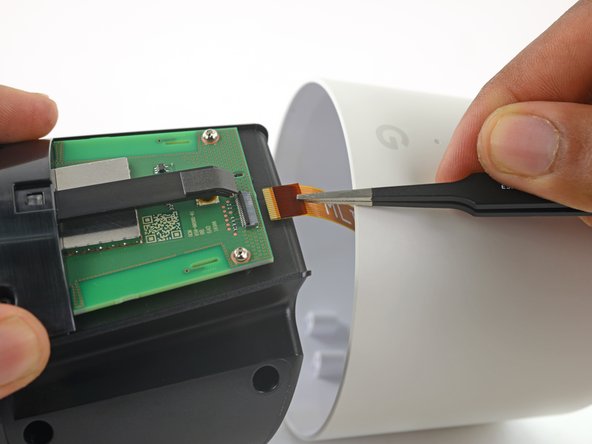
After sending out a few test signals, we move on to disconnect a pesky interconnect cable.
-
This cable runs from motherboard up to a board tucked in the top of the lid, probably home to a fancy microphone and LED array.
Would it be possible to get one of those cables/ribbon connector to make a sort of remote control ?
-
-
-
-
We turn up the heat on this teardown and bust out some enhanced interrogation tools—an iOpener and dental pick to be exact.
-
There is some seriously serious adhesive holding this board to the upper case.
-
With a final yank (and a healthy dose of isopropyl alcohol to dissolve the oodles of glue), the LED board comes free to reveal the source of our struggle: a ton of adhesive tape.
-
-
-
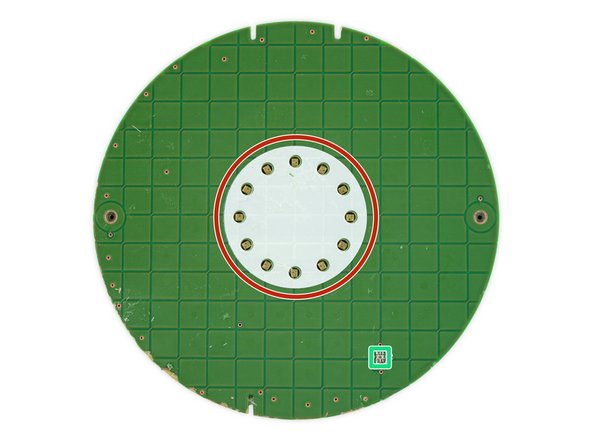
Here's the source of our board removal strife: A layer of super sticky adhesive, keeping the capacitive board in contact with the plastic upper case.
-
This side of the board also hosts an array of 12 status LEDs.
-
On the backside we find some chips:
-
Atmel ATSAMD21 32-bit ARM Cortex-M0+ microcontroller
-
Two NXP PCA9956BTW LED drivers
-
Two InvenSense INMP621 MEMS microphones—will only two be enough compared to the Echo's seven?
-
Ambient Light Sensor
It says QCM650-00987-010A6AD02571. It appears to be the number of the board silk screened at approximatly 2:00 on the board photo.
Jeff Hager - 返信
Any idea what IC U2 on the top is?
Also, MP1? “MP” usually designates a mechanical part but it’s tough to tell from the pictures what that is for?
Kevin Fisk - 返信
My microphone went bad on my Google home, is it possible to replace those?
Here is a suggestion. This is what I did, I disconnected the google home from power and hard tap few times on the top after turning it on the mic started to work.
zeusmos -
IC U2 on top is an ALS (Ambient Light Sensor) for control the bridness of the LEDs.
Any idea which brand/type of LED are these?
-
-
-
The stretchy o-ring seems to be the key to delving even deeper inside this smart speaker.
-
This seems a more repair-friendly solution than the layer of stuck-down fabric we sliced off the Echo.
-
We pry open the casing and reveal exciting green fields of magic and mystery:
-
The motherboard!
-
-
-
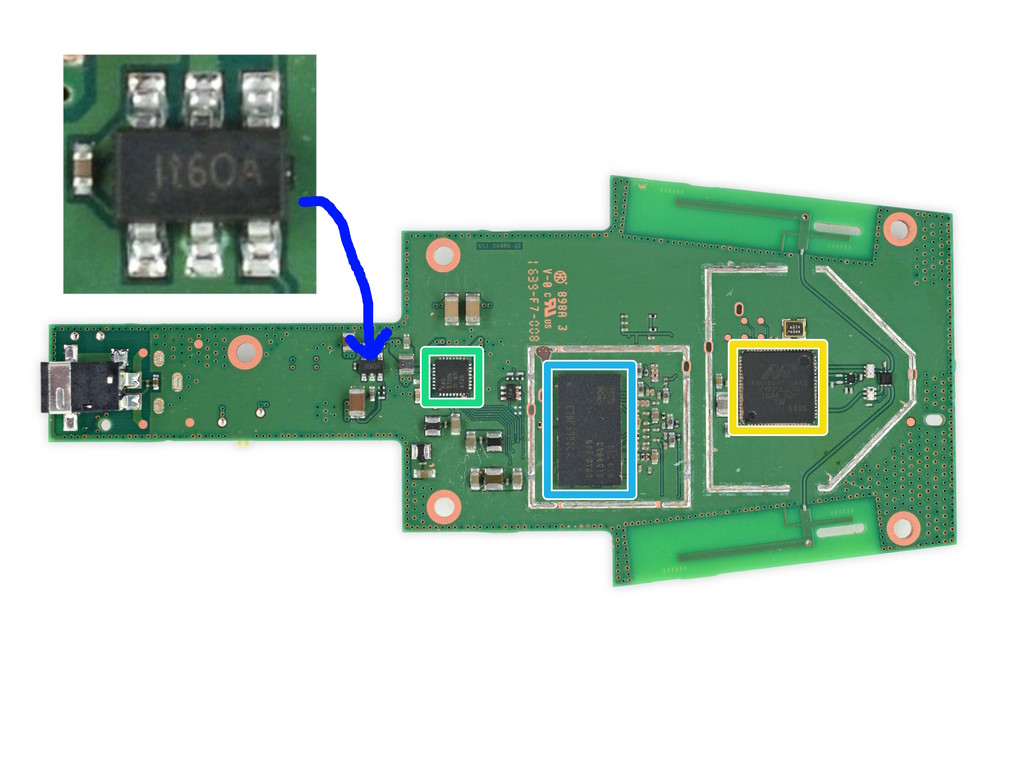
We're having déjà vu with these chips, as most of them (CPU, flash, and RAM) made an appearance in last year's Chromecast:
-
Marvell 88DE3006 Armada 1500 Mini Plus dual-core ARM Cortex-A7 media processor
-
Toshiba TC58NVG1S3HBA16 256 MB NAND flash
-
Marvell Avastar 88W8887 WLAN/BT/NFC SoC
-
Texas Instruments TAS5720 audio amplifier
-
Samsung K4B4G1646E-BYK0 512 MB B-Die DDR3 SDRAM
-
Marvell power management
-
Texas Instruments TS3USB31 480 Mbps USB 2.0 switch
Help….my daughter gave me her Amazon home which she bought in Oz. Like a fool i thought you could plug it in, in the uk (same voltage etc). Now its blown the chip that has the green surround in the picture in step 8. Anyone know where I can get a replacement motherboard or how to fix.
Thank, in anticipation…………………Paul
Sorry that this reply is literally two years late, but you can’t fix a single chip on a board like this without some talented microsoldering. I’d just get a new device.
The very first thing I noticed when seeing the X-ray image was the "home" shaped shielding over the wireless SoC. I was surprised that it wasn't mentioned here despite the iFixit silly-billy commentary 😞
-
-
-
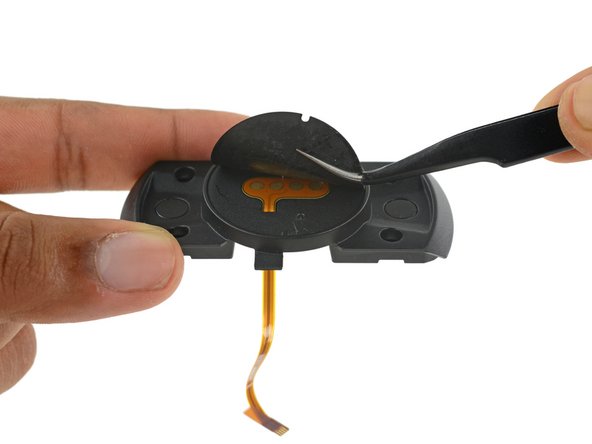
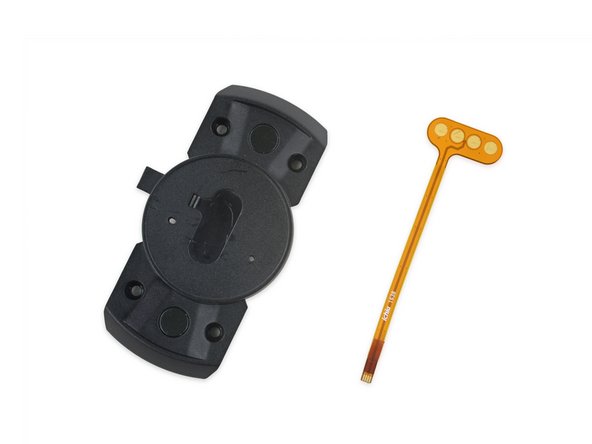
The footy bit that holds the magnets for the bottom case also has a mystery cable locked inside it.
-
Closer inspection reveals: yet more mystery!The cable sports four contact points. Perhaps more testing points?
-
Recognizes the color of the base, so the Home can coordinate its outfits better.
-
Vestigial charging mechanism. (Maybe the Home's architects intended it be a portable device?)
-
Abandoned easter egg dungeon level for teardown engineers.
Maybe a serial port connector to fix the firmware, when it has a soft-brick, or something like that...
It has a Micro-USB port for debuging
I would guess a serial or USB port that the hardware manufacturer uses for initial programming; probably special base stations in the factory they plonk these things down on before applying that sticker to the bottom or the colored base. Though it's a bit perplexing since the USB port is accessible with the colored base removed.
Two of the contacts are connected to each other (outer two) through conductive material below the film and share thicker planes/copper to the ribbon connector that goes to the motherboard. I highly suspect that the outer two are electrical ground connectors, designed to provide some degree of shielding for the two lines in the center, which are likely differentially paired signals. This would suggest the connector is half duplex serial (as USB has a 5V, D+, D-, and GND connector).
I'm almost tempted to break out an ohmmeter and try and figure out where those signals go on the board.
Maybe there's a possibility of future connectivity with peripherals of some sort for expansion via Special USB docks
Paul Ebrey - 返信
UART board for firmware loading and debugging
Did you check the additional contacts to see if they might be the other audio channel? (assuming it uses left for mono sound, this would be the right channel)
Jeff Young - 返信
These contacts are exposed on a retail demo model I saw once. The base platform contains four pins that contact these. Maybe for firmware?
-
-
-
We pull the speaker casing apart into its two halves....
-
....pluck out the driver...
-
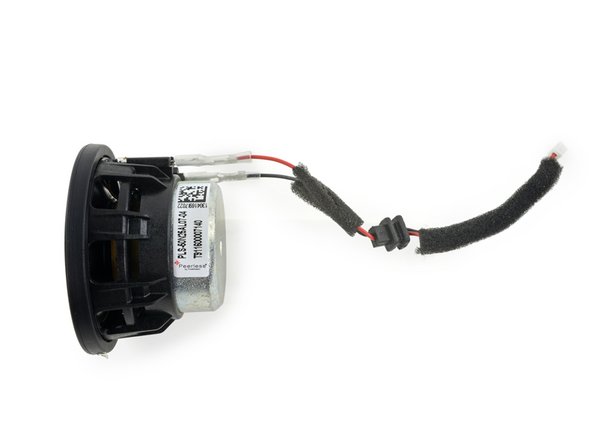
and there she be!
-
Looks like the Home is powered by a Peerless PLS-50N25AL07-04, likely very similar to the PLS-50N25AL01-08.
-
But, from our multimetering, and reading of that final "-04", it looks to be a 4 ohm version.
-
- Minimal moving parts means there are minimal points of failure.
- Only standard screws and connectors are used throughout the device.
- Many components are modular and can be replaced individually.
- The DC-in port is soldered to the motherboard, but is unlikely to experience much wear, considering the device stays plugged in.
- The touch board is strongly adhered to the upper case.


まとめ
リペアビリティのスコア


(10点が最も修理しやすい指標です)

62 件のコメント
Does it have GPS?
No, that's why it asks you to input your address during the setup process.
izzy -
Why would a stationary, internet-connected device have a GPS receiver?!
Amazon advertises that in the Echo, the mute button uses analog electronics to disconnect the microphone so that it's impossible for a software hack to ignore the mute button. Can you tell if this is the case with Google Home?
Great question! I'd also be interested to know this.
Im also interested in this question
+1 to the question
Can you point to where this is advertised? I'm very curious how this works as the button does not feel like it's toggling anything.
I don't think bluetooth is necessary because I can cast to Google Home from the Home app.
It's much better than Bluetooth .
Ditto! - Let the imbecile... ummm umbilical cord be cut.
The connection in the foot is maybe for an optional battery pack like the Heos? So you can carry it outside or around the house?
That may be the case and I can say people would like the option. I can also say from experience it is most likely that it's for powering the unit during final testing. Now that said, it is a secondary power source. So I would expect DIY'rs and Makers to utilize this feature before Google does.
No line out? Like the first gen Echo.
This was the one thing that really surprised me.
But unlike the Echo, the Home can send (well, control) audio to a Chromecast Audio (or two, or three, in sync!), which is far more versatile than having an audio output on the device itself. I've been using various Echoes (including a couple of output-jack-equipped Dots) since their first release, but the Chromecast connection is the primary reason why I purchased a Google Home.
Use Chromecast Audio. No line out needed.
What does the Micro USB port do?
No doubt something that will make all of us hacker types very happy, once we figure it out.
Probably for Android ADB.
eric -
It has Bluetooth but it seems there is no way to pair it as Bluetooth speaker. Very inconvenient when I want to watch videos the tablet but have louder speaker. With Echo it is easy just annoying 1sec latency, hoped Google would be better but no such functionality exposed.
Bluetooth pairing could always come in a future update and be managed in the Google Home app.
It seems to work as a BT speaker at the time of this posting. I have done this on both the Home and the Mini.
Ps. LG is coming out with wireless speakers and sound bars with Chromecast Audio built in.
Ok really cool teardown. Now put it back together. =)
dmart91300 - 返信
It's fully reassembled and working great for teardown room tunes :)
Is it possible to estimate the manufacturing cost from this? I
Cut the msrp by 60% to 70%, or more in some cases. This is so for every unit sold they can produce another one, pay for manufacturing (including transit) and make a profit. Thats my loose guess for google.
Thank you for this! Discovered too late. So ... what is the final word on 802.15.4. Is there a chip in there? I speculated about Thread in Google Home here, with a nod to this teardown: http://www.cepro.com/article/ces_2017_vo.... Thanks again!
Would it be possible to hack an audio-out into the home? It's a bit annoying to have this sitting next to my stereo and having to use a Chromecast Audio at the same time.
Toby White - 返信
Good question. People have Now added an audio jack to the mini, but unfortunately the mini is mono. Presumably if an audio jack could be added to the home, it would be stereo? I’d love to do this too!
Rick -
is there an optional power supply available, so the unit can be carried to another room without unplugging the power supply?
My question, too. What adapter would I need to accomplish this? There's a replacement power adapter available on eBay from a seller in China, but they want $30. There's got to be a way more reasonable means of accomplishing this.
The the mystery cable mist hold the chip for the wifi when in setup mode the google home connect your phone to its wifi.
I need a new power cord for mine and cannot find one any ideas?
did you ever come to a conclusion on this one?
There is an eBay seller from China offering a replacement adapter for $29.99. Search item no. 322441245141. That seems high for what it is. Specifically what would the layman look for in an alternative, cheaper solution, like maybe in a universal adapter set?
It' a 16.5v/2A DC power supply. I can't see there being anything special about it.
I find the Google home speaker to have excellent bass but higher frequencies sound muffled. The Echo on the other hand has much crisper and clearer highs. Could this be to do with the fact that the Google just has one speaker without a tweeter where is the Echo seems to have one of each? Or am I misunderstanding something.
Russ Smith - 返信
What ADC and DAC's are they using? TI?
The INMP621 microphone has an embedded ADC. Check the specification.
Great work! Maybe you can add a final bill of materials to your tear down format. Thanks!
Can you disable or disconnect the wireless module if there is a module. I saw someone manage to Ethernet wire it using a google chromecast Ethernet adapter.
So, that additional audio channel. Did you check it to see if it might be a right audio out. This might be a real game changer when it comes to modding.
Jeff Young - 返信
FYI, the Marvell IC part number you referenced is incorrect the package says “88W8887”
I did some digging and the google home mini has the 88W8897. I am curious if the latest hardware for google home still uses the 88W8887 IC
Actually the google home mini uses the 88W8887 too.
Good eye! I believe you’re correct, and that step has now been updated.
What's all that empty space in the plastic cavity above the speakers? Looks unnecessary, and explains why the mini is so much smaller. They could've eliminated it and made the Home a couple inches shorter (?)
Help….my daughter gave me her Amazon home which she bought in Oz. Like a fool i thought you could plug it in, in the uk (same voltage etc). Now its blown the chip that has the green surround in the picture in step 8. Anyone know where I can get a replacement motherboard or how to fix.
Thank, in anticipation…………………Paul
so, anyone managed to find what those pads under the UL sticker on the bottom is used/ can be used for?
Watching this steps I tried to open the Google home. I am unable to unscrew 2 out of the 6 t8 screw which makes it into two part. I feel either this screw are security torx screws or the groove are damaged. Basically I want to change the sound driver because by mistake I pressed the speaker dome and need to change or fix it. Any idea how to fix it.
Could someone tell me what this component is on the main board? Mine has burnt out and I need to replace it: https://www.spinningplanet.co.nz//images...
Hi, I am hoping someone here can help out. My Google Home Smart Speaker stopped working and I cannot reset it. The LED above the G sign goes yellow, then white and that’s all I get. None of the LEDs on top come on; there is no sound; and I have tried the method of resetting it by powering it ten successive times (although I did not see any of the LEDs on top ever come on).
I used to love listening to radio and music with this while in the kitchen. Anyone knows how to reset it back another way? Is there a hard reset button on the board itself?
thanks in advance.
hello, can i ask what component is this? and what value? thanks. https://usaupload.com/5rew/Screen_Shot_2...
Mine lost configuration when power goes off, is there a CMOS battery in it??
What cord does it take to charge
The shield on the back of the motherboard looks like a little house in this picture... intentional "home" easter egg?
kevlargibs - 返信
This article is excellent. I’m a grade 7 student, and I’m writing a tech article at school about the design of Google Home smart speakers. I’m wondering if I can use your photos in my project. I’ll quote the source, of course. Thanks in advance. Evelyn
Evelyn Zhu - 返信