メインコンテンツにスキップ

必要な工具と部品

この分解は修理ガイドでは ありません。 お持ちのDell Latitude E6400を修理する際は、iFixitの修理ガイドをご利用ください。

  1. Dell Latitude E6400 Teardown, Battery: 手順 1、 3の画像 1 Dell Latitude E6400 Teardown, Battery: 手順 1、 3の画像 2 Dell Latitude E6400 Teardown, Battery: 手順 1、 3の画像 3
    • Disconnect AC power adapter.

    • Push battery release tabs inwards, and slide the battery out of the computer.

  2. Dell Latitude E6400 Teardown, Hard Drive: 手順 2、 3の画像 1 Dell Latitude E6400 Teardown, Hard Drive: 手順 2、 3の画像 2 Dell Latitude E6400 Teardown, Hard Drive: 手順 2、 3の画像 3
    • Remove the two 2.8mm Phillips screws securing the hard drive.

    • Pull the hard drive out of the laptop.

  3. Dell Latitude E6400 Teardown, Optical Drive: 手順 3、 3の画像 1 Dell Latitude E6400 Teardown, Optical Drive: 手順 3、 3の画像 2 Dell Latitude E6400 Teardown, Optical Drive: 手順 3、 3の画像 3
    • Remove the 2.8mm Phillips screw securing the optical drive removal button.

    • Press the removal button on the side of optical drive.

    • Pull the Optical Drive out of the laptop.

  4. Dell Latitude E6400 Teardown, Bottom Case: 手順 4、 2の画像 1 Dell Latitude E6400 Teardown, Bottom Case: 手順 4、 2の画像 2
    • Remove the one 7.5 mm Phillips screw securing the bottom case.

    • Pull the bottom lid towards yourself to remove it.

  5. Dell Latitude E6400 Teardown, Display Assembly: 手順 5、 3の画像 1 Dell Latitude E6400 Teardown, Display Assembly: 手順 5、 3の画像 2 Dell Latitude E6400 Teardown, Display Assembly: 手順 5、 3の画像 3
    • Remove the two 4.8mm Phillips screws securing the plastic lids.

    • Slide the plastic lids of the case.

  6. Dell Latitude E6400 Teardown: 手順 6、 2の画像 1 Dell Latitude E6400 Teardown: 手順 6、 2の画像 2
    • Grab the plastic pull tab secured to the display data cable lock and pull the display data cable connector straight up from its socket.

    • De-route the display data cable from the channel.

  7. Dell Latitude E6400 Teardown: 手順 7、 2の画像 1 Dell Latitude E6400 Teardown: 手順 7、 2の画像 2
    • Using spudger lift and disconnect Wi-Fi antenna cable.

    • De-route the Wi-Fi antenna cable from the channel.

  8. Dell Latitude E6400 Teardown: 手順 8、 3の画像 1 Dell Latitude E6400 Teardown: 手順 8、 3の画像 2 Dell Latitude E6400 Teardown: 手順 8、 3の画像 3
    • Open your laptop so the display is perpendicular to the upper case.

    • Place your opened laptop on a table as pictured.

    • While holding the display and upper case together with your left hand, remove the two 4.8 mm Phillips screws from the display brackets.

    • Grab the upper case with your right hand and rotate the display slightly away from the upper case. Lift the display away from the upper case, minding any brackets or cables that may get caught.

  9. Dell Latitude E6400 Teardown: 手順 9、 3の画像 1 Dell Latitude E6400 Teardown: 手順 9、 3の画像 2 Dell Latitude E6400 Teardown: 手順 9、 3の画像 3
    • Remove the two 4.8mm Phillips screws securing the fan.

    • Disconnect the fan by pulling power cable straight up.

    • Lift the fan with your finger and slide it out towards the inside of the laptop.

  10. Dell Latitude E6400 Teardown, Heat Sink: 手順 10、 2の画像 1 Dell Latitude E6400 Teardown, Heat Sink: 手順 10、 2の画像 2
    • If you don't won't to remove heat sink you can skip to next step.

    • Remove the four Phillips screws securing the heat sink.

    • Using your finger gently lift and remove heat sink .

  11. Dell Latitude E6400 Teardown, Upper Case: 手順 11、 1の画像 1
    • If you skipped here without removing radiator you will need very narrow screwdriver in order to access screws underneath the fan bracket.

    • Remove the seven 4.8 mm Phillips screws securing the upper case.

    • Remove the two 4.8 mm Phillips screws securing the upper case.

  12. Dell Latitude E6400 Teardown: 手順 12、 2の画像 1 Dell Latitude E6400 Teardown: 手順 12、 2の画像 2
    • With your finger tip or spudger press three clips

    • Gently lift and remove panel

  13. Dell Latitude E6400 Teardown, Keyboard: 手順 13、 3の画像 1 Dell Latitude E6400 Teardown, Keyboard: 手順 13、 3の画像 2 Dell Latitude E6400 Teardown, Keyboard: 手順 13、 3の画像 3
    • Remove the two Phillips screws holding the keyboard

    • Holding the plastic film gently lift the keyboard upwards to realise the side clips.

    • Pull the keyboard towards the screen to slide it out from the sockets.

  14. Dell Latitude E6400 Teardown: 手順 14、 1の画像 1
    • Remove the four 4.8 mm Phillips screws securing the upper case.

  15. Dell Latitude E6400 Teardown: 手順 15、 2の画像 1 Dell Latitude E6400 Teardown: 手順 15、 2の画像 2
    • Use the tip of a spudger to slide out the locking lever to release the Wi-Fi switch ribbon cable from its socket.

    • Pull the Wi-Fi switch ribbon cable straight away from the logic board.

    • Disconnect the speakers cable by pulling the male end straight away from its socket.

  16. Dell Latitude E6400 Teardown: 手順 16、 3の画像 1 Dell Latitude E6400 Teardown: 手順 16、 3の画像 2 Dell Latitude E6400 Teardown: 手順 16、 3の画像 3
    • Disconnect the keyboard and touchpad cable by holding plastic film and pulling the male end straight away from its socket.

    • Use the tip of a spudger to flip up the locking lever to release the contactless smart-card reader ribbon cable from its socket.

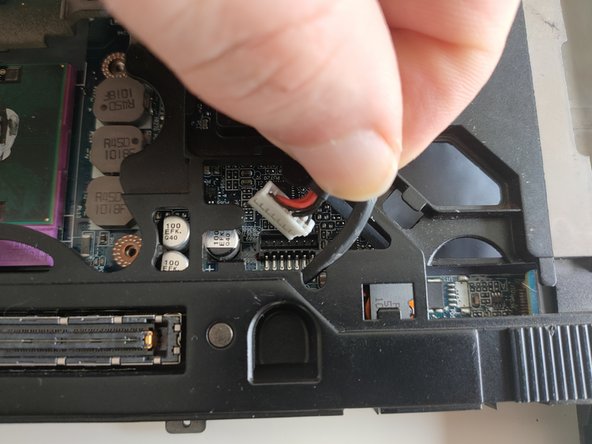
    • Pull the contactless smart-card reader ribbon cable straight away from the logic board.

  17. Dell Latitude E6400 Teardown: 手順 17、 1の画像 1
    • Gently lift the top case with your fingers and slide it away.

  18. Dell Latitude E6400 Teardown: 手順 18、 2の画像 1 Dell Latitude E6400 Teardown: 手順 18、 2の画像 2
    • Remove the two 2.8mm Phillips screws securing the PC Card slot.

    • Gently lift the PC Card slot and slide out of the socket .

  19. Dell Latitude E6400 Teardown, Logic Board: 手順 19、 2の画像 1 Dell Latitude E6400 Teardown, Logic Board: 手順 19、 2の画像 2
    • Use the tip of a spudger to flip up the locking lever to release the smart-card reader ribbon cable from its socket.

    • Pull the smart-card reade ribbon cable straight out of its socket.

  20. Dell Latitude E6400 Teardown: 手順 20、 3の画像 1 Dell Latitude E6400 Teardown: 手順 20、 3の画像 2 Dell Latitude E6400 Teardown: 手順 20、 3の画像 3
    • Disconnect the IEEE 1394a connector cable by pulling the male end straight away from its socket.

    • De-route the IEEE 1394a connector cable from the channel.

  21. Dell Latitude E6400 Teardown: 手順 21、 3の画像 1 Dell Latitude E6400 Teardown: 手順 21、 3の画像 2 Dell Latitude E6400 Teardown: 手順 21、 3の画像 3
    • Turn the laptop upside down.

    • Disconnect the AC adapter by pulling power cable straight up.

  22. Dell Latitude E6400 Teardown: 手順 22、 3の画像 1 Dell Latitude E6400 Teardown: 手順 22、 3の画像 2 Dell Latitude E6400 Teardown: 手順 22、 3の画像 3
    • Remove the four 4.8mm Phillips screws securing the logic board.

    • Gently lift the logic board out of the bottom bottom case.

  23. Dell Latitude E6400 Teardown: 手順 23、 1の画像 1
    • Remove the 4.8mm Phillips screw securing the I/O board.

    • Lift the I/O board out of the bottom case.

  24. Dell Latitude E6400 Teardown: 手順 24、 2の画像 1 Dell Latitude E6400 Teardown: 手順 24、 2の画像 2
    • Slide the smart card reader out of its socket.

作成者

2人の作成者と共同で作成されました。

D. K. Labudek

メンバー登録日: 03/09/18

685 ポイント

4のガイドは作成済み

0 件のコメント

コメントを追加

統計データ:

過去 24時間: 0

過去 7 日: 2

過去 30 日: 7

今までの合計 1,134