メインコンテンツにスキップ

removing the Dell Inspiron 1150 Speakers

必要な工具と部品

  1. removing the Dell Inspiron 1150 Speakers, Removing Dell Inspiron 1150 Battery: 手順 1、 3の画像 1 removing the Dell Inspiron 1150 Speakers, Removing Dell Inspiron 1150 Battery: 手順 1、 3の画像 2 removing the Dell Inspiron 1150 Speakers, Removing Dell Inspiron 1150 Battery: 手順 1、 3の画像 3
    • Place the laptop upside down on a clean, flat surface.

    • Locate the battery release button with the padlock symbol above it.

    • Slide the battery release button towards the padlock symbol and hold it there. Note that the button is spring loaded and will return if released.

    • The battery is now released from the battery compartment.

    • Gently remove the battery from the side of the laptop.

  2. removing the Dell Inspiron 1150 Speakers, Hard Drive: 手順 2、 2の画像 1 removing the Dell Inspiron 1150 Speakers, Hard Drive: 手順 2、 2の画像 2
    • Place laptop upside down on a clean flat surface.

    • Remove 2ea M2.5 x 5 mm screws.

    • Pull the HDD from main body of the laptop.

  3. removing the Dell Inspiron 1150 Speakers, Optical Drive (Based on Dell Service Manual): 手順 3、 3の画像 1 removing the Dell Inspiron 1150 Speakers, Optical Drive (Based on Dell Service Manual): 手順 3、 3の画像 2 removing the Dell Inspiron 1150 Speakers, Optical Drive (Based on Dell Service Manual): 手順 3、 3の画像 3
    • Place laptop upsid down on a clean flat work surface.

    • Remove the Philips M2.5 x 8 mm screw

    • Loosen the screw that holds the memory compartment closed

    • remove the memory module compartment cover

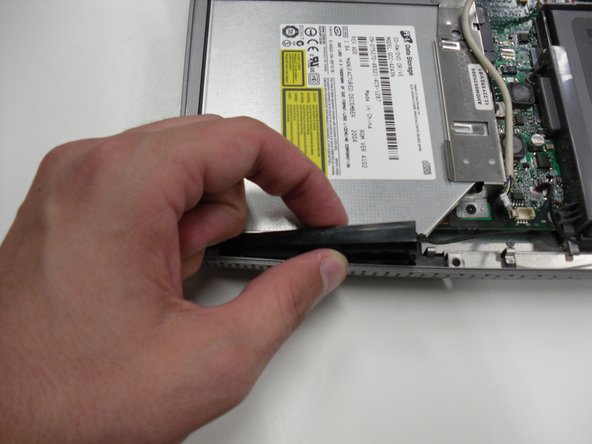
    • Press the Optical Drive release lever to the right and the optical drive should slide out of the case

  4. removing the Dell Inspiron 1150 Speakers, Keyboard: 手順 4、 3の画像 1 removing the Dell Inspiron 1150 Speakers, Keyboard: 手順 4、 3の画像 2 removing the Dell Inspiron 1150 Speakers, Keyboard: 手順 4、 3の画像 3
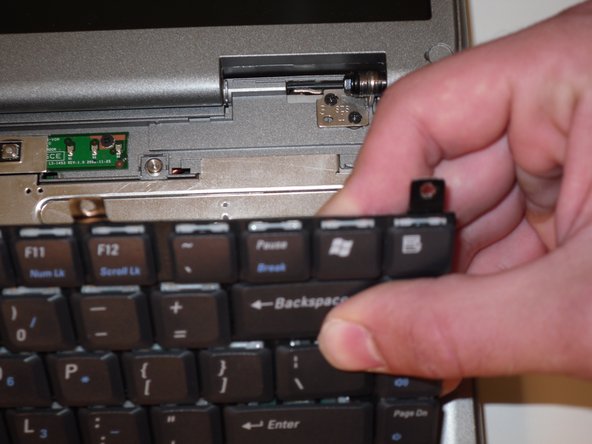
    • Use a spudger to lift the notched right edge of the hinge cover, and pry it loose

    • You need to lay the LCD screen down flat to allow the hinge cover to be lifted off

    • Lift the hinge cover off and set aside

  5. removing the Dell Inspiron 1150 Speakers: 手順 5、 3の画像 1 removing the Dell Inspiron 1150 Speakers: 手順 5、 3の画像 2 removing the Dell Inspiron 1150 Speakers: 手順 5、 3の画像 3
    • Remove 4ea M2 x 3mm keyboard screws

    • Lift up keyboard from the rear to expose the connector below

    • Disconnect the keyboard ribbon cable from the mother board

  6. removing the Dell Inspiron 1150 Speakers, Display Assembly: 手順 6、 3の画像 1 removing the Dell Inspiron 1150 Speakers, Display Assembly: 手順 6、 3の画像 2 removing the Dell Inspiron 1150 Speakers, Display Assembly: 手順 6、 3の画像 3
    • Remove 1ea M2.5 x 8mm screw holding the EMI shield in place

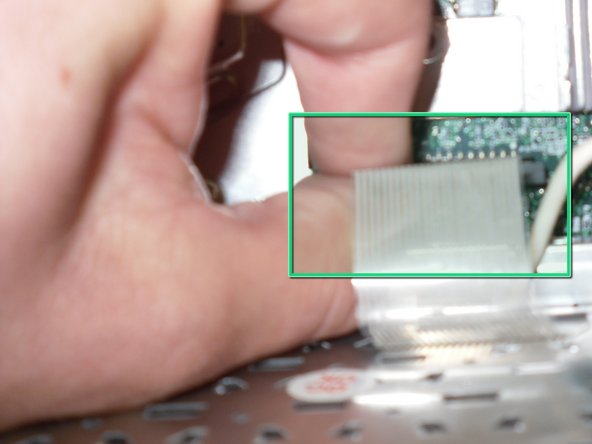
    • Remove the EMI shield to expose the LCD ribbon cable

    • Gently pull up on the tab to disconnect the ribbon cable from the main board

    • Close the lid carefully and remove the two M2.5 x 5-mm screws from the rear of the case

  7. removing the Dell Inspiron 1150 Speakers: 手順 7、 3の画像 1 removing the Dell Inspiron 1150 Speakers: 手順 7、 3の画像 2 removing the Dell Inspiron 1150 Speakers: 手順 7、 3の画像 3
    • Open the lid and support the Display Assembly while performing the next step to avoid it falling down when the hinge screws are removed

    • Remove 2e M2.5 x 5mm screws from each hinge bracket

    • The Display Assembly can now be lifted free of the laptop body

  8. removing the Dell Inspiron 1150 Speakers, Removing Dell Inspiron 1150 Palm Rest: 手順 8、 2の画像 1 removing the Dell Inspiron 1150 Speakers, Removing Dell Inspiron 1150 Palm Rest: 手順 8、 2の画像 2
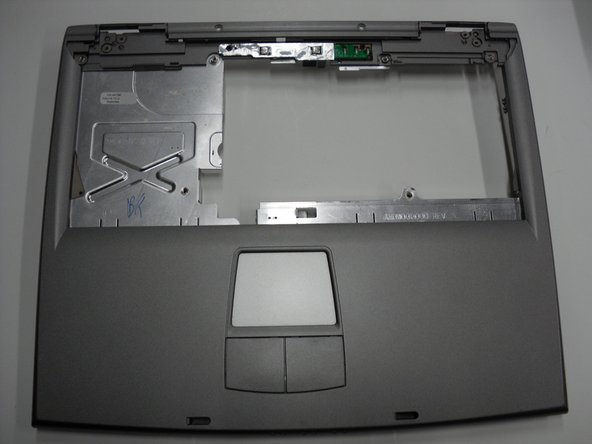
    • Position the computer upside down.

    • Remove the twelve M2.5 x 8-mm screws.

    • Remove the M2.5 x 4-mm screw from the battery bay

  9. removing the Dell Inspiron 1150 Speakers: 手順 9、 2の画像 1 removing the Dell Inspiron 1150 Speakers: 手順 9、 2の画像 2
    • Position the computer keyboard side up.

    • Remove the two M2.5 x 5-mm screws from the top of the palm rest.

    • Disconnect the mouse pad cable from the main board.

    • Separate the palm rest from the base by lifting its inside edge. Start at the back center.

    • Be careful to avoid damaging the palm rest while separating it from the base.

  10. removing the Dell Inspiron 1150 Speakers, removing the Dell Inspiron 1150 Speakers: 手順 10、 3の画像 1 removing the Dell Inspiron 1150 Speakers, removing the Dell Inspiron 1150 Speakers: 手順 10、 3の画像 2 removing the Dell Inspiron 1150 Speakers, removing the Dell Inspiron 1150 Speakers: 手順 10、 3の画像 3
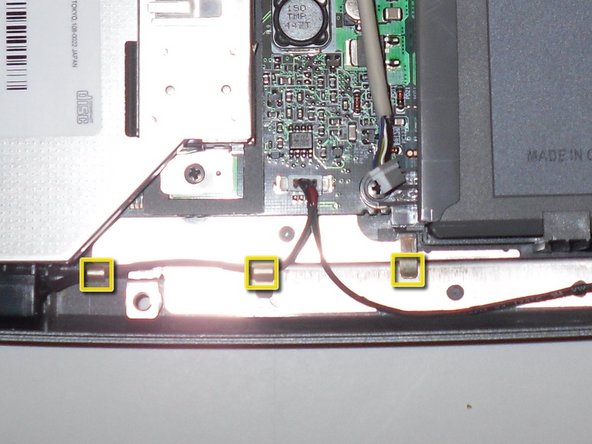
    • The speakers are located along the front of the laptop.

    • Disconnect the speaker cables from the main board

    • Unclip the speaker cables from the wire retainers along the front

    • Remove the speakers by pulling them straight up and out of the base

終わりに

To reassemble your device, follow these instructions in reverse order.

作成者

8人の作成者と共同で作成されました。

Lauren

メンバー登録日: 04/25/10

4 ポイント

2のガイドは作成済み

チーム

Cal Poly, Team 16-2, Maness Spring 2010 Cal Poly, Team 16-2, Maness Spring 2010人のメンバー

CPSU-MANESS-S10S16G2

4 メンバー

9のガイドは作成済み

0 件のコメント

コメントを追加

統計データ:

過去 24時間: 0

過去 7 日: 0

過去 30 日: 0

今までの合計 3,143