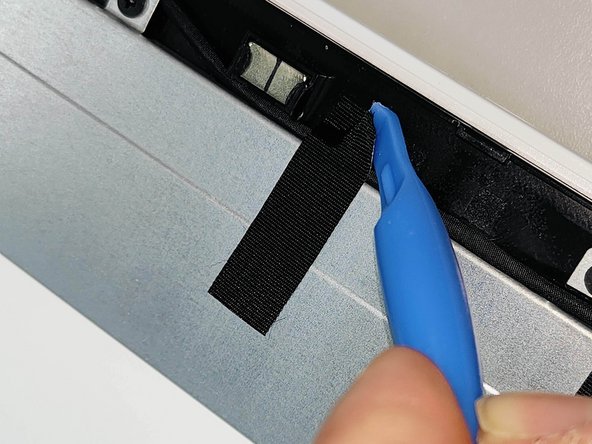
メインコンテンツにスキップ

jp.ik Leap T304 LCD Replacement Replacement

必要な工具と部品

  1. jp.ik Leap T304 LCD Replacement Replacement, jp.ik Leap T304 LCD Replacement: 手順 1、 2の画像 1 jp.ik Leap T304 LCD Replacement Replacement, jp.ik Leap T304 LCD Replacement: 手順 1、 2の画像 2
    • First make sure the notebook is turned off and check if you have the necessary tools.

  2. jp.ik Leap T304 LCD Replacement Replacement: 手順 2、 2の画像 1 jp.ik Leap T304 LCD Replacement Replacement: 手順 2、 2の画像 2
    • All screws are identified by circles. Pay special attention to the red circles as the rubber covers hide the screws.

    • With an utlility knife remove all the screw covers.

    • For this action, the procedure must be carried out with caution, as the covers are glued with a resistant glue.

  3. jp.ik Leap T304 LCD Replacement Replacement: 手順 3、 1の画像 1
    • Remove all screws with a Philips PH1 screwdriver

    • All screws are the same, don't worry about identifying them.

  4. jp.ik Leap T304 LCD Replacement Replacement: 手順 4、 3の画像 1 jp.ik Leap T304 LCD Replacement Replacement: 手順 4、 3の画像 2 jp.ik Leap T304 LCD Replacement Replacement: 手順 4、 3の画像 3
    • Using the plastic tool, insert it between the plastic and open it carefully.

    • You will feel and hear several clicks, which are perfectly normal. Remove the rear LCD Cover completely.

  5. jp.ik Leap T304 LCD Replacement Replacement: 手順 5、 3の画像 1 jp.ik Leap T304 LCD Replacement Replacement: 手順 5、 3の画像 2 jp.ik Leap T304 LCD Replacement Replacement: 手順 5、 3の画像 3
    • Unscrew both hinges.

    • All screws are the same, don't worry about identifying them.

  6. jp.ik Leap T304 LCD Replacement Replacement: 手順 6、 2の画像 1 jp.ik Leap T304 LCD Replacement Replacement: 手順 6、 2の画像 2
    • Carefully disconnect the cable identified in the figure, removing it from its connector.

  7. jp.ik Leap T304 LCD Replacement Replacement: 手順 7、 3の画像 1 jp.ik Leap T304 LCD Replacement Replacement: 手順 7、 3の画像 2 jp.ik Leap T304 LCD Replacement Replacement: 手順 7、 3の画像 3
    • Remove the mylers shown in the image.

  8. jp.ik Leap T304 LCD Replacement Replacement: 手順 8、 2の画像 1 jp.ik Leap T304 LCD Replacement Replacement: 手順 8、 2の画像 2
    • Peel off and remove the Wireless antennas

    • Before removing the wireless antennas, the cable route must always be analyzed to ensure that the antennas will be correctly replaced in their original position.

  9. jp.ik Leap T304 LCD Replacement Replacement: 手順 9、 3の画像 1 jp.ik Leap T304 LCD Replacement Replacement: 手順 9、 3の画像 2 jp.ik Leap T304 LCD Replacement Replacement: 手順 9、 3の画像 3
    • Remove the left and right LCD Bracket.

  10. jp.ik Leap T304 LCD Replacement Replacement: 手順 10、 3の画像 1 jp.ik Leap T304 LCD Replacement Replacement: 手順 10、 3の画像 2 jp.ik Leap T304 LCD Replacement Replacement: 手順 10、 3の画像 3
    • Remove the LCD from the Bezel.

    • To reassemble the LCD module, you must perform the previous steps in reverse.

    • After replacing the LCD, always check if flat cable is correctly connected and the protection tape is stuck in the original position.

終わりに

To reassemble your device, follow these instructions in reverse order.

ある他の人がこのガイドを完成しました。

以下の翻訳者の皆さんにお礼を申し上げます:

pt en

100%

Miguel Santosさんは世界中で修理する私たちを助けてくれています! あなたも貢献してみませんか?
翻訳を始める ›

作成者

1人の作成者と共同作成されました。

Miguel Santos

メンバー登録日: 01/29/24

509 ポイント

1ガイドが承認済み

チーム

jp.ik jp.ik人のメンバー

Business

2 メンバー

14のガイドは作成済み

0 件のコメント

コメントを追加

統計データ:

過去 24時間: 0

過去 7 日: 1

過去 30 日: 7

今までの合計 155