メインコンテンツにスキップ

このバージョンは誤った内容を含んでいる可能性があります。最新の承認済みスナップショットに切り替えてください。

必要な工具と部品

  1. この手順は未翻訳です。 翻訳を手伝う。

    : 手順 1、 2の画像 1 : 手順 1、 2の画像 2
    • Flip the device over onto its back.

    • Find the side brush, and unscrew the single screw that connects to brush motor by using the Phillips head #2 screwdriver.

    • This screw doesn't completely come out of the yellow side brush.

  2. この手順は未翻訳です。 翻訳を手伝う。

    : 手順 2、 2の画像 1 : 手順 2、 2の画像 2
    • Using a Phillips #1 screwdriver, remove the four screws on the back panel.

    • Once the screws are loose gently pry the back plate away from the body by using the spudger tool.

    • The screws don't completely come out of the panel, but it will still come apart once unscrewed.

  3. この手順は未翻訳です。 翻訳を手伝う。

    : 手順 3、 3の画像 1 : 手順 3、 3の画像 2 : 手順 3、 3の画像 3
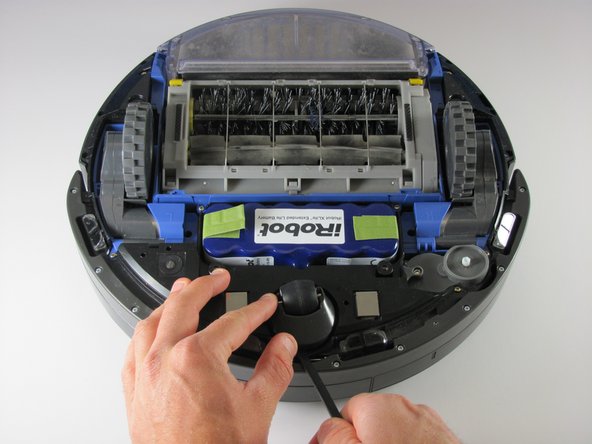
    • Turn the Roomba upside down, so that the vacuum and wheels are facing the ceiling.

    • Hold the caster wheel housing steady and insert the plastic spudger under the wheel housing.

    • Apply some force to pry the caster wheel straight up out of the device, and remove the caster wheel housing from the Roomba.

  4. この手順は未翻訳です。 翻訳を手伝う。

    : 手順 4、 2の画像 1 : 手順 4、 2の画像 2
    • Firmly hold the caster wheel housing, and remove the caster wheel from its setting.

    • Clean the caster wheel with soap and water.

    • Once the caster wheel is clean and thoroughly dried, repeat the process in reverse order to reinstall the caster wheel back to the Roomba.

ゴール

3 の人々がこのガイドを完成させました。

作成者

12人の作成者と共同で作成されました。

Rhett

メンバー登録日: 01/22/15

1,329 ポイント

7のガイドは作成済み

チーム

Cal Poly, Team 21-20, Maness Winter 2015 Cal Poly, Team 21-20, Maness Winter 2015人のメンバー

CPSU-MANESS-W15S21G20

4 メンバー

14のガイドは作成済み

0 件のコメント

コメントを追加

統計データ:

過去 24時間: 3

過去 7 日: 16

過去 30 日: 35

今までの合計 5,905