メインコンテンツにスキップ

iRobot Braava 320 Deck Plate Arms Replacement

必要な工具と部品

  1. iRobot Braava 320 Deck Plate Arms Replacement, Battery: 手順 1、 1の画像 1
    • Flip your device over and locate the battery cover.

    • The battery cover is located in the center of the device in between both wheels.

  2. iRobot Braava 320 Deck Plate Arms Replacement: 手順 2、 1の画像 1
    • Using a Flathead #4 screwdriver, gently turn the 12mm screw that holds the battery cover in.

    • The screw does not remove, it stays attached to the cover.

  3. iRobot Braava 320 Deck Plate Arms Replacement: 手順 3、 2の画像 1 iRobot Braava 320 Deck Plate Arms Replacement: 手順 3、 2の画像 2
    • Gently remove the battery from the tray and disconnect the battery cable.

    • To remove the battery, pull it straight up. To disconnect the cable, gently pull it straight out of the connector.

    • To reinstall the cable, hold it near the end and gently push it in the connector.

  4. iRobot Braava 320 Deck Plate Arms Replacement, Body Shell and Control Panel: 手順 4、 1の画像 1
    • With the battery removed, rotate your device so the front of it is facing you.

    • Remove the four 10mm Phillips #2 screws that attach the shell.

  5. iRobot Braava 320 Deck Plate Arms Replacement: 手順 5、 2の画像 1 iRobot Braava 320 Deck Plate Arms Replacement: 手順 5、 2の画像 2
    • Using both hands, hold the device together while you flip it over.

    • Starting from the front, gently lift up the shell and slowly tilt back until it is fully removed.

  6. iRobot Braava 320 Deck Plate Arms Replacement, Deck Plate Assembly: 手順 6、 1の画像 1
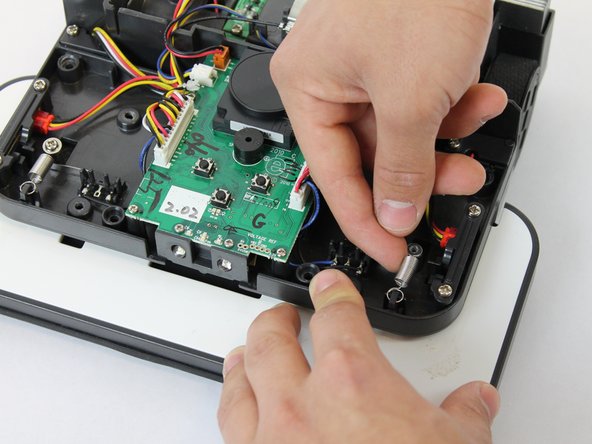
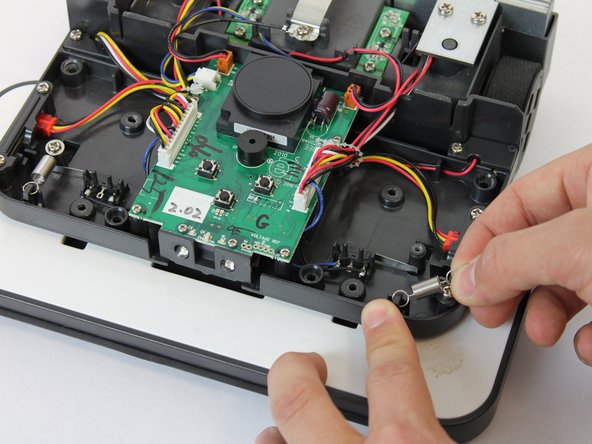
    • With the shell off, flip the iRobot over and remove the four 10mm Phillips #0 screws holding the deck plate assembly on.

  7. iRobot Braava 320 Deck Plate Arms Replacement: 手順 7、 3の画像 1 iRobot Braava 320 Deck Plate Arms Replacement: 手順 7、 3の画像 2 iRobot Braava 320 Deck Plate Arms Replacement: 手順 7、 3の画像 3
    • Remove the two 12mm Phillips #0 screws that hold the two springs onto the deck plate assembly.

    • Remove the two springs by gently lifting them up.

  8. iRobot Braava 320 Deck Plate Arms Replacement: 手順 8、 1の画像 1
    • Flip the device over and remove the deck plate assembly cover by lifting it up.

  9. iRobot Braava 320 Deck Plate Arms Replacement: 手順 9、 1の画像 1
    • Pull the arms together by lifting them up and to the center.

    • With the arms together. slide the deck plate up and over the arms until it is fully removed.

  10. iRobot Braava 320 Deck Plate Arms Replacement, Deck Plate Arms: 手順 10、 1の画像 1
    • With the deck plate off, remove the three 10mm Phillips #2 screw

  11. iRobot Braava 320 Deck Plate Arms Replacement: 手順 11、 2の画像 1 iRobot Braava 320 Deck Plate Arms Replacement: 手順 11、 2の画像 2
    • Be careful when removing the arms, do not lose the springs located under the arms.

終わりに

To reassemble your device, follow these instructions in reverse order.

作成者

3人の作成者と共同で作成されました。

Amroo

メンバー登録日: 02/28/17

101 ポイント

1ガイドが承認済み

チーム

USF Tampa, Team S1-G3, Nance Spring 2017 USF Tampa, Team S1-G3, Nance Spring 2017人のメンバー

USFT-NANCE-S17S1G3

4 メンバー

10のガイドは作成済み

0 件のコメント

コメントを追加

統計データ:

過去 24時間: 0

過去 7 日: 0

過去 30 日: 4

今までの合計 609