はじめに
画面が壊れていませんか?このガイドを読めばiPod Touchのディスプレイアセンブリを交換することができます。
必要な工具と部品
-
-
ディスプレイガラスが飛散している場合は、さらに広がらないようにガラス上にテープを貼ってください。
-
透明な梱包用テープをiPodのディスプレイ上に貼り、ディスプレイ表面全体を覆います。
-
-
-
吸盤カップをガラス下部の中央に装着します。カップ端を、ホームボタンの中央に配置します。
-
カップがしっかりと固定するように、押し込んで空気を抜いてください。
Be very careful. I have bought the ifixit kit. Tried with the suction cup and it didn’t work. None of the tools actually helped. Follower the instructions carefully and still ended up with a cracked screen. I wish I could go back in time and not doing any of this. I literally just cried and have no money for a new screen.
-
-
-
平らなテーブル上にiPodをしっかりと固定します。
-
吸盤を持ち上げたら、iPodの上部に向かって引いてください。忍耐強く、一定の力で引っ張り、接着剤が剥がれてディスプレイがリアケースから浮き上がるまで作業を続けます。
-
接着剤を柔らかくするためにヒートガンを使用する必要があるかもしれません。(特に寒い環境下) スクリーンをこじ開けても、ピザのチーズのトッピングのように接着剤がまだ付着して外れない場合は、薄いかみそりの刃をスライドさせて接着剤を切ることができます。
Step 2.5: Recover iPod from far side of the room due to suction assisted throwing.
thanks, Apple
Did as shown, button switch works fine, when I reinstall button, it's like it won't touch the switch to engage.
What next?
I've got the same problem, managed to get the screen off, transferred the little steel plate to the new home button and put it in. The switch works fine when I press it with my finger, but it won't work with the home button??? - Did you manage to solve this problem?
Tom -
I've got the same problem. Been trying to find a solution for a few days now. Lots of people ask this question, but no one ever answers it. How did you solve it?
tirgang -
It sounds like you need to replace the home button dome switch rather than the actual home button. I'm currently searching for one myself. My customer jammed the home button and now it doesn't click. The dome switch is located on the home button ribbon cable and not on the home button.
The "home button" repair shows the physical button, but it's not actually the repair for the switch, which is what should be shown as the home button repair. The switch has a little black plastic tab that breaks off with excessive presses, and that's why the button plate cannot engage the switch when the screen is reinstalled. You will need to replace the switch, or modify it with something small enough to press the switch when the LCD is lowered.
Rene -
I also ran in to the Home button not working issue. I have not idea what changed with the button, but it would not work (from the outside) after the battery replacement & re-assembling. If you opened the iPod up, you could press the switch directly and it clicked & worked, but it seemed finicky. I ended up putting the tiniest dot of hot melt on the center of the switch (smaller than the switch 'dome', and thin too, maybe 0.6-0.7mm thick), re-assembled, and it works fine now.
Use the hair dryer or a heat gun to loosen the adhesive. This did not work with just a suction cup for me.
I also had to use a heat gun and the opening tool instead of just a suction cup to open the assembly. The rest of the guide worked really well!
When putting back together, make sure the display connector is in firm or you might get lines. And also, perform a hard reset - my power wasn't working, I took it apart and checked the power flex cable, but all it needed was a hard reset when put back together.
Suction cup and hair dryer method never worked for me. Even tried my heat gun. Finger went numb before I gave up. Used thin prying + suction cup and eventually opened it but screen cracked in the process when I was too aggressive opening it.
In hind-sight, it would have been very helpful to know that the adhesive is just in the 2 areas to either side of the home button, nothing along the edges.
Biggest complaint is the time wasted, should have just bought a replacement iPod, better return on my money/time.
The adhesive strips are only located to the left and right of the home button. Imagine two small squares of tape in each corner. Be careful heating. I used a heat gun on the lowest heat, but I think I may have overheated the area and damaged the digitizer on the bottom of the screen. I now have small green lines on that section of the screen. I too had to use a thin metal spudger to release the adhesive.
-
-
-
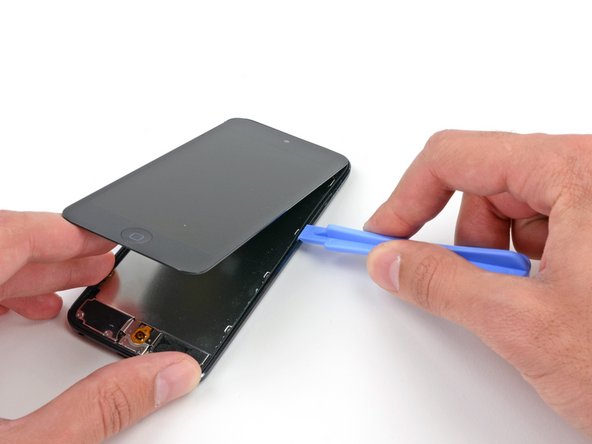
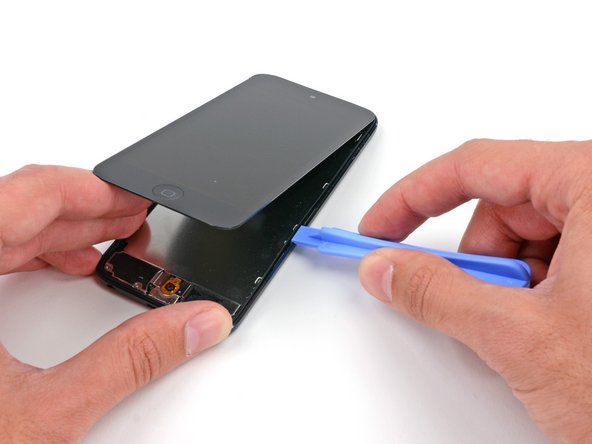
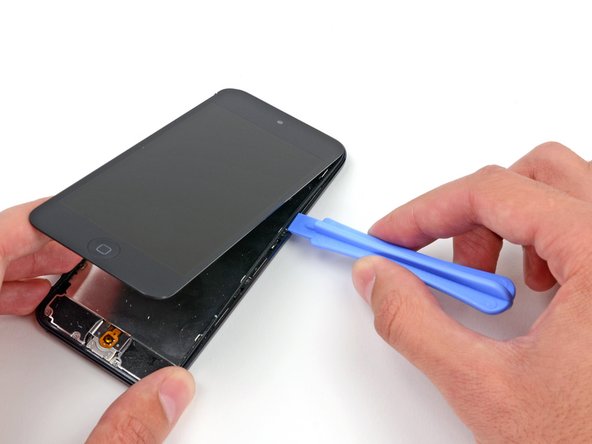
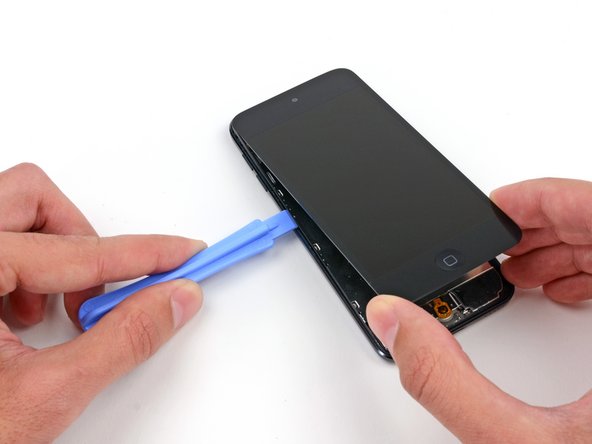
デバイス右上のプラスチックフレームとアルミ製リアケースの間に開口ツールを差し込みます。
-
隙間をスライドさせながら、ケースからフレームを外します。
Careful! This piece is super fragile. It really helps to understand the way the clips work. I struggled for 10 min with not a single un-clip, snapped the plastic frame in 2 places because I didn't understand the clips, and as soon as I figured out how they work the piece was off like a prom dress.
The clips are metal n shapes around the outside of the frame. They need to be pushed away from the center of the device to release the frame. You need to get something in between the plastic and clip to release, a guitar pick is probably too thick. A thin opening device would probably work but I used a razor blade. I'm not sure if these clips are on all of the newer Apple devices, but I've never encountered one before (usually work on android devices.)
I hope this helps prevent someone from having to replace the frame.
I wish I had read this comment before I broke my frame, hah! It made sense once I had the clips out, but while they were still in it was mystifying. Thankfully it won't be too big of a problem since all of the frame will still clip in, it just won't be connected.
-
-
-
こちら側の2つのクリップにも同じ作業を繰り返します。
-
プラスチックの開口ツールを、左側2番目のクリップ裏のプラスチックフレームとアルミ製リアケースの間に差し込みます。
-
ツールを左右に揺らしながら、ケースからクリップを外します。
Hello how are you? I don't know what happens when I go back and put everything I close and the home button doesn't work, I disarm it and check the flex and it works when I press it but with the home button it doesn't.
-
-
-
同様の手順で、プラスチック製フレームをリアケースに固定している最後のクリップを緩めます。
They have the exact same dimensions.
do you think if i use reolacement scren of itouch 5th gen to my itou h 6th gen this would work? i cant find screen for itouch 6th gen so im thnking to use the screen of 5th gen pls help me
-
-
-
-
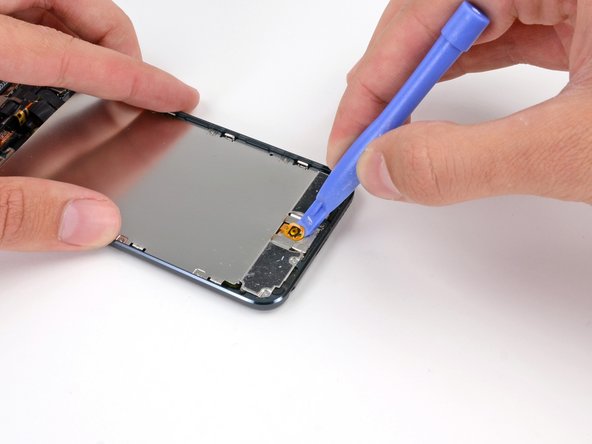
画像に示されているオレンジ色ではなく黒いホームボタンアセンブリがある場合は、この手順をスキップできます。 ボタンはLCDプレートに取り付けられていないため、作業中、取り外す必要はありません。
-
プラスチック製開口ツールを使って、ホームボタンスイッチをLCDプレートからこじ開けます。
-
ホームボタン裏側の接着剤を柔らかくするために、ヒートガンまたはヘアドライヤーが必要な場合があります。 使用する際は、常に低熱設定にしてください。
If you have trouble lifting the home button switch up with the plastic opening tool, you can try using an opening pick instead.
Hi I just replaced my screen on my ipod touch 5th gen and i connect all the ribbon chords and every thing and when i connect one of the ribbons from the screen to the motherboard the motherboard starts to get hot! The screen isnt actually fully on, I wanted to make sure it turned on before I snapped it back in place. Any ideas? When I disconnect the ribbon the temp goes down. Screen is an OEM screen from Apple. I read somewhere, and i have personally have done it, that you can short the battery on the ipod touch 4th and it fixes it but im not sure on the 5th.
I have the same problem. I am going to change the battery. I let you to know if it solved the problem. Please let me know if you solve your problem. Thanks
Eddie, Did you ever fix this? I have exactly the same issue, Board gets hot and screen remains black. Although i did Hear Siri and iTunes recognises it.
You need to make sure that all the adhesive covers for the battery and the board are on so that it isn't shorting with the metal cover, this may fix some issues with the board / battery heating up a lot and display not working. I just put some electrical tape over the batter solder and screen cables so that it's all in place properly and no shorting of electric terminal points on the board.
Ben -
With some newer versions of the gen 6 iPod, it seems that removing the home button from its adhered position is not necessary. I removed mine and then realized that it was adhered to the metal of the dock, not the actual LCD shield. Just something to keep in mind, might save you some grief later if you have to re-adhere it.
-
-
-
ロジックボードを背面ケースに固定している1.6mm#000プラスネジを3本外します。
Hi, the MPN on that WiFi flex confirms this is not an iPod Touch 6th gen, it is 5th Gen. I am trying to source a 6th Gen WiFi Flex.
-
-
-
バッテリーを固定している2本の接着ストリップがあります。
-
iPodを裏返して、アルミ製iPodケースの裏側を温めます。バッテリーをオーバーヒートしないようご注意ください。
-
アルミケースを温める必要はありません。この作業中、常に熱くなった部分を指で触ることができ、熱すぎて触れなくなることはありません。
Instead of a heat gun or hair dryer, I used a rice sock (http://www.wikihow.com/Make-a-Rice-Sock) to apply heat evenly across the entire back of the case while the case still sat upright for me to work on getting the battery loose. It was a lot easier than trying to heat the back of the case, then flip the case over and work feverishly before it cooled.
I'm sure this works, but it doesn't seem like the proper way to do this. I didn't like the feeling of prying on a flimsy battery at all. That's not practical. Instead get some molybdenum wire start it underneath the corners, then wrap the ends of the wire on like 2 pencils then tape them so u dont have to wrap the wire around your fingers because it will hurt lol. then apply heat, i went about 130 degrees is what my infrared gun said. I used a geat gun on low and a good distance away. Then just work the wire down the adhesive obviously lol. This worked out very easily for me and I felt safe and more confident about what I was doing. Good luck.
If you really don’t want to remove the battery, you may lift the mainboard slightly instead and disonnect display, back camera flexes and antenna connector. Then gently pull back camera module out of the seat. This gives you enough room to connect new display and back camera flexes. Back cam module would be hanging while you connect everything that got disconnected. Screw back the mainboard and push camera module to its seat.
-
-
-
スパッジャーの平面側先端を使って、ディスプレイアセンブリ上のソケットから正面カメラをさっとめくります。
-
カメラモジュールをソケットに固定している接着剤が少量あります。しかしこれを剥がすには、それほど大きな力は必要ありません。 スパッジャーを使って、カメラモジュールの黒いプラスチックとカメラソケットの黒いプラスチックの間に挟み、それらを乖離します。
My camera ceased to work after this. Anybody have the same issue?
A reboot can sometimes work. Once the camera is seen not to be working (say it was connected after the device goes to sleep), the iPod gives up trying to show any live images from the either front or rear cameras
mark -
How do you replace the front facing camera
I have a similar issue, the rear camera doesn't work and the facing camera sometimes works but very slow...everything else works well.
Any ideas on how to fix this problem?
-
-
-
ヘッドフォンジャック、Lightningコネクタ、スピーカーを固定している次のネジを外します。
-
2.6mm#000プラスネジ3本
-
2.0mm#000プラスネジ2本
The screw on the right that goes into the headphone jack is a little reluctant to come out
-
-
-
アセンブリ全体を裏返し、ロジックボードの裏が見えるようにします。
-
プラスチックの開口ツールを使い、ロジックボードからデジタイザーケーブルの接続を外します。
When reassembling, the digitizer and display cable connections very easily come loose. Make sure you press them in securely then I held down the logic board with my left hand while rescrewing it down one handed with my right hand otherwise they would disengage. Took several tries to get it right.
-
デバイスを再度組み立てるには、次の説明書の逆の順番で組み立ててください。
デバイスを再度組み立てるには、次の説明書の逆の順番で組み立ててください。
200 の人々がこのガイドを完成させました。
以下の翻訳者の皆さんにお礼を申し上げます:
100%
railgunさんは世界中で修理する私たちを助けてくれています! あなたも貢献してみませんか?
翻訳を始める ›
32 件のコメント
There is a major problem with the information provided here.
I followed the advice of the staff and purchased on eBay a replacement glass with tools for our cracked glass problem. I then began to follow the guide shown here.
The first major problem is that the suction cup will not pull off the glass. I tried the suction on various surfaces, and it's very strong. So no doubt, the problem is the fact that the glass is cracked. But that's the whole reason we're trying to take it apart. Secondly, if this guide doesn't apply to cracked glass, that should be clearly stated and possible another guide should be provided.
As it is now, removing the "glass" from the foamy "gasket" underneath was nearly impossible, and the local tech now tells me that in this condition, it's essentially worthless.
I don't know about Ipods, but I have worked on Samsung phones in their repair facility and to lift our digitizers from the lcd assembly you have to heat them up a little bit with a heat gun first. The heat loosens the adhesive tape that holds the digitizer down. Once that glue on the tape becomes pliable you should be able to lift it up. Hope this helps.
pau -
One more thing - ignore your local tech. Anything can be fixed unless its been sitting in water. They just want their service fee.
If you've got the confidence to try this repair (which it sounds like you do) and google and youtube too - you can do this.
pau -
I tried multiple times to remove the screen after heating it thoroughly with a hair drier. True, not a heat gun, but the display was well heated. The screen wouldn't budge with a suction cup a bit smaller than the one pictured above. My eureka moment was when I remembered the suction-cup on a car cellphone holder. The edges of the cup just exceed the size of the display, but I was able to turn the ring that "tightened" the suction. I pulled firmly on the base of the cellphone holder, and after a minute or so the display started pulling away. The key was being able to apply an even, slow pull.
Lance -
would Covering entire display with the packaging tape change anything?
Or you did & still thumbs down?
Prosit
PURCHASE -
im download the Ifixit official app in my galaxy tab to do this work and the guide is no the same of this guide, in the battery repleacement use a tewzeer to relase the battery of the logicboard this battery is solded at the same an broke the battery soldering and flex for use theese guide of SH2$T is not possible that wont check the guides before upload to all the users i lose my ipod touch thanks you! im searching if some body have the jumpers ways to see if can save something of my ipod, Jesus Ortiz Venezuela
The idea of using packing tape to help the suction cup to adhere is clever and might have worked great. Not sure I'll ever get another chance to try, but I'll try to keep it in mind.
On a separate note, I finally took it into a local shop this week, and they confirmed that you can't just replace the broken glass; you have to replace the entire assembly of glass+foam+LCD, which is what they did. Or perhaps you can replace just the glass if you have fancy equipment that can allow you to separate the glass from the foam. And then there's the matter of the button, which seemed stuck to the glass, too.
The tech said this type of repair is about as user-serviceable as 2/10, so I think this should be marked as a very high level of difficulty.
this guide just gives you basic idea where is what located, procedure itself is rubbish. suction cups nearly never work - not strong enough and in most cases screens are shattered, so forget about it. next - if you know where are the clips that holds screen in place, with flat knife undo them and screen is aff. probably good idea to heat up a wee bit bottom part near home button to make things easier. step 17 - why would, for freckles sake, you need to remove battery and dock port???? only risk to damage battery and rip some flex! leave battery alone! instead undo logic board (3 screws), pry out rear camera and you can lift logic board high enough to disconnect old screen and connect new screen no problem. repair is doable in 15 mins nae probz.
I agree that you shouldn't have to remove the battery to replace the screen.
I want to change the outer screen not the digitizer, any help?
Can someone please confirm that this is the same part for the 6th gen? I am having a hard time finding a screen for the 6th gen and am starting to feel that it is the same part as the 5th.
I don't believe so. There may just not be any parts released yet. You'll have to do some digging.
Im also looking for screen of myitouch 6thgen and i cant find parts for it. i also thinking to use screen of itouch 5th gen. do you think this would work. pls help me
Can someone please tell me, is this the same part for the 6th generation? I cannot find a replacement screen for it and am starting to think they are the same!
This Guide was AWESOME!!!!!! Ive never done anything this complicated with an electrical device beyond replacing my macbook battery, but slowly and calmly following the guide got me through pretty easily. Removing the cracked screen with the suction cup is definitely the trickiest bit. You have to use a really strong adhesive box tape and cover as much of the cracks as possible to create a seal because air can still make it under the tape through the cracks. Next tricky bit was reconnecting the digitizer and display cable since they are quite small. But everything worked as explained. Things I had to do different though:
I couldn't lie the two halves (the screen and the body of the Ipod) flat next to each other. I was propping up one half with a book.
When removing the battery, half the adhesive tape stayed stuck to the battery and half to the case. I went underneath with the spudger and working along the adhesive tape pasted it back down to the case until it was free from the battery.
Pretty fun repair!
Hey,
I just followed all the steps to fix my girlfriend's ipod. It all put back together and the screen is unresposive. The back light works but there is no content being shown, it's just blank. Is there something I did wrong and can I fix the problem without having to buy a new screen?
The digit screen is glued to the plastic screen its impossible to unstick without broke it, with that price to replace it i choose to buy a new ipod
I want to only replace the front glass as that's what I bought! Plz reply. Is this possible??
Yes it is Possible, but it is much more time consuming also you are likely to damage the underlying lcd when attempting a glass only screen repair. If you still want to try it Here is a video showing the process: https://www.youtube.com/watch?v=rH3x39uh...
I followed this guide and now my ipod is in a reboot loop
I solved my problem. I had to take apart the ipod again and reseat all the connectors. I recommend turning your device on and checking if it boots after every major step. My problem could have been avoided if I did a boot test before reassembly.
Will iPod screen work on 5c iPhone
Robbie Rob - 返信
im going to say no because an iphone will have a different motherboard than the ipod and the connectors will most likely be completely different.
Great step by step guide albeit took me about 2 hours. Patience and more patience take your time and it’s fairly simple if you follow this guide
i had recently bought a replacement screen and i was wondering if all the screen models fit different models. i have an A1509 model and my screen won’t sit flush.
I had the same issue. The one that ifixit sells is for the A1421. The difference is a small clip on top that’s just a little smaller than the normal one.
i’m kinda stupid but could someone explain why the battery needs to be removed?
r6ytuj5t6j - 返信
I did not use the suction cup method to separate the display from the case.
I heated the side of the display with the “HOME” button to soften up the glue holding the display.
I inserted a single edge razor blade vertically into the space between the display and the case. Then slowly and carefully pushed the blade down to pry the display up enough to get one of the “guitar pics” under the display on one corner. With a little more heat and “prying” I was able to get another “guitar pic” under the other corner.
Then I followed the rest of the instructions and completed the repair.
I have never been able to get the suction cup method to work very well.








Any repair guides for front camera?
ipod touch 5th generation front camera freezes then returns to rear camera. This happened after replacing battery. Any ideas? Tried hard reset & restoring. Nothing worked.
Libby - 返信