メインコンテンツにスキップ

この翻訳は、ソースガイドの最新の更新を反映していない可能性があります。 翻訳の更新に協力してください。 または ソースガイドを参照してください

iPod Touch 第4世代のフロントパネルの交換

必要条件のみ
この修理ガイドは、他のガイドの前提条件として使用されます。それ自体は不完全で、単独で使用されることはありません。

必要な工具と部品

  1. この手順は未翻訳です。 翻訳を手伝う。

    iPod Touch 第4世代のフロントパネルの交換, フロントパネル: 手順 1、 1の画像 1
    • The iPod Touch 4th Generation front panel is attached to the rear case by adhesive. The use of a heat gun to soften the adhesive is highly recommended.

    • With the heat gun set on "low", begin heating the lower portion of the Touch near the home button.

    • It is suggested to heat the desired portion in a circular motion pattern to evenly dissipate the amount of heat throughout the device.

  2. この手順は未翻訳です。 翻訳を手伝う。

    iPod Touch 第4世代のフロントパネルの交換: 手順 2、 2の画像 1 iPod Touch 第4世代のフロントパネルの交換: 手順 2、 2の画像 2
    • Beware, as the Touch will be very hot. It may be helpful to hold it with a towel while prying.

    • Insert the edge of an iPod opening tool between the front glass panel and the plastic bezel near the home button.

    • Do not try to pry between the plastic bezel and the steel rear case.

    • Pry the bottom edge of the front panel upward, being careful not to bend the glass excessively.

    • If it is too difficult to pry up the front panel assembly, reheat it and try again.

  3. この手順は未翻訳です。 翻訳を手伝う。

    iPod Touch 第4世代のフロントパネルの交換: 手順 3、 1の画像 1
    • When there is enough room to grab the bottom edge of the front panel, lift it away from the body of the Touch to peel up the adhesive along its left and right edges.

    • If the adhesive is too difficult to separate, use a heat gun to soften it before proceeding.

  4. この手順は未翻訳です。 翻訳を手伝う。

    iPod Touch 第4世代のフロントパネルの交換: 手順 4、 2の画像 1 iPod Touch 第4世代のフロントパネルの交換: 手順 4、 2の画像 2
    • Due to the construction of the 4th generation Touch, the digitizer cable cannot be disconnected until the logic board is removed. Use extreme caution when handling the front panel assembly, as it is attached to the rest of the Touch by the very delicate digitizer cable.

    • Also, the display data cable is very short and is connected to the logic board near the top of the front panel assembly. If it does not become disconnected while freeing the top edge of the front panel assembly, be sure to disconnect it with an iPod opening tool before rotating the front panel assembly out of the Touch.

    • Carefully pull the top of the front panel assembly away from the adhesive holding it to the Touch, minding the short digitizer cable connecting the two components.

  5. iPod Touch 第4世代のフロントパネルの交換: 手順 5、 1の画像 1
    • 次の8本の#00ネジを外します:

    • 3.5mmプラスネジ 1本

    • 3.0mmプラスネジ 2本

    • 2.3mmプラスネジ 1本

    • 2.4mmプラスネジ 1本

    • 2.0mmプラスネジ 3本

  6. この手順は未翻訳です。 翻訳を手伝う。

    iPod Touch 第4世代のフロントパネルの交換: 手順 6、 1の画像 1
    • Use the edge of an iPod opening tool to pry the thin steel cover up from the rear-facing camera.

    • Note the small spring located near the bezel next to the camera (highlighted in yellow).

    • Remove the steel cover from the iPod.

  7. この手順は未翻訳です。 翻訳を手伝う。

    iPod Touch 第4世代のフロントパネルの交換: 手順 7、 3の画像 1 iPod Touch 第4世代のフロントパネルの交換: 手順 7、 3の画像 2 iPod Touch 第4世代のフロントパネルの交換: 手順 7、 3の画像 3
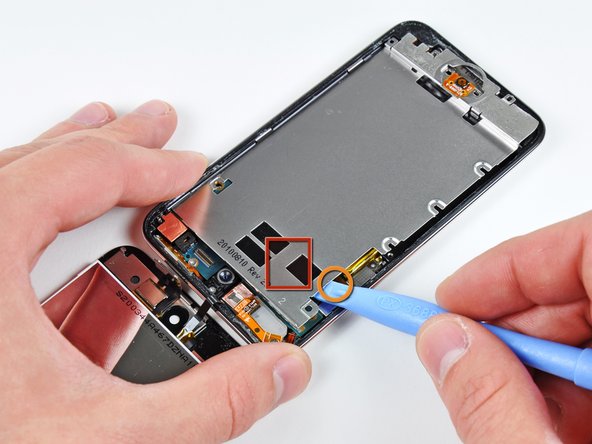
    • Insert the edge of an opening tool under the steel mid plate near the bottom left corner of the Touch.

    • Slowly pry upward to separate the plate from the adhesive securing it to the plastic inner case.

    • If the plate is still attached to the logic board, re-warm the area to loosen the adhesive, then slowly separate the plate from the logic board using the opening tool.

    • There is a thin, fragile ribbon cable underneath the plate. As you pry the plate up, be very careful not to rip the cable.

    • This cable may stick to the plate and will tear very easily if you're not careful. Work slowly and be careful not to strain the cable.

  8. この手順は未翻訳です。 翻訳を手伝う。

    iPod Touch 第4世代のフロントパネルの交換: 手順 8、 2の画像 1 iPod Touch 第4世代のフロントパネルの交換: 手順 8、 2の画像 2
    • Slightly tilt the steel mid plane to dislodge it from the rear case.

    • Be careful not to tear the piece of copper tape connecting the rear-facing camera to the steel mid plane.

    • Lift the steel mid plane up off the rear case and peel off the piece of copper tape stuck to the rear-facing camera.

終わりに

デバイスを再度組み立てるには、この説明書の逆の順番で組み立ててください。

4 の人々がこのガイドを完成させました。

以下の翻訳者の皆さんにお礼を申し上げます:

en jp

41%

railgunさんは世界中で修理する私たちを助けてくれています! あなたも貢献してみませんか?
翻訳を始める ›

作成者

25人の作成者と共同で作成されました。

Walter Galan

694,627 ポイント

1,203のガイドは作成済み

0 件のコメント

コメントを追加

統計データ:

過去 24時間: 0

過去 7 日: 0

過去 30 日: 0

今までの合計 4,327