はじめに
バッテリーが長持ちしませんか?交換しましょう(はんだ付けが必要です)。
必要な工具と部品


デバイスを再度組み立てるには、この説明書の逆の順番で組み立ててください。
デバイスを再度組み立てるには、この説明書の逆の順番で組み立ててください。
109 の人々がこのガイドを完成させました。
以下の翻訳者の皆さんにお礼を申し上げます:
100%

これらの翻訳者の方々は世界を修理する私たちのサポートをしてくれています。 あなたも貢献してみませんか?
翻訳を始める ›

12 件のコメント
I skipped steps 8,9,11-17, and 21.
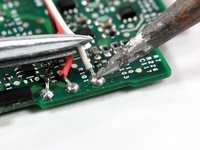
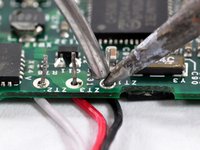
Step 19> when un-soldering the old battery wires, make sure to leave solder on the pads and in the holes.
I replaced steps 22-24 with Step 22-24> Very carefully and precisely:
-Place the black lead onto the pad nearest the hold switch (shown in red) with the end of wire pointing away from the battery.
-Place the red lead onto the center pad with the end of wire pointing away from the battery.
-Place the white lead onto the pad furthest from the hold switch with the end of wire pointing away from the battery.
Gently hold each wire in place on the pad while applying the soldering iron taking care not to touch the wire to any other pad or trace (note black wire). When the wire sinks into the solder, remove heat. Hold wire until solder has set.
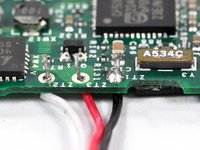
Do step 25 and charge battery. Much simpler and less risk.
For all newbies, make sure that your soldering spots are neat and clean. Your workplace must be clean! Too hasty repair...and you'll reassemble your Pod once again.
Thanks for the neat repair guide! Much appreciated!" Now I can enjoy my "new Pod" for another 8years at least! No that's what I call environmental awareness! (built in 2005)
Well, how’s it going? It’s been 8 years…
Success! The instructions were clear and helpful. This was the third battery for my iPod, so the desoldering step took a fair amount of time. I am not very experienced with soldering, so I practiced on a little blinking christmas tree kit before attempting this, and I think that was useful.