メインコンテンツにスキップ

このバージョンは誤った内容を含んでいる可能性があります。最新の承認済みスナップショットに切り替えてください。

必要な工具と部品

  1. , ケース: 手順 1、 1の画像 1
    • iPodを開口する前に、ホールドスイッチがロックされているか確認してください。iPodを手前に置いて、スライダーは右側に完全に移動しているか確認します。

  2. : 手順 2、 1の画像 1
    • iPodの開口はチャレンジです。数回試したところで、iPod本体が開く前に諦めないようにしましょう。

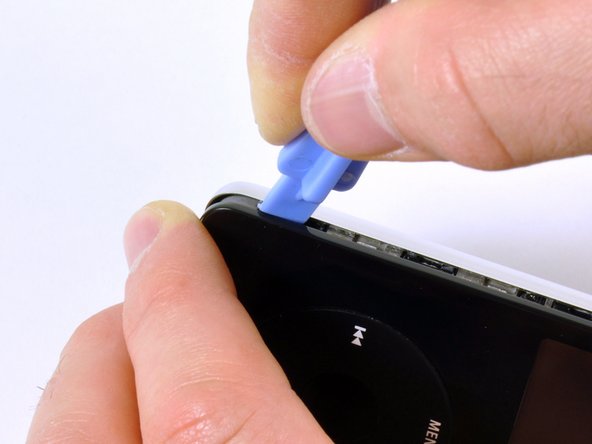
    • 開口ツールを使って、iPodの下部にある固定クリップを外します。ツールの先端をメタル製のバックケース側に向けてください。プラスチックのフロント側に傷が入らないようにご注意ください。

  3. : 手順 3、 1の画像 1
    • 開いた状態のiPodの画像を参考にして、固定クリップがどこに付いているか確認してください。両側に4つ、上部に1つ、下部に2つあります。プラスチックカバーを傷つけないように役立つ情報です。

  4. : 手順 4、 3の画像 1 : 手順 4、 3の画像 2 : 手順 4、 3の画像 3
    • iPod両側に4つの固定クリップが付いています。 iPod開口ツールを使って、iPodメタル背面から前面のプラスチックを分離します。

    • iPod開口ツールをiPod左側に挿入し、ツールの先端をメタル背面側に向けます。

    • 小さなギターピックなどは、iPodを開口するのに非常に役立ちます。 ピックを差し込んだら、ケース周辺にスライドさせるだけで、クリップが外れて、作業が簡単になります。

    • 開口ツールを左右に小刻みに動かして、左側に移動すると、隙間がわずかに拡大します。

    • iPodの端全体が緩むまで作業を続けます。

    • 次に開口ツールをホールドボタンの右側に挿入します。 ディスプレイは非常に壊れやすいため、ツールを挿入する際は十分に注意してください。

  5. : 手順 5、 2の画像 1 : 手順 5、 2の画像 2
    • ディスプレイ上部に開口ツールをゆっくりとスライドし、固定クリップを外します。

    • これで、iPodの反対側が簡単に緩むはずです。 そうでない場合は、iPod左側と同じようにiPod右側に開口ツールを差し込んでください。

    • iPod前面を背面から約2センチ程度、離します。

    • iPodのケーシングが開きますが、まだ両側を完全に分離しないでください。 2本のリボンケーブルが背面パネルとiPod本体に繋がっています。

  6. : 手順 6、 2の画像 1 : 手順 6、 2の画像 2
    • 角度のついたピンセットまたはiPod用オープニングツールで、オレンジ色のバッテリーリボンケーブルを固定している茶色のコネクタラッチを上にスライドさせます。このとき、ラッチの両側から引っ張るようにしてください。茶色のコネクターラッチを1〜2mmほど持ち上げればケーブルは外れます。それ以上持ち上げたり、ラッチを外したりすると、白いコネクターも一緒に引っ張ってしまう可能性があります。

    • あまり持ち上げすぎると、ロジックボードからバッテリーコネクターを引き抜いてしまう可能性があります。

    • 茶色のコネクターは必ず真上にスライドさせてください。コネクターはデリケートで、横にずらすと壊れてしまいます。コネクタの下部にはケーブルを固定するためのフックがあります。片方のアームが折れると、すぐにバッテリーケーブルを元に戻すことができなくなります。もし折れてしまったら、ケーブルをスロットに入れてから、茶色のホルダーを押してケーブルが滑り落ちないようにします。

    • コネクタからケーブルを外します。

  7. : 手順 7、 1の画像 1
    • これで、フロントケースとバックケースをつなぐオレンジ色のリボンケーブルが1本残りました。

    • この時点で、青いゴムバンパーを取り外して交換するか、ケースを分離して続行することができます。

    • ケースを分離することは、バッテリー交換を完了するために必要ではありませんが、交換を容易にすることができます。ただし、さらに余分なケーブルを取り外す必要があり、取り外しの際に破損する危険性があります。

  8. : 手順 8、 1の画像 1
    • ハードドライブを持ち上げて、ヘッドフォンジャックリボンコネクタ(黄色のボックスで表示)を露出させます。

    • ハードディスクのバンパーが緩んだ場合は、写真のように切り欠きがある状態で元に戻してください。

  9. : 手順 9、 2の画像 1 : 手順 9、 2の画像 2
    • iPodオープニングツールで、ヘッドフォンリボンケーブルコネクタの茶色のタブをゆっくりと持ち上げます。タブが90度回転し、リボンケーブルが外れます。

    • 指先を使って、ヘッドホンジャックのリボンケーブルを引き抜きます。

  10. : 手順 10、 1の画像 1
    • これでiPodの表と裏が完全に分離されたはずです。

  11. , ハードドライブ: 手順 11、 2の画像 1 , ハードドライブ: 手順 11、 2の画像 2
    • iPod用の小さなオープニングツールを使って、ハードドライブリボンケーブルを保持している黒いヒンジを外します。タブがロジックボードに向かって90度回転して、リボンケーブルが外れます。

    • 人差し指でリボンケーブルを固定し、ドライブをリボンケーブルから外します。

    • ハードドライブラバーサイドバンパーが取り付け中のドライブに取り付けられていることを確認します。この作業を行うには、ハードドライブラバーサイドバンパー取り付けガイドを使用します。

    • 必要に応じて、ハードディスク・ドライブの青いフォーム・パッドも交換用ドライブに移植する必要があるかもしれません。

  12. この手順は未翻訳です。 翻訳を手伝う。

    : 手順 12、 2の画像 1 : 手順 12、 2の画像 2
    • Remove the three black Phillips screws securing the front panel to the metal framework.

    • Rotate the iPod laterally 180 degrees and remove the three black Phillips screws securing the front panel to the metal framework on the other side.

  13. この手順は未翻訳です。 翻訳を手伝う。

    : 手順 13、 2の画像 1 : 手順 13、 2の画像 2
    • You may meet some resistance near the center of the iPod as there is a mild adhesive used to help hold the two pieces together.

    • Carefully work around the edge of the iPod to separate the front panel from the metal framework.

    • Lift the framework (including the attached display, logic board, and click wheel) away from the front panel.

    • Make sure that the click wheel button is in place before reinstalling the framework in the front panel.

  14. : 手順 14、 1の画像 1
    • これで、iPod本体からフロントパネルが解放されます。

  15. この手順は未翻訳です。 翻訳を手伝う。

    : 手順 15、 2の画像 1 : 手順 15、 2の画像 2
    • Rotate the iPod so the black plastic tab is more accessible to you.

    • Use a small iPod opening tool (or your fingernail) to flip up the black plastic tab holding the display ribbon in place. The tab will rotate up 90 degrees towards the display, releasing the ribbon cable.

    • Use your finger to prevent the cable from lifting upwards. Wiggle the display loose from the frame, and then pull it gently outwards to release the display's ribbon cable. You may need to lift the cable away from the two white pegs that poke through it near the edge of the frame.

  16. この手順は未翻訳です。 翻訳を手伝う。

    : 手順 16、 1の画像 1
    • The display should now be free from the rest of the iPod.

  17. この手順は未翻訳です。 翻訳を手伝う。

    : 手順 17、 1の画像 1
    • Peel up the black tape securing the silver ground strap to the metal framework.

    • The ground strap is very fragile. Be sure not to break it.

  18. この手順は未翻訳です。 翻訳を手伝う。

    : 手順 18、 2の画像 1 : 手順 18、 2の画像 2
    • Turn the iPod over and peel the orange click wheel ground tab up from the metal framework.

    • Be sure to detach only the thin ground tab, not the wider click wheel ribbon.

    • Carefully push the logic board away from the metal framework. Use the squares as indicators of where to push. The logic board is secured to the framework with mild adhesive; be careful not to bend the logic board by pushing too much in any one spot.

    • The framework should now be free from the rest of the iPod.

  19. この手順は未翻訳です。 翻訳を手伝う。

    : 手順 19、 3の画像 1 : 手順 19、 3の画像 2 : 手順 19、 3の画像 3
    • Use a small iPod opening tool to flip up the black plastic tab holding the orange click wheel ribbon in place. The black tab will rotate up 90 degrees, releasing the ribbon cable.

    • Use a small iPod opening tool to loosen the click wheel cable from the logic board. Be careful not to bend the cable too much, or the electronics on the cable could be damaged.

    • Disconnect the click wheel cable from of its connector, and lift the entire click wheel assembly away from the logic board.

    • The click wheel should now be separate from the rest of the iPod.

ゴール

91 の人々がこのガイドを完成させました。

作成者

3人の作成者と共同で作成されました。

Miroslav Djuric

158,300 ポイント

144のガイドは作成済み

0 件のコメント

コメントを追加

統計データ:

過去 24時間: 12

過去 7 日: 90

過去 30 日: 392

今までの合計 86,032