はじめに
iPhoneバッテリーは最大500回の充電サイクルまで、容量の約80%まで充電できるとされています。これは、多くのユーザーにとって約18−24ヶ月で500回のサイクルを迎えることになります。iPhoneの充電を頻繁に行っていたり、パフォーマンスの低下をiOSが警告している場合(言い換えるとスマートフォンの速度が遅い場合)はバッテリーを交換する時期に差し掛かっています。このガイドを使って、新品の頃のようなiPhoneを取り戻しましょう。
バッテリーが膨張している場合は特別に注意しながら、適切に処理をしてください。
ご注意:この修理ガイドを完成した後、iPhoneディスプレイ上に、”正規品”バッテリーの使用に関する警告が表示されます。 これはオリジナルのAppleパーツを使用しても同じです。iPhoneが通常通り機能する場合は、この表示は無視してください。特に問題ありません。
この修理ガイドを完成したら、新しく装着したバッテリーのカリブレーションを行なってください。まず100%まで充電し、そのままプラグに繋いだまま2時間充電状態にします。それからiPhoneがローバッテリーでシャットダウンするまで放電させ、中断なく一気に100%まで充電してください。
必要な工具と部品
ビデオの概要
-
-
iPhoneの画面全体に、透明な梱包用テープを重ね合わせます。
-
次の手順でうまく吸盤が装着しない場合は、強力なテープ(ガムテープなど)を持ち手に折って、代わりにスクリーンを持ち上げてみてください。
-
-
-
青いハンドルを後方に引き、リバースクランプのアームのロックを解除します。
-
iPhoneの左/右側の端に向けてアームをスライドします。
-
吸盤カップを、ホームボタンすぐ上のiPhoneの下端付近に装着します。上部に一つ、下部に1つずつ取り付けます。
-
両側のカップをしっかりと押し付けて、取り付けたい位置に装着します。
-
-
-
青いハンドルを手前に引くと、アームがロックされます。
-
ハンドルを時計回りに360度回転させ、カップが両側をストレッチするまで回し続けます。
-
吸盤の位置が合っていることを確認してください。装着位置がずれ始めたら、吸盤を少し緩めてアームを装着し直してください。
-
-
-
iOpenerを熱し、リバースクランプのアームに通します。
-
iOpenerをiPhoneの下端に重なるように折ります。
-
1分ほど待つと、粘着剤が剥がれ、隙間ができます。
-
オープニングピックをスクリーンではなく、スクリーンとプラスチック製ベゼルの下の隙間に差し込みます。スクリーンには差し込まないでください。
-
次の3つの手順をスキップします。
-
-
-
吸盤カップをしっかりと引き上げます。リアケースとフロントパネルの間に僅かな隙間が生じるまで一定の力で引っ張ります。
-
隙間に開口ピックをスクリーンとプラスチックベゼルの間の下の隙間に差し込みます。スクリーン自体には差し込まないでください。
It seems like I need a third hand to do this. To hold the phone; hold the suction cup; and push the pick in the space.
-
-
-
ロジックボードのコネクターブラケットを固定している次の5本のネジを外します。
-
1.0 mm Y000ネジー3本
-
1.3 mm Y000ネジー1本
-
3.7 mmプラスネジー1本
FYI: I used a tiny piece of scotch tape to hold those 1mm screws in place while aligning the magnetic screwdriver. Otherwise they are so tiny the magnetic bit pulls them right out the hole.
-
-
-
-
スパッジャーもしくは指先の爪を使って、フロントパネルセンサアセンブリのコネクタの接続を外します。
In my phone the connector made poor contact with the socket resulting in no sound audible through the phone receiver/headset. There was an overhang of insulation close to the socket which I believe may have prevented a good connection. So if you have these kinds of audio problems you might see if this is the problem.
-
-
-
スパッジャーもしくは指先の爪を使って、ソケットからデジタイザケーブルのコネクタの接続を外します。
Reassembly: reconnecting the press connectors upon reassembly was so hard, even for the ones not seated in a recessed location !! It took me two days to get them reconnected. What helped me was to shine bright lights on all sides of the iPhone and then hold the iPhone vertically like a book and press it in that way. They are now all in, but the touchscreen functionality has disappeared :( so I will need to reconnect that one.
-
-
-
ゆっくりとケーブルを持ち上げながら、接着剤から剥がします。
Will replacing camera and sensors fix damaged face I'd
No, FaceID will be disabled because the original sensors are paired with the logic board.
-
-
-
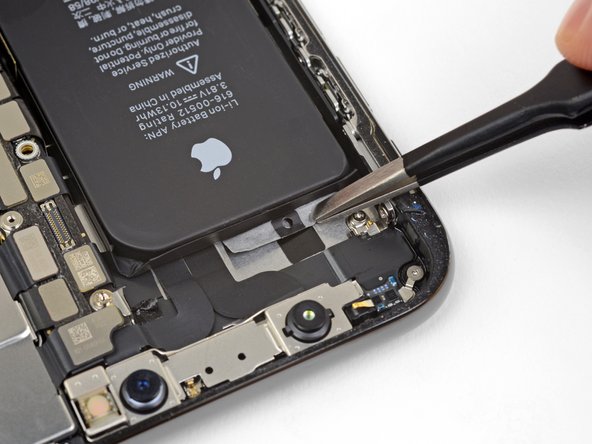
Taptic Engineとメインスピーカーの下にある2つのブラケットを固定している5本のネジを外します。
-
1.0 mmトライポイントY000ネジー1本
-
1.3 mmプラスネジー2本
-
1.7 mmプラスネジー1本
-
1.8 mmプラスネジー1本
Bonjour,
Plus pratique avec une Y000. Dans mon cas c’était impossible en Y00.
Bonne journée. :)
got stuck on the 1.8 mm screw and had to abort. The Phillips head provided “PH000” didn’t quite fit and stripped the screw.
I ended up skipping this step through 32. It’s not necessary to take the speaker and taptic thing off. I just used the thin black spudger flat edge and pried under the battery on the L-shaped edge and dislodged the adhesive and then did the same on the top edge. You will end up bending the old battery but that’s ok—just don’t poke it. keep poking the flat edge of the spudger in there kind of like a knife to break the adhesive. once you get at least two spots of the adhesive pulled, the rest comes up quite easily when you lift the whole battery.
I agree with R.J. The bracket screws are minute. They are much easier to remove than to put back. Avoid taking them out if you can.
-
-
-
スピーカーを取り出します。
I thought my speaker gasket was also missing, however looking back into the part box I found it tucked under the flap at the other (unopened) side of the box. Glad I took a second (and closer) look. IFIXIT needs to do a better job securing very small parts as it is very easy for these types of parts to get jostled during shipping and then could fall out or stuck in the box unnoticed. I've purchased iFixit products for more than 10 years and am super satisfied their quality in parts and provided instructions. Hopefully they'll make some adjustments to their shipping containers as I'd love to continue using them.
My speaker gasket was stuck to the inside of the box also. Unfortunately it has the back peal removed and has stuck itself to the cardboard box. I tried to remove it but it was firmly attached. Bummer. This is my first iFixIt. Please package it more carefully as the other person said.
I can't find mine in the part box. Is it possible it was excluded?
It might have fallen out. Search in the crevasses of the box. If you still cannot find it contact iFixit.
Update to last comment, I looked again at the listing for the battery with and without the "fix it kit". I ordered without, and apparently, the speaker gasket is part of the kit. Will need to order separately and take the phone apart again and replace the seal and battery adhesive again to install the gasket.
-
-
-
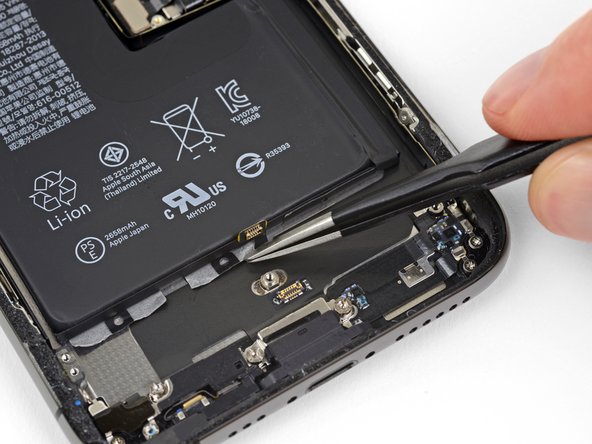
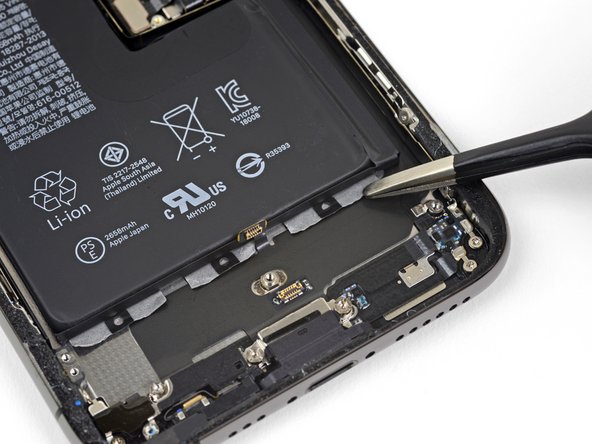
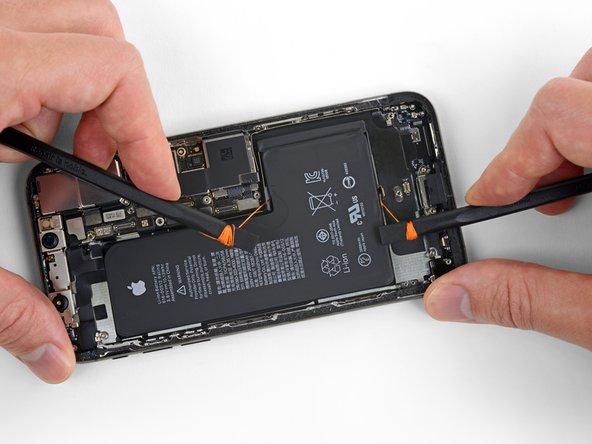
バッテリーの底側端から残りの2本のタブについても同じ作業を繰り返して、先端を取り出します。
The tabs are stuck on with the same glue that is holding the battery down. It is fairly strong but will come off with some patience and consistent progress.
Despite the photo, I do NOT suggest using the tweezers for this but the black plastic spudger that comes with the kit. I say this after having the tweezers lose grip and slide across the bottom black ribbon attached to the case. If you must use the tweezers because of the strength of the glue, use a downward force into the case bottom, not an outward force. That way, you will not have the same happen to you…
Here is hoping the slight scratch did not damage anything vital…
-
-
-
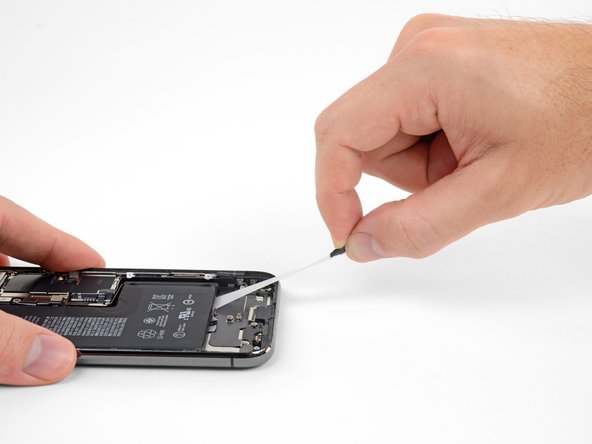
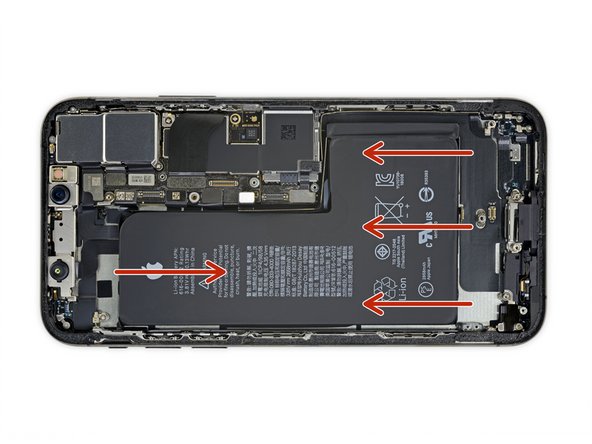
ストリップを取り出せる確率を高めるために:
-
iPhoneの両側を持ち、バッテリーを押さえないでください。
-
ストリップを引っ張る際にはできるだけ水平に、シワが寄らないようにしてください。
-
ストリップが十分に伸びきって、乖離するまでゆっくりと時間をかけて引っ張ります。各ストリップを取り外すには約15−30秒かけて、慎重に引っ張ります。
-
低い角度でストリップを引っ張ります。バッテリー下側の端に引っかかって切断するのを防ぐことができます。
-
ストリップがバッテリーの下で切断してしまい取り出せない場合は、次のストリップに作業を移してから、下の追加手順に従ってください。
Pour cette étape, vous pouvez saisir les bandes adhésives avec une pince à bouts ronds (pour éviter de percer la batterie) et l’enrouler petit à petit.
-
-
-
接着ストリップが切断して、バッテリーがリアケースに貼り付いたままの状態は、90%以上の高濃度イソプロピルアルコールを数滴、残留したままのストリップ付近のバッテリー下に注入して、除去します。
-
1分間待機して、慎重にバッテリーを持ち上げます。
-
-
-
バッテリーの底で接着ストリップが切断してしまいリアケースに付いたままの場合はiOpener かヘアドライヤーを準備して、バッテリー裏のリアケースに直接熱をあててください。
-
iPhoneを裏返しにして、頑丈な糸(デンタルフロスや薄いギター弦など)をバッテリーの下にくぐらせます。
-
のこを引くように、糸を左右にスライドしながら、バッテリー上部から下部まで接着剤を切り込みながらスライドします。この作業には若干時間がかかります。忍耐してバッテリーを外しましょう。バッテリーにダメージを与えたり変形させないようにご注意ください。
-
バッテリーの上側もしくは下側から作業を始めて、中央部分に向けて引っ張ります。バッテリーのストリングをバッテリー中央部分は引っ張らないでください。この下にリボンケーブルやワイヤレス充電コイルが搭載されています。
I didn't have any of the alcholol, so came in straight here. Can't over stress the need for patience, but once I put the phone on my microwaved sock of rice (that's how we roll) and started to gently saw away with the floss - it all came good.
-
-
-
バッテリーの下端を掴み、iPhoneから取り出します。
-
バッテリーを装着して、接続を外してからデバイスの再組み立てを継続してください。
For those that plan to proceed with the hack that eliminates the “battery is not genuine” message and no battery health information (requires extra tools that most don’t have), be careful not to bend the original battery’s flex cable too much. I found out the hard way that the flex cable doesn’t really “flex” much and ended up snapping in half when trying to hook it up to a programmer. So much for trying to do the hack :(
Willy Parr - 返信
How do I force restart and calibrate the battery at the same time?
-


交換用のパーツとオリジナルのパーツを見比べてください。残りのコンポーネントを移植する必要があるか、パーツを装着する前に接着剤の裏張りを取る必要があります。
デバイスを再組み立てする際は、これらのインストラクションを逆の順番に従って作業を進めてください。
不要になった電子廃棄物は 認証済みリサイクルセンターで処分してください。
修理が上手くいきませんか?トラブルシュートのヘルプにはアンサーコミュニティを参照してください。
交換用のパーツとオリジナルのパーツを見比べてください。残りのコンポーネントを移植する必要があるか、パーツを装着する前に接着剤の裏張りを取る必要があります。
デバイスを再組み立てする際は、これらのインストラクションを逆の順番に従って作業を進めてください。
不要になった電子廃棄物は 認証済みリサイクルセンターで処分してください。
修理が上手くいきませんか?トラブルシュートのヘルプにはアンサーコミュニティを参照してください。
110 の人々がこのガイドを完成させました。
以下の翻訳者の皆さんにお礼を申し上げます:
100%

これらの翻訳者の方々は世界を修理する私たちのサポートをしてくれています。 あなたも貢献してみませんか?
翻訳を始める ›


17 件のコメント
i don’t know what happened but now my iphone xs will only boot into recovery mode and there is nothing showing up on the display. i have double triple quadruple checked and dont know what my issue is. any feedback on the matter would be greatly appreciated.
My iPhone has been turned off completely for the past few weeks, I have tried to hard restart it but nothing seems to work. It has a black screen and isn’t responding to anything. Nothing has ever been wrong with the phone it just shut down one day and hasn’t restarted since. Do you have a suggestion to get my phone working again?
Anyone have an issue where the phone won’t charge after replacing the battery/
Yes, I cant figure out why. I wonder if because its not the original battery, it wont let the new one charge? Idk.
Nick Lo -
It is possible the you went to deep with the plectrum, knocking of a capacitor from the logic board. I think it’s best you take it to a really good repair shop where the owner has expert solder skills to replace it.
Good luck
I ended up skipping steps 20-32. The kit didn’t come with the right screwdriver top and I realized it’s not necessary to take the speaker and taptic thing off.
I just used the thin black spudger flat edge and pried under the battery on the L-shaped edge and dislodged the adhesive and then did the same on the top edge. You will end up bending the old battery but that’s ok—just don’t poke it. keep poking the flat edge of the spudger in there kind of like a knife to break the adhesive. once you get at least two spots of the adhesive pulled, the rest comes up quite easily when you lift the whole battery.
Hey, after changing the battery the volume and silent buttons stopped working. There is no apparent reason as why they would, what could it be and can it be fixed before I close the phone ??
you've likely damaged the volume flex cable that lies under the battery, it is very thin and easily damaged. unfortunately pull tabs rarely work as intended. alcohol is the best method for loosening adhesive.
I skipped removing the taptic engine and speaker because I knew I was going to break the adhesive strips when pulling as they break very easily. Just dripped some alcohol, waited 10 minutes and with a bit of force the battery came right off without even bending. Makes the process much quicker although that’s not the intended way of removal.
Ive got a metal protection plate of some sort in-between the screen and the battery around the inside perimeter of the phone. it is blocking access to most of the bottom screws. and does look like it pulls out. might be fixed at the bottom or sides.
anyone found one of these plates in their attempts? might have been placed by a repairer at some point
that is the display frame you have damaged it and you will need to replace the display because the display has its own frame and that frame holds it in place.
My phone's touch screen and camera were unresponsive after reassembly. I prised it all apart and checked all the connections 3 times unfortunately ruining the glue around the edge and then after Googling found a Forced Restart cleared the problem. Press and release volume up button then the volume down button then hold and keep holding the on off button on the right until the apple appeared. And hey presto it all worked!!! I'm well chuffed as I'm a 64 year old 'girl' with no experience of this sort of thing but am pretty competant with practical things - I thought 'how difficult can it be?' Not too difficult, except for removing the adhesive from behind the battery (should have read the detailed instructions properly) which I eventually did with some Isopropyl alcohol following the further instructions.
My top tip! I found putting all the screws on a bit of 'blue tac' kept them safe and in order.
Very tricky indeed but thankfully I managed to replace battery and screen and it worked 😊
Paul Tighe - 返信
After the change of battery the lower speaker has stopped to work. The battery it's ok and works fine but i have only speaker working right now.
I have tried to connect and disconnect it, with and without the battery connected but nothing. I don't thing that the speaker is dameged, but maybe the connector? What i can verify?
After replacing battery, I am getting ghost typing and activity on the touchscreen without touching it. And the phone is hot. What did I do wrong? Replaced a battery in my iPhone 6s prior to trying battery replacement on the XS, thought I would have equal success, not! Also noted the warning about the genuineness of the new battery, don't mind that but I also lost the health of the battery status; was that supposed to happen?
Friendly Suggestion: would have purchased the full fix kit had I know I would need to replace the adhesive gasket during reassembly. Having purchased many kits before, I have all the tools. When looking at the photo, it didn't seem to include anything other than the battery, so I just ordered the battery. Missed the tiny adhesive gasket! Might want to highlight items like that so when people order, they don't make a similar mistake.
Der Original Akku ist codiert. Egal, ob man einen zweiten Apple Original Akku oder einen neuen Fremdakku einbaut erscheint bereits in den Einstellungen eine "Wichtige Batterienachricht" mit einem roten Punkt. "Unbekanntes Bauteil" und die "Informationen zum Batteriezustand" sind nicht verfügbar. Diese Nachricht verbleibt immer und nervt auf Dauer immens.
Der Akku muss angelernt werden und dieses können von jetzt an nur authorisierte Apple Servicebetriebe und diesen ist es durch Apple verboten die notwendige Info weiterzugeben.
Dies ist nicht zu verwechseln mit der bereits bekannten Rekalibrierung seit iOS 14.5.
Seit dieser neuen Codierung kostet der Akkutausch bei Apple auch nicht mehr 75 € sondern aktuell 99 € (Stand Novmber 2023 in Deutschland).
Damit sind künftig alle nicht authorisierten Servicebetriebe raus - denn wer will schon dauernd diese Mitteilung auf dem Bildschirm haben?
Überlegt vorher, ob unter diesen Bedingungen ein eigener Akkutausch noch sinnvoll ist .....
Manfred Wachtel - 返信
Lieben Dank @manfredwachtel ! Mehr Infos dazu haben wir auch in unserem Blog zusammengefasst: https://de.ifixit.com/News/78890/teileko...
Sandra Hiller -