はじめに
Taptic EngineはiPhoneのバイブレーションでハプティック(触覚)によるフィードバック機能があります。このガイドを使って、iPhoneXRのTaptic Engineを交換/取り外しをしてください。
このガイドではディスプレイアセンブリを完全に取り外します。これは作業中、アクシデントでケーブルを引っ張ったり、ダメージを与えないようにするためです。ディスプレイケーブルにダメージを与えずにTaptic Engineを取り出せる方は、ディスプレイケーブルの接続を外す手順をスキップしてください。
必要な工具と部品
-
-
解体を始める前に、iPhoneの電源を切ってください。
-
iPhone下側の底から、2本の6.7 mm長さのペンタローブネジを外します。
-
各ペンタローブネジのネジ頭の下に黒いゴム製ガスケットがついています。これは防塵防水性能を最大限に強化するためです。このガスケットのコンディションをチェックしてください。必要であれば、再組立の際にネジを交換してください。
-
-
-
iPhoneの画面全体に、透明な梱包用テープを重ね合わせます。
-
次の手順でうまく吸盤が装着しない場合は、強力なテープ(ガムテープなど)を持ち手に折って、代わりにスクリーンを持ち上げてみてください。
-
-
-
青いハンドルを後方に引き、リバースクランプのアームのロックを解除します。
-
iPhoneの左/右側の端に向けてアームをスライドします。
-
吸盤カップを、ホームボタンすぐ上のiPhoneの下端付近に装着します。上部に一つ、下部に1つずつ取り付けます。
-
両側のカップをしっかりと押し付けて、取り付けたい位置に装着します。
-
-
-
青いハンドルを手前に引くと、アームがロックされます。
-
ハンドルを時計回りに360度回転させ、カップが両側をストレッチするまで回し続けます。
-
吸盤の位置が合っていることを確認してください。装着位置がずれ始めたら、吸盤を少し緩めてアームを装着し直してください。
-
-
-
iOpenerを熱し、リバースクランプのアームに通します。
-
iOpenerをiPhoneの下端に重なるように折ります。
-
1分ほど待つと、粘着剤が剥がれ、隙間ができます。
-
オープニングピックをスクリーンではなく、スクリーンとプラスチック製ベゼルの下の隙間に差し込みます。スクリーンには差し込まないでください。
-
次の3つの手順をスキップします。
Please UPDATE THIS STEP to say 'insert the opening pick underneath the PLASTIC FRAME OF THE SCREEN' and not the screen. Way too many people are taking this as the way to do it then posting their screen looks different when it's open when they've actually removed the screen leaving the frame in place. It's not rocket science.
Thanks for the suggestion! We updated this step to clarify that.
-
-
-
ヘアドライヤーもしくはヒートガンを使うか、iOpenerを準備してiPhoneの下部端に約1分間載せます。留められた接着剤が柔らかくなります。
An alternative to the Iopener or heat gun is to heat water to EXACTLY 80 degrees F (cooking thermometer is great for this) and pour into a reinforced ziplock type bag. Leave the bag on the screen, but be sure that none of the hot water rests on the zipper portion, as the water is hot enough to soften that seal and leak out on to your device! This meat had is my personal favorite as the heat is distributed very equally and precisely as compared to a heat gun, but is more accessible than the Iopener.
-
-
-
吸盤カップをしっかりと引き上げます。リアケースとフロントパネルの間に僅かな隙間が生じるまで一定の力で引っ張ります。
-
隙間に開口ピックをスクリーンとプラスチックベゼルの間の下の隙間に差し込みます。スクリーン自体には差し込まないでください。
-
-
-
開口ピックを本体下側の左端周辺までスライドします。それから、ディスプレイに留められた接着剤を切開しながら端に沿って本体上側に向けて移動します。
I think it's important to note that depending on how a screen was damaged, make sure to insert the pic under the black bezel directly under the actual screen. This bezel is a frame around the digitizer. I unknowingly inserted the pic between the bezel and the screen, and separated them both. I did this all the way around the phone. So I basically had to struggle to keep together two different sections of the display assembly because of this mishap, until I removed all the ribbon connectors. It made things much more difficult.
-
-
-
iPhoneの下側端にオープニングピックを再度差し込みます。接着剤を切断しながら本体下側の右端より上部に向けてスライドします。
My replacement screen for the XR has a black rim but it looks pink. Is that normal?
Step 11 says not to insert your pick around the right side to avoid damaging cables, then Step 12 says to insert it on the right side. Help, I'm confused!
Hi there!
Thank you for the feedback! The wording in step 11 was definitely ambiguous, so we have changed it! You only need to avoid the marked spots rather than the right edge.
-
-
-
-
iPhoneのディスプレイを左側から右側に向けて(本のページをめくるように)開きます。
-
作業中、ディスプレイが邪魔にならないよう、ディスプレイを立てかけるための衝立てを準備してください。
sure looks like the "hinge" is on the right hand side to me.. not left...!
Doug Trout - 返信
If you leave the suction cup attached to the screen during the “hinging” process, it makes for a very handy holder for the screen until it’s completely detached.
-
-
-
バッテリーコネクタのブラケットを固定している1.2 mm Y000ネジを3本外します。
-
ブラケットを取り出します。
Definitely make sure all three lobes of your tool are aligned before use (it’s a little harder to tell with this style of bit) and apply even and adequate pressure to ensure it grabs as you spin the driver to prevent disfiguring the lobes/slot of the screw head.
Unfortunately my Y000 tool was perhaps not the best fit (tolerance a bit off) in these screws and I ended up stripping out the heads of all three of these. I started to panic but after I sanded the tip of my Y000 bit down a little with super fine grit (1000CW-C) sand paper to flatten the domed tip (visible with macro lens) and give it a bit more bite I was able to remove and reinstall without issue—in fact I had to remove and install them twice since I forgot my adhesive tape during reassembly, so the screws survived and the sanded bit worked.
+1 to above comment. I bought a cheap kit from Amazon and the Y000 screw driver is not good for this job. I’m concerned that I may have disfigured the heads and i type this comment in the midst of my fix :D Be gentle and assess if you can remove at least one screw with your driver before rummaging through all three and other similar screws holding display connector as well.
Shan Potti - 返信
Update to above comment. I got hold of a Y0.8 screw driver bit (lucky to find an ORIA screw driver kit in my office) and it works like wonders :) Now back to work…
Shan Potti - 返信
-
-
-
スパッジャーの先端を使って、バッテリーコネクタをソケットからまっすぐ引き抜きます。
-
コネクタをロジックボードから離すように曲げて固定します。アクシデントでロジックボードに接続してしまい、作業中、電源が入らないようにするためです。
-
-
-
ディスプレイコネクタのブラケットを固定している1.2 mm Y000ネジを2本外します。
-
ブラケットを取り出します。
-
-
-
スパッジャーの先端を使って、ディスプレイケーブルコネクタの接続を外します。
The new display cable isn’t snapping in but I was just able to snap in the old one. Did I break the new one somehow?
Same it is really frustrating, just keeps slipping up and its bound to get damaged
-
-
-
リアケースにロジックボードコネクタのブラケットを固定している5本のネジを外します。
-
1.3 mm #000 プラスネジー1本
-
1.5 mm #000 プラスネジー1本
-
1.2 mm Y000 ネジー3本
-
ブラケットを外します。
I’m not sure it makes much if any difference, but we went ahead and swapped the order for you guys. Thanks for your comments!
I just repaired another XR, and you are right! It doesn’t make any differnerce in the order these screws come out. I still damaged this fragile piece. As I work on more of these, I’ll figure out a way to remove this screw without damaging the clip. For now everyone, just use extra caution when removing the 1.3mm phillips screw! Thanks Jeff
I’ve now done at least 6 of these so far and I have fairly consistent good results by taking the 2 Philips head screws out first, then doing the Y screws.
Stow -
Is this piece important for the repair if broken? I have broken it on a home repair. What is it used for? Is it a grounding connection or is it completely unimportant. More information needed please
I’m wondering that too. Is this piece important?
I can confirm that taking out the 1.3 mm screw first then the 1.5 mm screw works the best. If done correctly, you should be able to to remove the rest of the screws and pull the panel off with the clip still attached to the panel. For reassembly, start with the 1.5 mm screw then the 1.3 mm screw.
I don’t remove the small screw at all. I just slide out the metal cover plate and slide back in to reassemble.
this is what i have done as well. Care is still needed to avoid damaging this part. However, it is seemingly far less prone to damage or loss and thus less risky for this repair process.
I too broke this shield. In looking over this problem I believe it’s best to loosen, but not remove, either screw first then the other. To be clear, loosen the red or yellow screw but only just to break it free, then the second screw. Then remove both and the others and the shield should remain in one piece. I put it back with the broken part (on the red screw) and made sure the two are in contact so there’s conductivity as these shields serve a purpose other than just holding in connectors. My phone works fine with this fix.
Is this small bracket important if broken??
Mine is broken
Mine is broken and my apple pay doesn’t work. Something to do with NFC antenna this little clip??
I'm guessing so. I replaced a screen on a phone I bought from a friend. I noticed this bracket was broken when I disassembled the phone but didn't think much of it. When I reassembled it my NFC also does not work. Bummer. A lot of people in these comments have asked if it is crucial that this bracket be connected. Can someone from iFixit or other please reply to those comments?
Kyaw-Zin is right because the shield contains of two tin parts. But there is another option:
1. Unscrew the yellow and orange screws first.
2. Lift the shield gently that it can turn about 20° anticlockwise.
3. Open the red screw and let the shield turn with it the first degrees.
The first time I did this repair, I didn’t see the comments ahead of time and broke the bracket, even removing the 1.3mm screws first. The second time I did the repair, I was prepared and being extra careful, but the simple act of turning the 1.3mm screw head was enough to break it. If I ever have to do this repair again, I’ll just leave the screw in and try to slide the plate out with the screw (and bracket, hopefully) still in tact, as per Kyaw-Zin Win.
None of the screw driver bits I got fits the 1.3mm and 1.5mm screws. How do I remove them?
Same issue as above. The bits provided in the kit do not work with the 1.3mm and 1.5mm screws
Further to above comment about bit not working. Had to go and purchase another PH000 from Home Depot and that worked
I’ve broken that little bracket attached to the red screw. Is it important and can I get a replacement????? Thanks all
steve.arfa - 返信
Broken the clip. Is this important??
Don't remove the 1.3 Phillips screw! Twisting this screw will break the smaller bracket that is clipped to the larger. Remove all the other screws. Block the smaller bracket from moving as you gently slide the larger bracket horizontally toward the battery until free. The smaller bracket can stay in place while the screen is replaced. When reassembling, support the small bracket by backing with a spudger or similar tool.
I just broke the smaller bracket also :( I didn´t notice these comments until now :(
It looks like part of the antenna for NFC, as all except NFC works on my iPhone now.
It should be repairable using some wire wrap wire, either twisted around the two screws that connected that part of the bracket (or soldered in place). I will try and report back if it works.
Success!! I managed to re-construct the small arm of the bracket by screwing the 1.3mm screw back in with some 0.3mm enamel wire soldered into what was left of the small bracket arm on the screw, then the other end of the enamel wire I wrapped under the 1.5 wire screw's head (enamel exposed to bare metal), then screwed both screws down. also I lifted up the small metal arm with a screw driver (to make sure it reconnects with the display grounding square) ..and NFC worked again (slightly different antenna pattern mind (need to place cards slightly higher up the rear of the phone). Anyway works again :)
-
-
-
スパッジャーの先端を使って、ソケットからフロントセンサアセンブリのコネクタを引き抜きます。
During testing, make sure your proximity sensor is not on upside down, as it’s easy to connect upside down. Your phone will boot loop if it’s on incorrectly.
-
-
-
ディスプレイアセンブリを取り出します。
unclear if this is where screen removal ends
I had the same question, but the answer is yes. Steps 21-30 are removing parts from the original screen that need to be reattached onto the new screen. You are no longer working inside the frame, but on the back of the screen itself.
I apologize for missing these comments initially, but yes that’s correct, the screen is removed now and the rest of the guide goes on to other parts, either in the phone or on the back of the screen. Good luck with the repair!
The alternate method of removing the battery should be highlighted as a standard option. There is so much more work and potential to damage the parts than if you left them in place and carefully with plenty of heat remove the battery. I so wish I had seen this before!
-
-
-
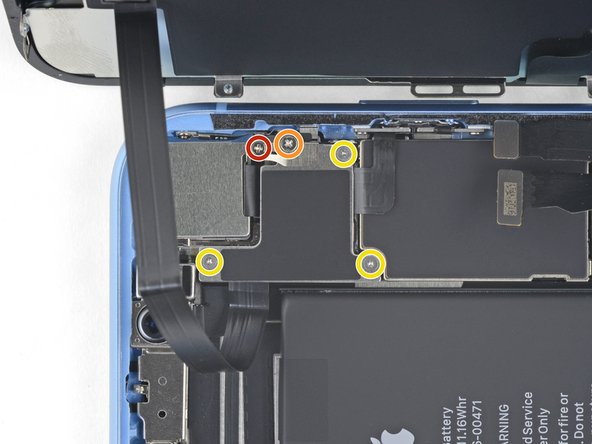
スピーカーとTaptic engine下のブラケットを固定している次の7本のネジを外します。
-
1.4 mmプラスネジー3本
-
1.7 mmプラスネジー2本
-
1.9 mmプラスネジー1本
-
1.6 mmプラスネジー1本
-
-
-
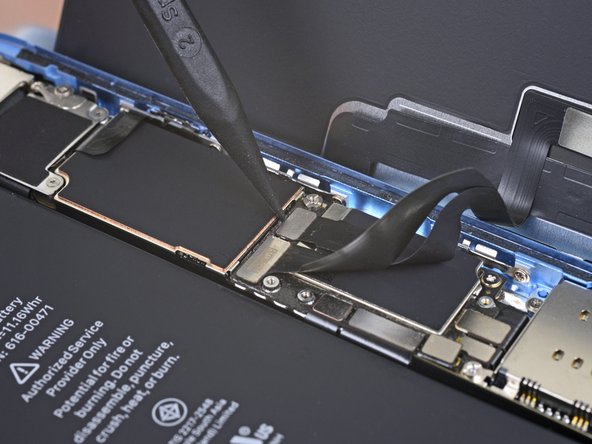
Taptic Engineコネクタのカバーを覆っている小さな長方形のゴムと黒いテープを外します。
In my case, the rubber rectangle was mechanically attached to the Taptic Engine connector cover. To remove the cover, I lifted the thinner portion of the rubber rectangle and removed the 1.8mm Phillips screw indicated in step 25. Once the 1.8mm screw was removed the cover and the rubber square came off as one piece.
Joel White - 返信
-


交換用のパーツとオリジナルのパーツを見比べてください。残りのコンポーネントを移植する必要があるか、パーツを装着する前に接着剤の裏張りを取る必要があります。
デバイスを再組み立てする際は、これらのインストラクションを逆の順番に従って作業を進めてください。
不要になった電子廃棄物は 認証済みリサイクルセンターで処分してください。
リペアが上手くいきませんか?トラブルシュートのヘルプにはアンサーコミュニティを参照してください。
交換用のパーツとオリジナルのパーツを見比べてください。残りのコンポーネントを移植する必要があるか、パーツを装着する前に接着剤の裏張りを取る必要があります。
デバイスを再組み立てする際は、これらのインストラクションを逆の順番に従って作業を進めてください。
不要になった電子廃棄物は 認証済みリサイクルセンターで処分してください。
リペアが上手くいきませんか?トラブルシュートのヘルプにはアンサーコミュニティを参照してください。
24 の人々がこのガイドを完成させました。
以下の翻訳者の皆さんにお礼を申し上げます:
100%

Midori Doiさんは世界中で修理する私たちを助けてくれています! あなたも貢献してみませんか?
翻訳を始める ›

One of my gaskets was as shown in your second photo, the other had been worked into the threads (as if smeared) probably from the factory and was completely unusable.
In place of replacements (unsure of where to purchase) I just used a clear silicone caulking on both screws upon reassembly to offer at least some water seal. I wish these gaskets were included with the gasket waterproofing sealant kit!
Erica - 返信
Is there any place to buy these screw gaskets? I haven’t seen it mentioned anywhere but one of mine was pretty much chewed up. Silicone should work but I’d prefer the oem solution.
Chilinh Nguyen - 返信
I found a place on Amazon that sells them. It's cheapest to get a full set of screws than to get just these. $5-$6 USD.
J Olin -
Can it be dead?
Lulu navarro - 返信
If I transfer the data from the old to the new battery with an icopy, don't I get an error message?
David Julian Krause - 返信
how am i supposed to know if the battery is below 25% if the screen won't turn on?
Beth Jackson - 返信