はじめに
Lightningポートのクリーニングを試しても効果がなかった場合、このガイドを参照して、iPhone 8 PlusのLightningコネクタアセンブリを交換してください。そうすることで、多くの充電と接続に関する問題を解決することができます。
必要な工具と部品
-
-
油性ペンでオープニングピックの先端から3mmの位置にマークを入れます。
Got to step 2 and realized the fix kit doesn't include an opening pick! Looks like a guitar pick, and I have those lying around. Is that expected? Looks like the pick is used in many steps below. There's a little blue crowbar that isn't mentioned in the instructions. Perhaps that replaces the opening pick?
Hi! I can't see which guide you were using when writing this comment. Can you reply here with which guide and fix kit you used?
I see you posted this in Meta. I hope it's resolved soon! In the meantime, a guitar pick may work well enough for your repair.
what fix kit?
My fix kit didn't include an opening pick either
My AliExpress refurbished screen came with a pick that has a coin-like circle that pops out, so no modification was necessary
-
-
-
iPhoneの画面全体に、透明な梱包用テープを重ね合わせます。
-
次の手順でうまく吸盤が装着しない場合は、強力なテープ(ガムテープなど)を持ち手に折って、代わりにスクリーンを持ち上げてみてください。
-
-
-
次の3つの手順では、デバイスの開口作業を簡単にするために開発されたツール、リバースクランプの使い方を紹介します。リバースクランプを使用しない場合は、この3つの手順をスキップして別の方法をご覧ください。
-
青いハンドルを後方に引き、リバースクランプのアームのロックを解除します。
-
iPhoneの左/右側の端に向けてアームをスライドします。
-
吸盤カップを、ホームボタンすぐ上のiPhoneの下端付近に装着します。上部に一つ、下部に1つずつ取り付けます。
-
吸盤カップ両側をしっかりと握って、当てたい位置に吸引力を加える、装着します。
-
-
-
青いハンドルを手前に引くと、アームがロックされます。
-
ハンドルを時計回りに360度回転させ、カップが両側をストレッチするまで回し続けます。
-
吸盤の位置が合っていることを確認してください。装着位置がずれ始めたら、吸盤を少し緩めてアームを装着し直してください。
-
-
-
iOpenerを熱して、リバースクランプのアームに通します。
-
iOpenerをiPhoneの下端に重なるように折ります。
-
接着剤がはがれて、隙間ができるまで1分待します。
-
クランプで十分な隙間が作れたら、スクリーンのプラスチックベゼルの下にオープニングピックを挿入します。
-
次の3つの手順はスキップしてください。
-
-
-
ヘアドライヤーを使用するか、iOpenerを準備し、ディスプレイ裏側の接着剤を柔らかくするために、iPhoneの下端に約90秒間あてます。
6/14/23 I did this repair but used a heat gun on low for 60 seconds. This allowed me to open the case as the instructions say, but in the end the Home button failed. I probably over heated it. I used this "go around" for a virtual Home button. I don't care about touch ID:
-
-
-
ホームボタンのすぐ上にあるフロントパネルの下半分に吸盤を取り付けます。
Using just the single suction cup that is included in the battery replacement kit probably wouldn’t open the device. An iOpener and an iSlack should be the recommended method. However, you can get it open with just the single suction cup and iOpener, but does take a lot of time.
Get an iOpener and iSlack with the battery replacement kit.
I used a flat x-acto (#18) blade knife tool to gently pry back the screen enough to allow me to insert the pick near the bottom corner. I then worked the pick under the screen as mentioned in steps 5 & 6 below then. This worked really well for me.
Kyle Luksa - 返信
I used the suction cup without heating the phone - the adhesive came away quite easily without applying any heat. Maybe due to age of phone (nearly 4 years old). Worth trying.
My screen was very shattered, and was quite hard to get suction, as my tape was very low quality. However, after pulling it up a little bit, I was able to insert a regular razor blade into the very small gap and used that as a lever.
Oh my goodness! Don't do that again. You can definitely damage something in the phone if you use a sharp metal razor blade..
cytur -
-
-
-
一定の力で吸盤カップを引き上げて、フロントパネルとリアケースの間にわずかな隙間を作ります。
-
隙間に開口ピックまたは薄い開口ツールを挿入します。
After multiple tries and using a very hot iOpener, it will not open.
In sheer frustration, I pulled out my trusty pocket knife and managed to lift the bottom of the screen slightly, but in the process, cracked the glass from the bottom to the home button. The case is open now.
-
-
-
開口ピックを左下からiPhoneの音量コントロールボタンとサイレントスイッチの方向にスライドさせて、ディスプレイを固定している接着剤を剥がします。
-
ディスプレイの左上隅付近で停止します。
Do not go over the top otherwise you can crack the screen. Sadly happened to me :(
The instruction should be:
“Stop near BUT BEFORE REACHING the top left corner of the display”
-
-
-
iPhoneの右下隅に開口ピックを再度差し込み、角を回ってiPhoneの右上にスライドさせて接着剤を剥がします。
I had really good luck using a hairdryer on some of the more stubborn portions of adhesive.
-
-
-
ディスプレイ下の開口ピックを左上の角からiPhoneの上端に沿ってスライドさせて、残りの接着剤を剥がします。
Be very careful at this step. The glass at the top will break very easy when the display is lifted too much.
Gerdschi D - 返信
-
-
-
本のページをめくるように、ディスプレイの左側を持ち上げてiPhoneを開きます。
-
作業がしやすいように、iPhoneを開口をしたままディスプレイの後ろに衝立を置き、立てかけてください。
Das “links” ist auf dem Foto rechts.
-
-
-
基板とディスプレイケーブル下側のブラケットを固定している次の長さの4本のプラスネジを取り外します。
-
2本の1.3 mmネジ
-
1本の1.4 mmネジ
-
1本の2.7 mmネジ
The Phillips screwdriver bit is the PH000. The measurement refers to the screw length.
Jack Harry - 返信
-
-
-
スパッジャーの先端を使って、基板上のソケットからバッテリーコネクターの接続を外します。
-
バッテリコネクタケーブルを基板から少し離して曲げます。アクシデントでケーブルがソケットに接触していまい、iPhoneの電源が入らないようにするためです。
When I reassembled the iPhone 8 Plus, I had to plug it into a Lightning cable to wake it up (just pushing power button wasn’t sufficient).
-
-
-
スパッジャーの先端か爪を使用して、ディスプレイ下側にあるコネクタをソケットから外します。
I got hold of a iPhone 8 Plus with cracked screen that I am planning to fix.
Here is my problem:
When I tried to take out the screen from my phone, (step 15-18) I was curious about the new screen, so I tried to connect it. It was completely dead! Then I tried the old cracked one, and suddenly that was dead to! This is a phone that some fool has been inside earlier and changed battery, but I suspect he has done some more really stupid things. The Taptic Engine is living its own life and vibrating every time I slightly touch the home button. (I have a new Taptic Engine) The phone is also full of dust and small particles that does not belong there. One tri-point Y000 screw (step 18) is even missing! Now the biggest problem is that both screens are black! I know the phone is on, because I hear voice command speak when I turn on the power. The screen worked before I tried to change it? And one last thing: My new LCD screen came with new flex cables. Is it possible to switch over, so I can use the old ones?
Hi,
Is your problem solved?
Be careful of damaging MOSFETs by the LH side of the large lower display cable. After replacing the battery and turning the device on, the phone showed low charge and didn't have a charging symbol even after plugging into multiple cables and chargers. Turns out I had damaged the logic board attempting to disconnect the connector.
-
-
-
前の手順で外したコネクターのすぐ後ろにある、下から2番目のディスプレイケーブルの接続を外します。
I used the other end of the spudger on this connector and it seemed to work a little better for me. I came in from underneath the top-right edge instead of the bottom right.
-
-
-
フロントパネルのセンサーアセンブリコネクターとブラケットを固定している2本のtri-point Y000ネジを取り外します。
-
1本の1.0mmネジ
-
1本の1.2mmネジ
una vite da 1mm e due viti da 1.2 mm???
Ciao Matteo! Grazie per l’osservazione. Ho appena modificato il testo :) La traduzione è aperta a tutti. Hai quindi la possibilità di fare le tue suggestione direttamente nel testo e sei il benvenuto se vuoi usare di questa possibilità nel futuro. Grazie ancora per la vigilanza! Saluti, Claire
The tool kit does include a 1.0 or1.2mm screwdriver! How am I supposed to remove those screws?
Bought the screwdriver that supposedly fits these screws and it still doesn’t work.
My bracket looks different. Can’t get these screws out.
kit came with wrong bit. i received 2x P02 (penta tips) and no tri point y000.
-
-
-
スパッジャーの先端か爪を使って、フロントパネルのセンサーアセンブリのコネクターをソケットから外します。
-
-
-
ディスプレイアセンブリを取り外します。
Should there be a step somewhere in here to point out when to remove the blue plastic from the new iFixit screen?
-
-
-
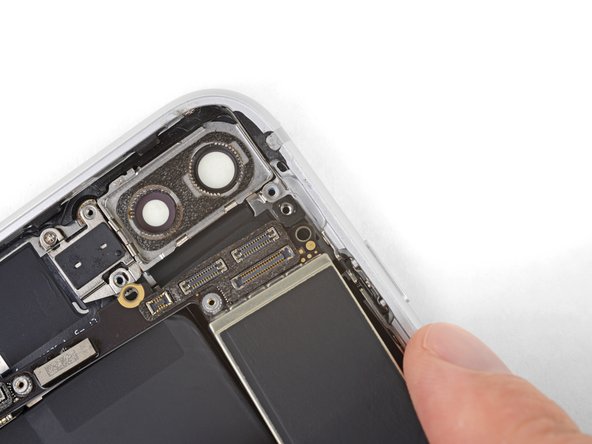
リアカメラのコネクタカバーブラケットを固定しているY000 ネジを2本外します。
-
1.4 mmネジー1本
-
1.4 mm (非鉄金属ネジ)ー1本
the standoff screw underneath the left screw came loose together and was impossible to detach from the screw. In a later step (49) it was possible to remove it together with the antenna flex cable
-
-
-
-
リアカメラモジュールのカバープレートを固定している2本のネジを外します。
-
1.8 mmネジー1本
-
2.7 mm (非鉄金属)スタンドオフネジー1本
Yeah, the flathead screw driver is not really a good option for the standoff screwdriver bit. I managed to remove the standoff screws easily enough, but replacing them with the flathead was laborious.
andystills - 返信
Does the second screw (nonferrous standoff 2.7mm) actually exist? My phone has not had any repairs before but did not have this screw, and the previous step says there's a Y000 screw (for the bracket) in what appears to be exactly the same location as this step says the standoff screw is.
-
-
-
リアカメラアセンブリを取り出します。
-
-
-
リアケースの上部端にアンテナコンポーネントを固定している1.3 mmプラスネジを外します。
This screw is stuck and will not come out. I'm using the same head I used for the previous one which is the same size. I've even tried them all. I can get any other screw fine but this one will not come out. Just wasted my time undoing everything up to then and this stupid screw is stopping me from finishing.
Jalen Pace - 返信
-
-
-
アンテナコンポーネントを本体の上部に向けて傾けます。
-
ネジボスをコーナーから下向きにスライドして外します。
I accidently ripped the screw boss of the antenna component. Is that very bad? Do I need to replace the antenna component, or could I try to solder it back on, or does it even matter? Thanks in advance.
-
-
-
Taptic Engineの隣に付けられたL字ブラケットを固定している3本のネジを取り出します。
-
1.3 mm Y000ネジー1本
-
2.6 mmプラスネジー1本
-
3.5 mmプラスネジー1本
De Y000 schroef nam meteen ook de 2.4 mm standoff-schroef aan de achterzijde mee. Wat lastig om die uit elkaar te halen.
-
-
-
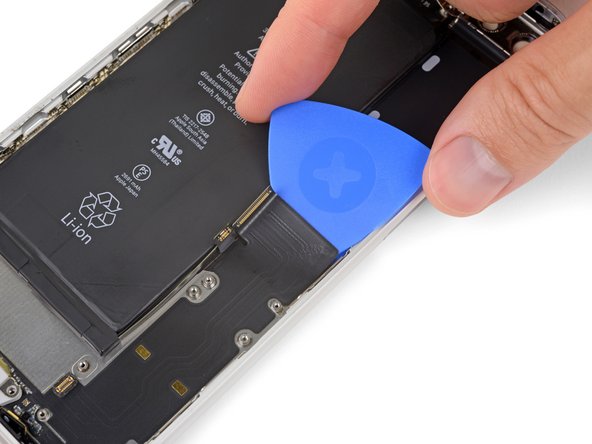
開口ピックを使って、スピーカーの表面に付けられたアンテナフレックスケーブルの接着部分を丁寧に剥がします。
-
-
-
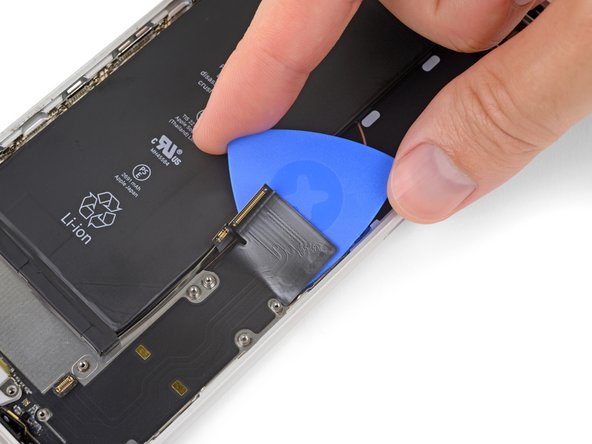
スパッジャーの先端を使って、Lightningポートの隣にあるソケットからアンテナフレックスケーブルの反対側の先端を外します。
I was unable to plug this back in when re-assembling. My home button doesn’t work anymore. The connector it was supposed to plug into seems to spin around.
Dan Putnam - 返信
I had a similar experience during this repair. My problem was that the nib on the ribbon that actually connects in to the socket came off the ribbon cable when I initially detached the cable. I didn’t realize this until after the repair, but I also had to replace the Wifi Diversity cable entirely. A tell-tale sign is that you don’t receive good cell reception.
Lucas -
I did not notice until reassembly, but the antenna socket pulled off the board. I have no micro-soldering tools. The friction of the connector was greater than the solder holding it in place.
The little connector in the first picture ripped the component off the circuit board when trying to pry it up so be careful. I’m guessing it’s like a previous poster said and the socket is stronger than the glue/material that holds the component to the PCB. This was on a new board during disassembly trying to locate a potential problem. Phone still workings with WiFi and cellular normally but the cellular signal is down about 1/3 on average wherever I am.
Mine broke too and wifi still works fine
Does this have anything to donwith upper speaker connection?
-
-
-
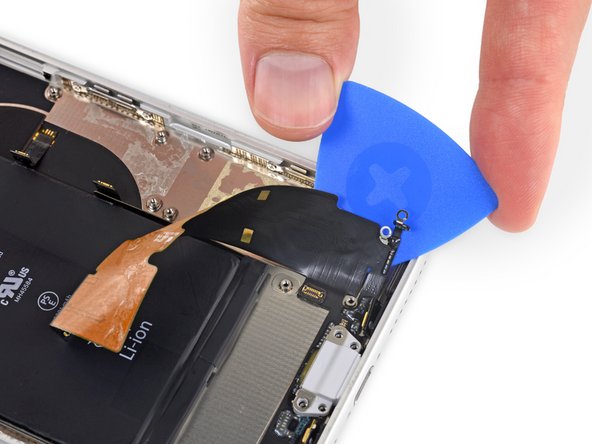
Wi-Fiダイバーシティアンテナを取り出します。
This had a little adhesive on the metal band. Couldn’t just pluck it out as shown. What I did worked but what I should’ve done is run my blue puck up and down the length.
I followed these steps to this point and maybe applied force in the wrong spot or too much force and it appears that when I loosened the wifi diversity antenna from the socket below the Taptic Engine module, it came up with the socket detached from the logic board. Did I just really screw up my iPhones WiFi capability?
-
-
-
Taptic Engineを固定している3本のネジを外します。
-
1.5 mmプラスネジー2本
-
2.4 mmスタンドオフネジー1本
-
-
-
iPhoneのリアケースの上部端にアンテナフレックスケーブルを固定している1.2 mmプラスネジを外します。
-
-
-
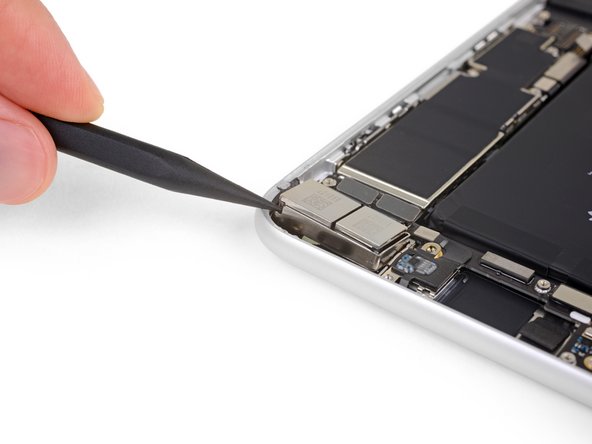
スパッジャーの先端を使って、ロジックボードからLightningコネクタアセンブリのフレックスケーブルの接続を外します。
I did this repair and I followed it too a T, but when I reassembled, the flex cable for the Lightning connector assembly keeps popping out. Ive replaced it twice and followed your guide exactly. No mistakes. But when I go to clip it back in, it always does that….
-
-
-
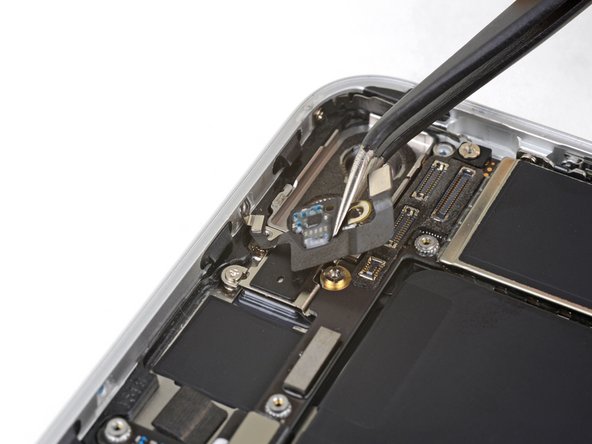
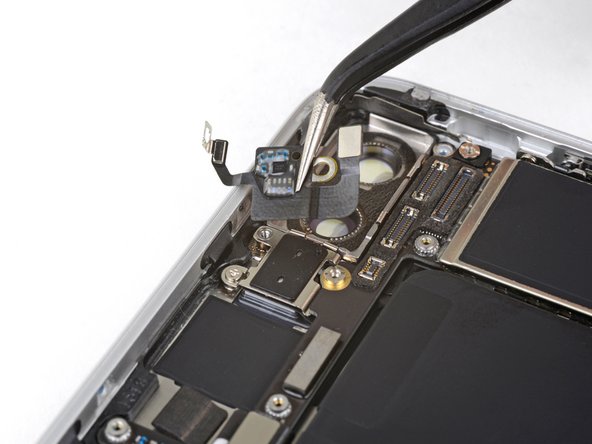
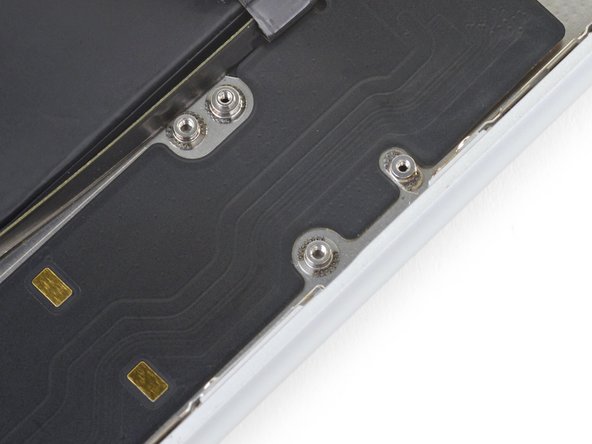
ロジックボードに固定された5本のネジを外します。
-
1.8 mmプラスネジー2本
-
2.3 mmスタンドオフネジー1本
-
2.4 mmスタンドオフネジー1本
-
2.7 mmスタンドオフネジー1本
My repair kit from iFixit included a standoff screwdriver bit. I do not recommend trying this without one.
-
-
-
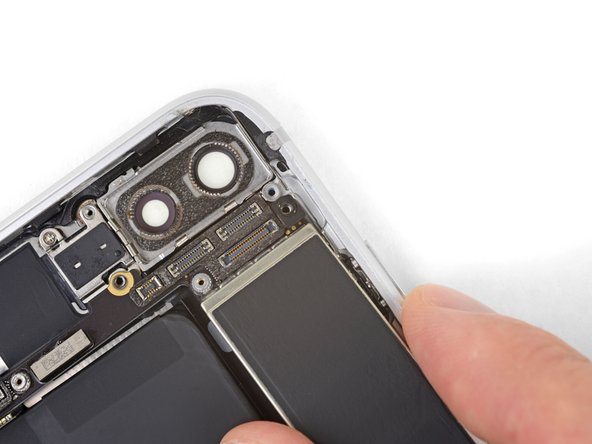
iPhoneの幅に合わせてピックをスライドさせて、Lightning コネクタの残りの部分をすべてリアケースから解放します。
-
-
Dopo la sostituzione non funziona più il microfono, ma se non ho capito male i microfoni sono integrati nel gruppo connettore di ricarica giusto? Questo significa che è difettoso? Non mi pare sia possibile montarli male (dato che appunto in effetti non sono da montare). Potrebbe essere qualche impostazione nel sistema operativo per abilitare i nuovi microfoni?
Correctly positions the new Lightning connector assembly is very important! I found that event the slightest misalignment will prevent you from easily reconnecting the flex cable to the logic board. I had to remove the logic board and peel back some of the new adhesive on my replacement Lightning connector a few times in order to get the proper alignment. I found it useful to plug in the flex cable prior to mounting the logic board so that you have at some leeway when lining up the connectors.
Make sure to save the rubber gasket for the lightning connector as my kit did not come with a replacement. The kit also included replacement screens for the microphones but no instructions or labelled parts so you’ll have to use your best guess as to how to install them. Make sure to take pictures of the old screens before you pull them out and use those pics as reference.


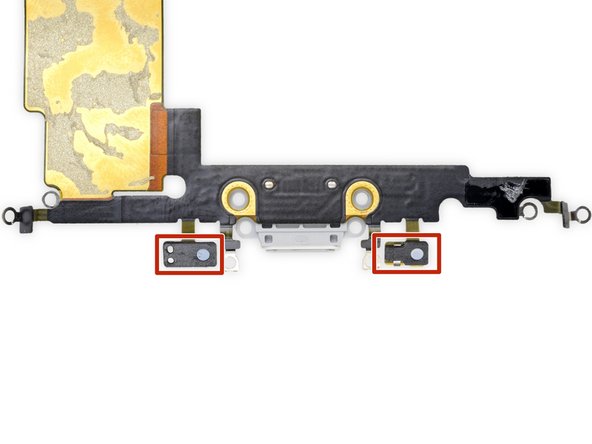
交換用のパーツとオリジナルのパーツを見比べてください。残りのコンポーネントを移植する必要があるか、パーツを装着する前に接着剤の裏張りを取る必要があります。
デバイスを再組み立てするには、これらの手順を逆の順番に従って作業を進めてください。
不要になった電子廃棄物は 認証済みリサイクルセンターで処分してください。
修理が上手く進みませんか?トラブルシュートのヘルプにはAnswers communityを参照してください。
交換用のパーツとオリジナルのパーツを見比べてください。残りのコンポーネントを移植する必要があるか、パーツを装着する前に接着剤の裏張りを取る必要があります。
デバイスを再組み立てするには、これらの手順を逆の順番に従って作業を進めてください。
不要になった電子廃棄物は 認証済みリサイクルセンターで処分してください。
修理が上手く進みませんか?トラブルシュートのヘルプにはAnswers communityを参照してください。
75 の人々がこのガイドを完成させました。
以下の翻訳者の皆さんにお礼を申し上げます:
100%

Midori Doiさんは世界中で修理する私たちを助けてくれています! あなたも貢献してみませんか?
翻訳を始める ›


17 件のコメント
40 minutes seems crazy fast for this repair. If anyone can do this entire repair from beginning to end utilizing these steps in 40 minutes… they should spend a day or two practicing the Rubik’s cube and go smash the world record.
The guide helped me accomplish the repair. So, for that, thank you very much.
andystills - 返信
Very well done and easy to follow. Great piece of work and I appreciate the time spent putting it all together.
Have repaired 2 other iPhones, 6 and 6S, using the guides found here. When confronted with the iPhone 8 plus repair this is the site I came to.
Again, very well done indeed.
Kudos
Where dose one find a new gasket for the lighting cable?
You will not find a more comprehensive or thorough or accurate guide to dismantling and replacing the charging port on an iPhone 8 Plus than this. Awesome guide, thanks for your attention to detail and thoroughness! Bravo!
Will White - 返信
Thank you very much for the very detailed repair instructions. My microphone wasn’t working properly and I was able to get it fixed for just $12! (got the replacement from eBay)
Dopo la sostituzione non funziona più il microfono, ma se non ho capito male i microfoni sono integrati nel gruppo connettore di ricarica giusto? Questo significa che è difettoso? Non mi pare sia possibile montarli male (dato che appunto in effetti non sono da montare). Potrebbe essere qualche impostazione nel sistema operativo per abilitare i nuovi microfoni?
Mi correggo, ho problemi solo durante le chiamate, se uso l’app note vocali o whatsapp o faccio video con entrambe le fotocamere non ho problemi
Why is removing the camera and antenna necessary for replacing the lightning port?
nvrm i see why
Buon pomeriggio, devo fare i complimenti al sito per come e dettagliato ogni guida e riparazione. adesso ho finito di riparare un iphone 8 plus e va una bomba
Wish I had been told I would need a standoff screwdriver before I was halfway into taking the thing apart…
This was not a quick job. It took me far longer than expected because the sound did not work the first time that I re-assembled it. I took the phone back apart far enough to remove the speaker and clean the contacts. On re-assembly, it would not boot cleanly. It continuously rebooted until I had to restore to factory settings and reload from save.
Make sure you have a current save _before_ you do this repair.
I want to let everyone know that it is absolutely unnecessary to remove the entire logic board when doing this repair. You only need to remove the SIM holder and the the 2 (or 3 on XR) logic board screws (2 saddle screws and 1 Phillips on XR, 2 saddles on 7/8 series) that hold the logic board down. Once those are removed, you can gently lift the lower end of the logic board up enough to slide the portion of the dock flex that is under the logic board out from under the logic board. A few things to keep in mind when removing the existing port are that once all screws and brackets and such are taken off, you need to start the pulling up and removal of the old charging port flex starting from the very bottom first, I start with the with the 2 microphones and then the lightning port itself. As you free the existing port from the bottom upwards, when you peel up the flex where it is held down with adhesive nearing the logic board, it will then simply slide out from under the logic board.
Show less
Ran out of characters!..When you go to install the new port, you must START the process by sliding the new flex cable back up underneath the logic board first (you may need to hold the battery flex cable out of the way a bit and pre bend the new ports flex cable at the connector so that it will slide up easily) and then attach the new flex cable to the connector on the logic board FIRST before you do any other screw or adhesive installations. This way you don't end up struggling to try to get the connector to re-connect to the logic board at the end. If you don't do it this way and you start re-installing the new port from the bottom without pre-connecting it to the logic board, any slight misalignment may cause the connector to not line up properly when you go to connect it to the logic board. I feel on any iPhone component removal/replacement, the less extra parts and connectors you have to touch, pry on, disconnect and/or remove and then reconnect, the better. Good luck all! - Chad from GURUmicro.
Show less
This was a very helpful guide and the photos were really well done. A few pointers for newbies to iPhone repair like myself.
1) The base install (no mesh screen replacements near the microphones) is about 3 hours. Another 45 minutes or so for the mesh screens as there were no instructions.
2) There were no instructions on how to start the phone back up so here is what happened to me. After plugging everything back in (but the phone screen still physically separated from the phone body) I could not start the phone from the battery despite it having about a 30% charge. I ended up taking the phone apart 2 times checking all the connections but couldn’t find a faulty one. In this process I ended up snapping a part related to the antenna off of the PCB (Step 36, see comment above). What ended up working was plugging the phone into a fast charger and waiting about 5 minutes. I wasn’t able to start it after 1 minute and was worried, but after 5 minutes it booted up normally and everything is fine.
Does this remove any functionality with the phone? I know apple is very difficult with the “right to repair”. At least with replacing the home button and battery, fingerprint and battery health functionality is removed. Does something similar happen with this?
The microphone of my Iphone8 plus isn't working and the speaker isn't sounding nice, what should I do?....
As someone with very little to no experience repairing smartphones, I will say that 40min-2hrs is very generous. It took me almost 9 hours to replace both the lightning cable adapter and the battery at the same time, and most of that was just working through the adhesives of both the display and the battery. The second-most time-consuming part was just keeping each screw labeled and organized - I used some sticky tabs to keep the screws in the cardboard trays that the replacement parts came in. Aside from that, the repair process wasn't bad at all. I made some mistakes: I accidentally scraped off some of the black film (graphite?) that was on the logic board, and I placed the new adapter just slightly too far to the right, which made plugging it into the logic board later a bit difficult. If I had to do it again, I would definitely prefer to try the Anti-Clamp and the iOpener - I had neither for this repair, and I would bet having both would have made it much easier. It'd be nice if they came with the tools.
what do I do about super stripped screws?
Ean Palacios - 返信
I’m sorry, your comment slipped past my radar earlier. For future fixers that might see this and ask the same question, you can check out our stripped screw guide for some detailed advice.
Adam O'Camb -
Do you need a toolkit like the essential toolkit
Adam Palmer - 返信
Hi Adam. Having a tool kit with all of the listed parts above is best. The screw heads are very small and each set of screws needs a very specific type of driver to remove them without stripping any of them.
Kyle Luksa -