はじめに
iPhoneのディスプレイアセンブリ全体を交換するには、iFixitオリジナルのフィックスキットを使って 簡略版修理ガイドを参照して作業を進めてください。
修理経験が豊富な方は、このガイドでiPhone 8 Plus LCDとデジタイザアセンブリ(別名:”フロントパネル”)のみを交換してください。このガイドではオリジナルスクリーンから交換用の新しいスクリーンに幾つかのコンポーネントを移植しなければなりません。フロントカメラやイヤホンスピーカー、LCDシールドプレートとホームボタンアセンブリを含みます。
全てのスクリーン/ディスプレイの修理では、オリジナルのホーム/ Touch IDセンサの機能を保持するため、交換用のディスプレイに移植することが重要です。ソリッドステートのホームボタンは Appleの工場製造時にオリジナルのロジックボードとペアで製造されています、そのため、パーツを交換すると機能しなくなります。
ご注意: スクリーンの交換後、iPhoneの明るさ自動調節機能が反応しない場合は、お持ちのiPhoneがiOS 12にアップデートされているか確認してください。スクリーンを交換した後はTrue Toneは機能しません。オリジナルのAppleスクリーンを再装着した後も同様です。
必要な工具と部品
-
-
ディスプレイのガラスが割れている場合、作業中さらにダメージが広がったり、作業中、怪我をしないようガラスの表面にテープを貼ります。
-
透明な粘着テープをiPhoneディスプレイ表面上に二重に装着します。
-
次のひび割れたガラスのため、次の手順で吸盤カップを引き上げれない場合は、ダクトテープのような強力な粘着テープを使ってハンドルを作り引き上げてください。
Tape doesn’t hold. suction cup doesn’t work. Tape folded over doesn’t work as a handle. I’ve used 3m’ s Gorilla duct tape. The glass is so shattered I cant get a point started to remove the glass. Phone has been in an otter box for years. dropped it and shattered glass while replacing case. Now what?
When all else fails, you can superglue your suction cup (or tape) to the display, wait for it to cure, and pull.
I had issues getting the suction cup to stick on my cracked screen, so I tried using scotch tape (only tape I had around), but it didn’t work. This best thing I did was to forcefully pry the screen off (I wasn’t worried about damages because it’s already cracked) with the spudger. I think its best to find something stickier (like Duct Tape) and used that to lift up the screen.
Definitely surprised how sticky the adhesive was.
It’s amazing how a heat gun or hair dryer makes life easier to soften up the adhesive. Then use a thin iSesame opening tool to get in under the screen (start @ 90 degrees/vertical either side of the home button & slowly go horizontal) the need to use suction cups. Run the opening tool along the front and down both sides to cut the adhesive before trying to lift the screen.
Cheers Wayne
I didn’t have a hair dryer so I (gingerly) used an iron over some wet coffee filters (I mean , it is waterproof) . Then, quickly dried i off with paper towels, used gorilla tape and my fixit metal splunger . worked like a charm .
What about baby cracks? skip to step 3 or not…
As others have mentioned, suction cup and tape doesn’t work. I used the blade of a box cutter (watch fingers) and inserted just below and right of home button. Then moved spudger along the crack to tear adhesive/seal. Easy peasy.
-
-
-
iPhoneの画面全体に、透明な梱包用テープを重ね合わせます。
-
次の手順でうまく吸盤が装着しない場合は、強力なテープ(ガムテープなど)を持ち手に折って、代わりにスクリーンを持ち上げてみてください。
-
-
-
次の3つの手順では、デバイスの開口作業を簡単にするために開発されたツール、リバースクランプの使い方を紹介します。リバースクランプを使用しない場合は、この3つの手順をスキップして別の方法をご覧ください。
-
青いハンドルを後方に引き、リバースクランプのアームのロックを解除します。
-
iPhoneの左/右側の端に向けてアームをスライドします。
-
吸盤カップを、ホームボタンすぐ上のiPhoneの下端付近に装着します。上部に一つ、下部に1つずつ取り付けます。
-
吸盤カップ両側をしっかりと握って、当てたい位置に吸引力を加える、装着します。
-
-
-
青いハンドルを手前に引くと、アームがロックされます。
-
ハンドルを時計回りに360度回転させ、カップが両側をストレッチするまで回し続けます。
-
吸盤の位置が合っていることを確認してください。装着位置がずれ始めたら、吸盤を少し緩めてアームを装着し直してください。
-
-
-
iOpenerを熱して、リバースクランプのアームに通します。
-
iOpenerをiPhoneの下端に重なるように折ります。
-
接着剤がはがれて、隙間ができるまで1分待します。
-
クランプで十分な隙間が作れたら、スクリーンのプラスチックベゼルの下にオープニングピックを挿入します。
-
次の3つの手順はスキップしてください。
-
-
-
ヘアドライヤーを使用するか、iOpenerを準備し、ディスプレイ裏側の接着剤を柔らかくするために、iPhoneの下端に約90秒間あてます。
6/14/23 I did this repair but used a heat gun on low for 60 seconds. This allowed me to open the case as the instructions say, but in the end the Home button failed. I probably over heated it. I used this "go around" for a virtual Home button. I don't care about touch ID:
-
-
-
ホームボタンのすぐ上にあるフロントパネルの下半分に吸盤を取り付けます。
Using just the single suction cup that is included in the battery replacement kit probably wouldn’t open the device. An iOpener and an iSlack should be the recommended method. However, you can get it open with just the single suction cup and iOpener, but does take a lot of time.
Get an iOpener and iSlack with the battery replacement kit.
I used a flat x-acto (#18) blade knife tool to gently pry back the screen enough to allow me to insert the pick near the bottom corner. I then worked the pick under the screen as mentioned in steps 5 & 6 below then. This worked really well for me.
Kyle Luksa - 返信
I used the suction cup without heating the phone - the adhesive came away quite easily without applying any heat. Maybe due to age of phone (nearly 4 years old). Worth trying.
My screen was very shattered, and was quite hard to get suction, as my tape was very low quality. However, after pulling it up a little bit, I was able to insert a regular razor blade into the very small gap and used that as a lever.
Oh my goodness! Don't do that again. You can definitely damage something in the phone if you use a sharp metal razor blade..
cytur -
-
-
-
一定の力で吸盤カップを引き上げて、フロントパネルとリアケースの間にわずかな隙間を作ります。
-
隙間に開口ピックまたは薄い開口ツールを挿入します。
After multiple tries and using a very hot iOpener, it will not open.
In sheer frustration, I pulled out my trusty pocket knife and managed to lift the bottom of the screen slightly, but in the process, cracked the glass from the bottom to the home button. The case is open now.
-
-
-
開口ピックを左下からiPhoneの音量コントロールボタンとサイレントスイッチの方向にスライドさせて、ディスプレイを固定している接着剤を剥がします。
-
ディスプレイの左上隅付近で停止します。
Do not go over the top otherwise you can crack the screen. Sadly happened to me :(
The instruction should be:
“Stop near BUT BEFORE REACHING the top left corner of the display”
-
-
-
iPhoneの右下隅に開口ピックを再度差し込み、角を回ってiPhoneの右上にスライドさせて接着剤を剥がします。
I had really good luck using a hairdryer on some of the more stubborn portions of adhesive.
-
-
-
ディスプレイ下の開口ピックを左上の角からiPhoneの上端に沿ってスライドさせて、残りの接着剤を剥がします。
Be very careful at this step. The glass at the top will break very easy when the display is lifted too much.
Gerdschi D - 返信
-
-
-
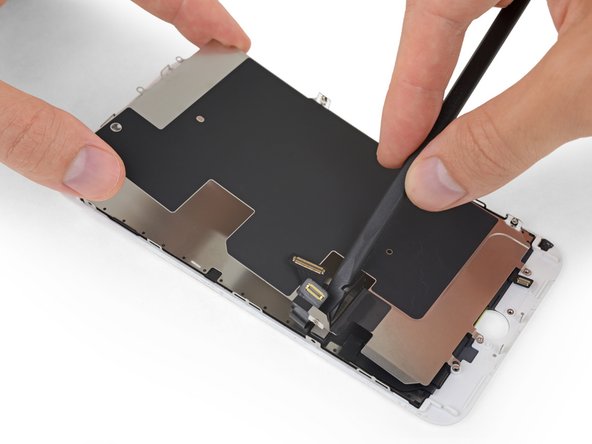
本のページをめくるように、ディスプレイの左側を持ち上げてiPhoneを開きます。
-
作業がしやすいように、iPhoneを開口をしたままディスプレイの後ろに衝立を置き、立てかけてください。
Das “links” ist auf dem Foto rechts.
-
-
-
-
基板とディスプレイケーブル下側のブラケットを固定している次の長さの4本のプラスネジを取り外します。
-
2本の1.3 mmネジ
-
1本の1.4 mmネジ
-
1本の2.7 mmネジ
The Phillips screwdriver bit is the PH000. The measurement refers to the screw length.
Jack Harry - 返信
-
-
-
スパッジャーの先端を使って、基板上のソケットからバッテリーコネクターの接続を外します。
-
バッテリコネクタケーブルを基板から少し離して曲げます。アクシデントでケーブルがソケットに接触していまい、iPhoneの電源が入らないようにするためです。
When I reassembled the iPhone 8 Plus, I had to plug it into a Lightning cable to wake it up (just pushing power button wasn’t sufficient).
-
-
-
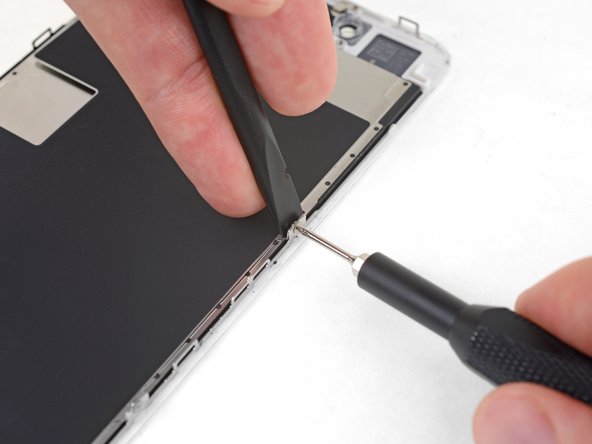
スパッジャーの先端か爪を使用して、ディスプレイ下側にあるコネクタをソケットから外します。
I got hold of a iPhone 8 Plus with cracked screen that I am planning to fix.
Here is my problem:
When I tried to take out the screen from my phone, (step 15-18) I was curious about the new screen, so I tried to connect it. It was completely dead! Then I tried the old cracked one, and suddenly that was dead to! This is a phone that some fool has been inside earlier and changed battery, but I suspect he has done some more really stupid things. The Taptic Engine is living its own life and vibrating every time I slightly touch the home button. (I have a new Taptic Engine) The phone is also full of dust and small particles that does not belong there. One tri-point Y000 screw (step 18) is even missing! Now the biggest problem is that both screens are black! I know the phone is on, because I hear voice command speak when I turn on the power. The screen worked before I tried to change it? And one last thing: My new LCD screen came with new flex cables. Is it possible to switch over, so I can use the old ones?
Hi,
Is your problem solved?
Be careful of damaging MOSFETs by the LH side of the large lower display cable. After replacing the battery and turning the device on, the phone showed low charge and didn't have a charging symbol even after plugging into multiple cables and chargers. Turns out I had damaged the logic board attempting to disconnect the connector.
-
-
-
前の手順で外したコネクターのすぐ後ろにある、下から2番目のディスプレイケーブルの接続を外します。
I used the other end of the spudger on this connector and it seemed to work a little better for me. I came in from underneath the top-right edge instead of the bottom right.
-
-
-
フロントパネルのセンサーアセンブリコネクターとブラケットを固定している2本のtri-point Y000ネジを取り外します。
-
1本の1.0mmネジ
-
1本の1.2mmネジ
una vite da 1mm e due viti da 1.2 mm???
Ciao Matteo! Grazie per l’osservazione. Ho appena modificato il testo :) La traduzione è aperta a tutti. Hai quindi la possibilità di fare le tue suggestione direttamente nel testo e sei il benvenuto se vuoi usare di questa possibilità nel futuro. Grazie ancora per la vigilanza! Saluti, Claire
The tool kit does include a 1.0 or1.2mm screwdriver! How am I supposed to remove those screws?
Bought the screwdriver that supposedly fits these screws and it still doesn’t work.
My bracket looks different. Can’t get these screws out.
kit came with wrong bit. i received 2x P02 (penta tips) and no tri point y000.
-
-
-
スパッジャーの先端か爪を使って、フロントパネルのセンサーアセンブリのコネクターをソケットから外します。
-
-
-
ディスプレイアセンブリを取り外します。
Should there be a step somewhere in here to point out when to remove the blue plastic from the new iFixit screen?
-
-
-
イヤピーススピーカーのブラケットに留められた次のプラスネジを5本外します。
-
1.8 mmネジー2本
-
2.3 mmネジー1本
-
2.4 mmネジー1本
-
2.8 mmネジー1本
-
-
-
iFixit特製開口ツールをフロントカメラの反対側に搭載されたカメラアセンブリ用フレックスケーブルの下に先端を差し込みます。
-
ディスプレイ裏側からフレックスケーブルの端を剥がします。
FYI i think you should put up a warning on which side you should start the prying from. If you start prying from the top there’s a risk of prying apart the two parts of the flex cables that are soldered together. If you start from the bottom as pictured you should be safer, but I think it should be specified in text on this guide… because I managed to do this mistake and have to order the whole front cam/speaker/etc. assembly now. My own fault but still, haha!
-
-
-
フロントカメラとセンサケーブルアセンブリを取り出します。
-
ディスプレイとカメラ/センサーケーブル背面に付いている3列の銅接点の間に黒い両面絶縁テープがあります。 ディスプレイに付着したままか、ケーブルと一緒に外れることがあります。
Why is the insulating tape needed, and what other materials should I using instead of it if I loose the tape?
jhtran1234 - 返信
I moved the insulating tape from the broken screen to the new screen.
Don’t forget to check if your new screen assembly has the two plastic pieces for the camera and proximity detector. You’ll need to move them from the old screen if it doesn’t have them.
Hi, is it possible for the flex cable to work without placing he tape over the contacts?
Thanks
I forgot to add move the double sided tape over and I’m wondering if that was why my ear speaker wasn’t working. I opened it back up and put the tape on the new screen but the speaker is still not working. Any ideas? Did the speaker “short” out?
Mine the same , did you solve the problem? Thank you
I bought the ifixit tool kit iPhone plus 8 screen. Do i need to skip this step ? (not sure)
Whenever I had my camera unit and speaker in, it prevented my phone from charging or finding my sim. Any explanation for this? seems really strange to me
-
-
-
ホーム/Touch IDセンサーを固定しているブラケットの4つのY000ネジを外します:
-
1.2 mm ネジー1本
-
1.2 mm ネジー3本
The 1.2mm screw on the home button stripped for me. I ended up bending the bracket on each side in order to remove the home button. I then bent it back as best I could during reassembly and screwing it down.
-
-
-
ホームボタンケーブルをソケットから外すためホームボタンケーブルコネクターの左端を持ち上げます。
I accidentally severed the cable, now my sensor is disabled. So far this was the most delicate cable I encountered because it was so small.
-
-
-
開口ピックを使用して、ホーム/タッチIDセンサーケーブルを固定している接着剤をディスプレイパネルの背面から静かに剥がしてください。
This did not work for me…. ended up breaking the connector from the home button. Most likely messed up the customer’s iPhone… the adhesive would not pry up with just pick… does iFixit offer a home button replacement?
did not work for me either, also ended up breaking the connector, just use the tweezer to separate it. do not use opening pick!!!!! it’s too thick for it!!
Isopropanol and heat will loosen the adhesive and its possible to gently remove with plastic pick, metal tweezers risk damaging the Home button cable and disabling the Touch facility.
Pretty easy to follow instructions if you have patience and careful hands. If you have clumsy hands you will not succeed in fixing any small electronics. There are some small things you should use to help you succeed at fixing small electronics, like some scotch tape or other clear tape to hold some of the cables in place while you work on small electronics items, also a small heavy bottle or object to propped the iPhones cases against to hold them from falling over so that your hands can be free to perform your tasks. Great job you are doing iFixit personel and I am with you all the way with fighting for our rights to fix our electronics equipment.
wogriffith - 返信
Isopropanol in conjunction with the heat really did the trick here. Heat up first, then use plenty of the alcohol to pry it up carefully using the pick.
Heat dryer on high worked for me.
I heated the tip of a thin knife with a hot air gun and slide it under the flexible cable. When I hit resistance I reheated the knife. Keeping it parallel to the board while doing this. After 4 heatings the knife moved the rest of the way and the cable lifted easily off of the iPhone back. This method left enough glue on the cable that it restuck fine when moved to the new iPhone.
Apple loves to make this the most difficult thing. I've been successful many times, and not so on other repairs. I just finished a repair and everything was in tact, but sadly it didn't work. Took a part and put back. So I turned on the assistive touch home button. They will be getting a new phone soon, so not a big issue except Pride.
-
-
-
LCDシールドプレートステッカーの長方形の部分上部を剥がして、下にあるフレックスケーブルを解放します。
Not sure what this sticker is for exactly. It broke during reassembly. So far, so good.
-
-
-
LCDシールドプレート周辺のフレックスケーブルを押さえながら、LCDシールドプレートを持ち上げます。
-
LCDシールドプレート内の切り込みからフレックスケーブルを解放します。切り込みに引っかけないようにご注意ください。
My new LCD screen came with new flex cables. Is it possible to switch over, so I can use the old ones?
When I tried to take out the screen from my phone, (step 15-18) I was curious about the new screen, so I tried to connect it. It was completely dead! Then I tried the old cracked one, and suddenly that was dead to! This is a phone that some fool has been inside earlier and changed battery, but I suspect he has done some more really stupid things. The Taptic Engine is living its own life and vibrating every time I slightly touch the home button. (I have a new Taptic Engine) Now the biggest problem is that both screens are pitch black! I know the phone is on, because I hear voice command speak when I turn on the power. What could this be? The screen worked before I tried to change it?!…
-


交換用のパーツとオリジナルのパーツを見比べてください。残りのコンポーネントを移植する必要があるか、パーツを装着する前に接着剤の裏張りを取る必要があります。
デバイスを再組み立てする際には、これらのインストラクションを逆の順番に従って作業を進めてください。
不要になった電子廃棄物は 認証済みリサイクルセンターで処分してください。
修理が上手くいきませんか?トラブルシュートのヘルプにはアンサーコミュニティを参照してください。
交換用のパーツとオリジナルのパーツを見比べてください。残りのコンポーネントを移植する必要があるか、パーツを装着する前に接着剤の裏張りを取る必要があります。
デバイスを再組み立てする際には、これらのインストラクションを逆の順番に従って作業を進めてください。
不要になった電子廃棄物は 認証済みリサイクルセンターで処分してください。
修理が上手くいきませんか?トラブルシュートのヘルプにはアンサーコミュニティを参照してください。
86 の人々がこのガイドを完成させました。
以下の翻訳者の皆さんにお礼を申し上げます:
100%

Midori Doiさんは世界中で修理する私たちを助けてくれています! あなたも貢献してみませんか?
翻訳を始める ›


8 件のコメント
I got hold of a iPhone 8 Plus with cracked screen that I am planning to fix.
Already got all new part that I think I need.
Here is my problem:
When I tried to take out the screen from my phone, (step 15-18) I was curious about the new screen, so I tried to connect it. It was completely dead! Then I tried the old cracked one, and suddenly that was dead to! This is a phone that some fool has been inside earlier and changed battery, but I suspect he has done some more really stupid things. The Taptic Engine is living its own life and vibrating every time I slightly touch the home button. (I have a new Taptic Engine) The phone is also full of dust and small particles that does not belong there. One tri-point Y000 screw (step 18) is even missing! Now the biggest problem is that both screens are pitch black! I know the phone is on, because I hear voice command speak when I turn on the power. What could this be? The screen worked before I tried to change it?!…
Hi smikalsen,
Did you disconnect the battery when you swapped the screens? If not, there is a chance that the screen backlight circuits are damaged as a result of disconnecting/reconnecting to a powered phone. With a screen connected and the phone powered on, shine a bright light directly at the screen. If you can faintly see the screen, it means that the LCD is working but the backlight is broken.
Thank you Jeff for these very clear instructions, and for the warnings on cautions to take in the delicate steps. This guide was helpful in replacing my broken screen on an iPhone 8 Plus. Every step was successfully accomplished, and now my iPhone is back to life. Of course, as a caution I did a backup before starting all the procedures. Thanks again. Saul
Okay can I bring it in
Thanks Jeff for this really helpfull instruction.
I have a question about the colors displayed on the new display. I heard that you can restore TrueTone function using light sensor programmer. But before I invest another $40 in something I will use only once, I would like to ask if darker and very saturated colors on display is the fault of lack of TrueTone function or the fault of display itself?
what do I do about super stripped screws?
Ean Palacios - 返信
I’m sorry, your comment slipped past my radar earlier. For future fixers that might see this and ask the same question, you can check out our stripped screw guide for some detailed advice.
Adam O'Camb -
Do you need a toolkit like the essential toolkit
Adam Palmer - 返信
Hi Adam. Having a tool kit with all of the listed parts above is best. The screw heads are very small and each set of screws needs a very specific type of driver to remove them without stripping any of them.
Kyle Luksa -