メインコンテンツにスキップ

iPhone 7 Plus Speaker Replacement

必要な工具と部品

  1. iPhone 7 Plus Speaker Replacement, Pentalobe Screws: 手順 1、 1の画像 1
    • Before you begin, discharge your iPhone battery below 25%. A charged lithium-ion battery can catch fire and/or explode if accidentally punctured.

    • Power off your iPhone before beginning disassembly.

    • Remove the two 3.4 mm pentalobe screws at the bottom edge of the iPhone.

    • Opening the iPhone's display will compromise its waterproof seals. Have replacement seals ready before you proceed past this step, or take care to avoid liquid exposure if you reassemble your iPhone without replacing the seals.

  2. iPhone 7 Plus Speaker Replacement, Opening Procedure: 手順 2、 1の画像 1
    • Heating the lower edge of the iPhone will help soften the adhesive securing the display, making it easier to open.

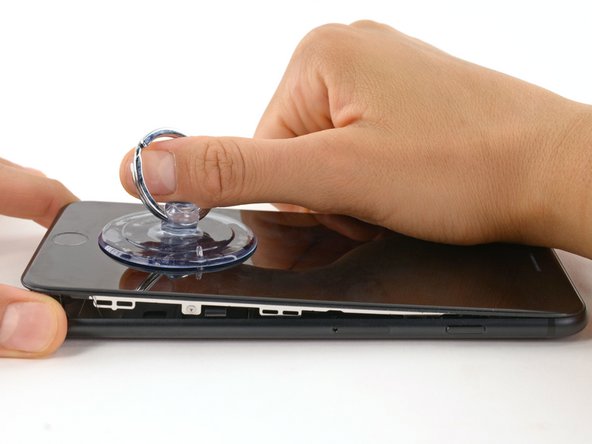
    • Use a hairdryer or prepare an iOpener and apply it to the lower edge of the iPhone for about a minute in order to soften up the adhesive underneath.

  3. iPhone 7 Plus Speaker Replacement: 手順 3、 2の画像 1 iPhone 7 Plus Speaker Replacement: 手順 3、 2の画像 2
    • Apply a suction cup to the lower half of the front panel, just above the home button.

    • Be sure the suction cup does not overlap with the home button, as this will prevent a seal from forming between the suction cup and front glass.

    • If your display is badly cracked, covering it with a layer of clear packing tape may allow the suction cup to adhere. Alternatively, very strong tape may be used instead of the suction cup. If all else fails, you can superglue the suction cup to the broken screen.

  4. iPhone 7 Plus Speaker Replacement: 手順 4、 3の画像 1 iPhone 7 Plus Speaker Replacement: 手順 4、 3の画像 2 iPhone 7 Plus Speaker Replacement: 手順 4、 3の画像 3
    • Pull up on the suction cup with firm, constant pressure to create a slight gap between the front panel and rear case.

    • Insert the flat end of a spudger into the gap.

    • The watertight adhesive holding the display in place is very strong; creating this initial gap takes a significant amount of force. If you're having a hard time opening a gap, rock the screen up and down to weaken the adhesive until you can fit a spudger inside.

    • While pulling up on the suction cup, twist the spudger to widen the opening between the screen and rear case.

  5. iPhone 7 Plus Speaker Replacement: 手順 5、 3の画像 1 iPhone 7 Plus Speaker Replacement: 手順 5、 3の画像 2 iPhone 7 Plus Speaker Replacement: 手順 5、 3の画像 3
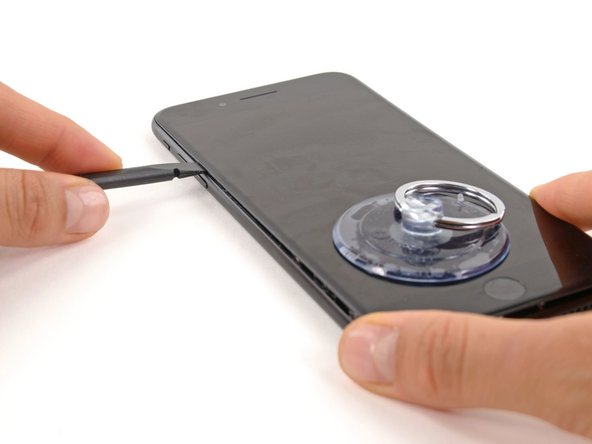
    • Insert the flat end of the spudger between the front panel and the rear case at the lower left edge of the iPhone.

    • Slide the spudger up the left edge of the phone starting at the lower edge and moving towards the volume control buttons and silent switch, breaking up the adhesive holding the display in place.

    • Do not try to pry the top edge of the display away from the rear case, as it is held in place by plastic clips that may break.

  6. iPhone 7 Plus Speaker Replacement: 手順 6、 2の画像 1 iPhone 7 Plus Speaker Replacement: 手順 6、 2の画像 2
    • Remove the spudger from the left side of the phone and insert the flat end into the bottom right corner.

    • Slide the spudger up the right edge of the phone to the top corner, breaking up the adhesive holding the display in place.

  7. iPhone 7 Plus Speaker Replacement: 手順 7、 2の画像 1 iPhone 7 Plus Speaker Replacement: 手順 7、 2の画像 2
    • Pull up on the suction cup to lift up the display and open the iPhone.

    • Do not raise the display more than 10º as there are delicate ribbon cables along the right edge of the device connecting the display to the logic board.

  8. iPhone 7 Plus Speaker Replacement: 手順 8、 2の画像 1 iPhone 7 Plus Speaker Replacement: 手順 8、 2の画像 2
    • Pull up on the small nub on the suction cup to remove it from the front panel.

  9. iPhone 7 Plus Speaker Replacement: 手順 9、 2の画像 1 iPhone 7 Plus Speaker Replacement: 手順 9、 2の画像 2
    • Slide an opening pick underneath the display along the top edge of the phone to loosen the last of the adhesive.

  10. iPhone 7 Plus Speaker Replacement: 手順 10、 3の画像 1 iPhone 7 Plus Speaker Replacement: 手順 10、 3の画像 2 iPhone 7 Plus Speaker Replacement: 手順 10、 3の画像 3
    • Pull the display assembly slightly away from the top edge of the phone to disengage the clips holding it to the rear case.

    • Open the iPhone by swinging the display up from the left side, like the back cover of a book.

    • Don't try to fully separate the display yet, as several fragile ribbon cables still connect it to the iPhone's logic board.

  11. iPhone 7 Plus Speaker Replacement, Battery Disconnection: 手順 11、 1の画像 1
    • Remove the following four tri-point Y000 screws securing the lower display cable bracket to the logic board:

    • Three 1.2 mm screws

    • One 2.6 mm screw

  12. iPhone 7 Plus Speaker Replacement: 手順 12、 2の画像 1 iPhone 7 Plus Speaker Replacement: 手順 12、 2の画像 2
    • Remove the lower display cable bracket.

  13. iPhone 7 Plus Speaker Replacement: 手順 13、 3の画像 1 iPhone 7 Plus Speaker Replacement: 手順 13、 3の画像 2 iPhone 7 Plus Speaker Replacement: 手順 13、 3の画像 3
    • Use the point of a spudger to lift the battery connector out of its socket on the logic board.

    • Bend the connector cable up slightly to prevent it from making contact with the socket and providing power to the phone.

  14. iPhone 7 Plus Speaker Replacement, Display Assembly: 手順 14、 3の画像 1 iPhone 7 Plus Speaker Replacement, Display Assembly: 手順 14、 3の画像 2 iPhone 7 Plus Speaker Replacement, Display Assembly: 手順 14、 3の画像 3
    • Make sure the battery is disconnected before you disconnect or reconnect the cables in this step.

    • Use the flat end of a spudger or a fingernail to disconnect the two lower display connectors by prying them straight up from their sockets on the logic board.

    • To re-attach press connectors, press down on one end until it clicks into place, then repeat on the other end. Do not press down on the middle. If the connector is even slightly misaligned, the connector can bend, causing permanent damage.

    • If you have a blank screen, white lines on the display, or partial or complete lack of touch response after reassembling your phone, try disconnecting and carefully reconnecting both of these cables and make sure they are fully seated.

  15. iPhone 7 Plus Speaker Replacement: 手順 15、 3の画像 1 iPhone 7 Plus Speaker Replacement: 手順 15、 3の画像 2 iPhone 7 Plus Speaker Replacement: 手順 15、 3の画像 3
    • Remove the three tri-point Y000 screws securing the bracket over the front panel sensor assembly connector:

    • One 1.3 mm screw

    • Two 1.0 mm screws

    • Remove the bracket.

  16. iPhone 7 Plus Speaker Replacement: 手順 16、 2の画像 1 iPhone 7 Plus Speaker Replacement: 手順 16、 2の画像 2
    • Disconnect the front panel sensor assembly connector from its socket on the logic board.

    • This press connector should also be reconnected one end at a time to minimize the risk of bending.

  17. iPhone 7 Plus Speaker Replacement: 手順 17、 1の画像 1
  18. iPhone 7 Plus Speaker Replacement, Speaker: 手順 18、 2の画像 1 iPhone 7 Plus Speaker Replacement, Speaker: 手順 18、 2の画像 2
    • Use a thin pry tool or tweezers to carefully pry up and disconnect the upper coaxial cable connector from the logic board.

    • There are two coaxial connectors in close proximity. Disconnect the one nearest the battery connector.

    • During reassembly, this can be tricky to reconnect. Hold the connector in place over its socket and press down with the flat of your spudger. The connector should snap into place.

  19. iPhone 7 Plus Speaker Replacement: 手順 19、 2の画像 1 iPhone 7 Plus Speaker Replacement: 手順 19、 2の画像 2
    • Carefully de-route the coaxial cable you just disconnected from the small metal clip holding it to the logic board.

  20. iPhone 7 Plus Speaker Replacement: 手順 20、 2の画像 1 iPhone 7 Plus Speaker Replacement: 手順 20、 2の画像 2
    • Use tweezers or the point of your spudger to pry both coaxial cables out of the metal clip holding them on the side of the speaker.

  21. iPhone 7 Plus Speaker Replacement: 手順 21、 1の画像 1
    • Remove the five Phillips screws securing the speaker:

    • Three 1.3 mm screws

    • One 2.3 mm screw

    • One 3.3 mm screw

  22. iPhone 7 Plus Speaker Replacement: 手順 22、 1の画像 1
  23. iPhone 7 Plus Speaker Replacement, Wi-Fi Diversity Antenna: 手順 23、 1の画像 1
    • Warm the lower speaker area where the antenna is adhered with an iOpener, hair dryer, or heat gun, until it's slightly too hot to touch.

    • Heat helps soften the adhesive securing the antenna.

  24. iPhone 7 Plus Speaker Replacement: 手順 24、 3の画像 1 iPhone 7 Plus Speaker Replacement: 手順 24、 3の画像 2 iPhone 7 Plus Speaker Replacement: 手順 24、 3の画像 3
    • Slide an opening pick between the antenna and the speaker on the right side, and carefully separate the adhesive underneath.

  25. iPhone 7 Plus Speaker Replacement: 手順 25、 1の画像 1
    • Rotate the speaker and re-insert your opening pick on the opposite side.

    • Separate any remaining adhesive securing the antenna.

    • If necessary, re-heat the adhesive until it separates easily.

  26. iPhone 7 Plus Speaker Replacement: 手順 26、 1の画像 1
    • Remove the Wi-Fi diversity antenna from the speaker.

終わりに

Compare your new replacement part to the original part—you may need to transfer remaining components or remove adhesive backings from the new part before installing.

To reassemble your device, follow the above steps in reverse order.

Take your e-waste to an R2 or e-Stewards certified recycler.

Repair didn’t go as planned? Try some basic troubleshooting, or search our Answers forum for help.

51 の人々がこのガイドを完成させました。

作成者

2人の作成者と共同で作成されました。

Jeff Suovanen

メンバー登録日: 08/06/13

428,004 ポイント

259のガイドは作成済み

チーム

iFixit iFixit人のメンバー

Staff

135 メンバー

16,767のガイドは作成済み

6 件のコメント

Thanks Jeff, this guide helped me complete the repair, even the fiddly bits with the diversity antennae. Oh the joy of hearing the “by the seaside “ ringtone from a previously mute iPhone. :D

Kola - 返信

Hi, I have completed this but the speaker option is still not available and am not able to record videos, and basically not able to hear anything when placing a call. should i replace the earpiece speaker as well?

bhargava perni - 返信

Thank you Jeff! I followed this guide and everything went smoothly. Used this to fix my friend’s iPhone when her phone went silent. She says everything is working as it should be. Thanks again from her and I.

Maganafixes - 返信

Hallo zusammen, ich habe den Umbau wie oben vorgenommen, jedoch kommt unten kein Ton wenn mich jemand anruft. Woran kann das liegen?

Kann es noch eine andere Ursache geben außer den Lautsprecher zu tauschen?

Freue mich über eine Rückmeldung.

iannarrig - 返信

People still can’t hear me when I call. However, if I switch to loudspeaker they can. Did I miss a connection or do I need another part?

mtderosier - 返信

コメントを追加

統計データ:

過去 24時間: 11

過去 7 日: 90

過去 30 日: 396

今までの合計 72,218