はじめに
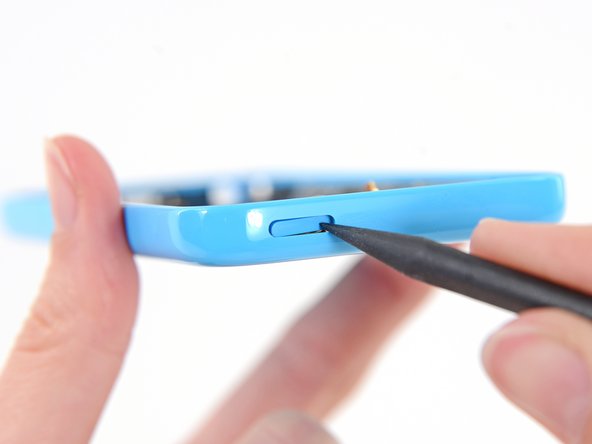
iPhone 5c から電源/スリープボタンを取り出すにはこの手順をご利用ください。
必要な工具と部品
-
-
ディスプレイガラスにひび割れがある場合、修理作業中の怪我を防ぐため、ガラス表面にテープを貼って破損箇所が広がらないようにします。
-
iPhoneの画面上に透明テープを貼り、表面全体を覆います。
-
-
-
解体作業を始める前にiPhoneの電源を切ってください。
-
Lightningコネクター両側の 3.8 mm P2ペンタロープネジを2本取り外します。
I found that these screws did not remove easily. After turning several times and feeling the threads drop back, indicating they were loose, the heads did not extend far enough to grip with my fingernails to pull out. I had to use the tweezers and then it took a bit more force than expected to remove them.
Jim Thomas - 返信
My iPhone 5c has P1 Pentalobe screws, not P2. This guide caused me to buy wrong tools so I thought I would share my experience. Perhaps they vary.
@codycraven01 These guides are created using iFixit tools, and P2 is definitely the correct driver. If you’re using tools you bought somewhere else, then yes, results may vary.
-
-
-
iSclackのレバーを閉め吸盤カップを開きます。
-
吸盤カップの間にiPhoneを挟みプラスチックの溝に本体の下部を差し込みます。
-
上部の吸盤カップはホームボタンより上に接着させてください。
-
iSclackのレバーを開いて吸盤を閉じます。iPhoneの両面、中心部に吸盤カップをしっかりと押し当てます。
I just replaced my iPhone 5C battery today and only used the I fix it repair kit that came with the suction cup. Getting the glass screen out was not too difficult as I used a little bit of upward motion on the suction cup while at the same time prying gently with the flat end of the opening tool at the same time. If you have two people it makes it a little easier as someone can hold the phone. After getting the end open, I was able to go around the perimeter and gently pry up the edges with very little trouble.
Experienced immediate problem: there is s strap going from the home button to the screen, about 1-1/2 inch long. After removing 3-4 screws I saw no way to disconnect it from either end. My daughter came to help get the screws back (my 70 years have problems with very tiny screws). Slid a piece back and the strap came free of the home button ares. Screen could only open then 75-80 degrees. Tapr tore. Pried battery out. Replaced on original sticky tape. Restarted fine and about to recycle the charge. Thanks for the kit and all. But 6 demos and 3 inatructions never mentioned this strip! So careful opening it up, please!!
@mikamazn What you’re describing sounds like an iPhone 5s. This guide is for the 5c. Glad to hear things worked out for you.
-
-
-
iPhoneを両手でしっかりと持ち、吸盤を引き離すようにiSclackの持ち手を閉めていきます。するとフロントパネルが背面ケースから持ちあがってきます。
-
iSclackはiPhoneを安全に開口できるようにデザインされていますが、ホームボタンケーブルにダメージを与える場合があります。
-
次の3つの手順をスキップして手順8まで進んでください。
-
-
-
カップをしっかりとホームボタン上部のスクリーンにしっかりと密着させます。
cool i diden't now
very, very difficult to get a tight seal on tape. I removed the tape and still can't get a tight seal.
bromanmoon - 返信
-
-
-
iPhone を片手でしっかりと抑えながら、吸盤カップを少しずつ引き上げて、本体背面ケースからフロントパネルのホームボタン端を引き離していきます。
-
吸盤カップを上に持ち上げながら、プラスチック製の開口ツールで、ゆっくりと背面ケースの端からフロントパネルアセンブリを引き離します。
-
-
-
フロントパネルのホームボタン端を持ち上げて開き、本体上部付近のコネクターにアクセスします。
-
ディスプレイを約90度の角度で開き、作業中邪魔にならないよう、後ろに衝立を設置して固定します。
-
緊急の際は、衝立として未開封の飲料缶をご利用できます。
-
作業中、ディスプレイをしっかりと固定するためにゴムで留めてください。ディスプレイケーブルに余剰な力が加わるのを防いでくれます。
I use an old iPhone box to support the open phone. Set the box up on its end, and rubber band the screen side to the box. It works perfectly!
What do I do if it’s a little sticky and dirty inside?
-
-
-
ロジックボードに留められたメタル製のバッテリコネクターのブラケットから1.6 mm #000プラスネジを2本外します。
These screws are very tiny and hard to manipulate. The screwdriver is magnetic; which is great to take them out, but makes it hard to put the screws back in, as the screwdriver pulls them from the hole. I solved this problem by using the pointed end of the spudger to put a tiny drop of Elmer's glue in the hole and then insert the screw. You can do this before putting the bracket in place if you want. Then the screw wont pull out by the magnetic driver and make lining up and fastening the screws much easier; at least for me!
I found that you don't need to disconnect the battery... why bother doing more fiddling with annoyingly tiny screws and obstinate cable connectors when you don't actually have to? Especially when you could only end up causing more damage. As a matter of fact, the original iFixit video didn't bother to disconnect the battery either, but they've since updated the video to include battery disconnection, I guess as a "belt and braces" approach in case the repair-hero forgets to power down the phone first?
Disconnecting the battery is a safety precaution, and yes it's worth doing. Even with the phone powered off, there is some danger of blowing the backlight filter fuse if you disconnect the display while the battery is connected. At that point you're no longer looking at a simple DIY repair. Even though it's possible to skip this step and still come out okay, my advice is not to risk it.
It’s a relatively junky phone, so if it breaks, what the heck. I’m not going to disconnect the battery.
-
-
-
-
スパッジャーの平面側先端もしくは清潔な爪先で、ロジックボードのソケットからバッテリコネクターをこじ開けて外します。
-
ロジックボードのソケットをこじ開けるのではなく、バッテリコネクタのみをこじ開けるように十分注意してください。ロジックボードのソケットや基板をこじ開けると、ソケットが破壊されたり、基板上の近くの部品が破損したりすることがあります。
Instead of using a spudger, you can use your fingernails too. This is quicker and enables you to feel if you're not accidentally putting on too much pressure or lifting the connector instead of the cable.
Jona Wolff - 返信
Accidentally pulling out the logic board socket is no idle warning - exactly what I did without much effort. I think this shouldn’t be described as ‘prying’ up because it implies needing to use force - but these things actually pop off quite easily with a nudge, which you discover at later steps.
Peter Hill - 返信
-
-
-
ロジックボードに留められたフロントパネルアセンブリケーブルブラケットから、次の#000 プラスネジを外します。
-
1.3 mmネジー2本
-
1.7 mmネジー1本
-
3.25 mm ネジー1本
I didn't need to remove the front panel to replace the lightning connector. Just prop it up like in Step 8, then skip steps 12-16.
I always put my screws in a magnet tray and place the screws in the exact position they were taken out. The magnet tray holds the screws tight in the position I put them in. No chasing on the floor looking for small screws that you brushed off the table.
I always take a picture of the phone, print it out, then use scotch tape to tape the screws onto the picture in the location where they go. You don't lose the screws and you always know where they go for re-assembly
good tip! but instead of taking & printing a picture of your own phone, you probably could just print the color coded pic from this step (assuming everything on your phone is exactly the same).
When reassembling, the screw holder that the screws screw into came off the board. Is there a way to superglue that back in?
no, do not use super-glue. Quite some of these ‘screw-holders’ are screws themselves with e hollow tread in the head (didn’t find the correct naming for it) - just like the things you screw into a PC case and fasten the mainboard on.
did NOT remove the front entirely. its not necessary to do this to remove the battery. these are only precautionary steps in case your clumsy or you feel you might not be able to manage it without. as always, be cautious.
Agree. Step 12 is unnecessary if one is extremely careful.
*warning* … this connector assembly is very messy to re-build. Next time I change such a battery, I’ll try to get it out carefully *without* detaching the display unit. My resumée: *never* unscrew more things than necessary. These things are not M five (5 mm bolt diameter) like on a bike, these are M zero-point-five. Even for a smirf, this is tiny stuff.
Hi Ali,
You can choose to not remove those screws and still be able to take the battery out. Be very careful supporting the display, or you may tear the display cables and damage your screen.
-
-
-
プラスチック開口ツールや指の爪を使って、正面カメラとセンサーケーブルコネクターの接続を外します。
You might get a more “modernised” part from eBay (for this very model, iPhone 5c) which has an ENTIRE CABLE missing… if you look closely, it’s been re-directed into the middle cable. And it all works perfectly, touch screen, and display. So it’s a optimisation.
In summary - if you get this version of the screen, you only need to deal with 2 cables, not 3. The rightmost socket will remain empty.
-
-
-
この手順で、ケーブルの接続を入れたり抜いたりする前に、バッテリーの接続が外れているかどうか確認してください。
-
プラスチックの開口ツールもしくは爪先で、LCDケーブルコネクタの接続を外します。
I replaced the broken front panel of the iPhone 5c and got the "famous white stripes" on the new screen. Reading about all kind of problems that the lcd/digitizer cable contacts may cause, I compared the cable connectors of the original Apple and the replacement part I bought online with a 35x magnifying glass. The quality difference was visible: The white description on the original part on the cable next to the connector is: 821-1784-A, while the inferior replacement part is: 821-1784-02. Check out the two numbers online and insist getting the "A" to avoid future troubles !!!
This person above is not knowledgeable. That number is a camera proxy part number, not the lcd or digitizer number. It changes with production date, both for original and aftermarket ones. A, B, D, 02, 04, 08 etc. Can all be either or.
vince -
Apple uses numerical revisions (-02) for pre-production parts, and alpha revisions (-A) for production revisions. It looks like you got a preproduction assembly, or a knock-off.
There are, in fact, three connectors in this step, not two. The front-facing camera and digitizer connector (Step 11) is really difficult to align when you put it back. Took me about 15 minutes before I succeeded.
Now I have a different problem. Everything works just dandy, EXCEPT:
Towards the bottom of the screen (in portrait) there is a horizontal line that is dead to the touch. For example, on the keyboard, I can use the spacebar, but not C V B N M, etcetera.
Three possibilities in my mind: One, when I dropped it, something else besides the glass and digitizer, etc, was damaged.
Two: I did not replace the cables correctly. This seems unlikely. They all "clicked" into place and stayed there.
Three: The digitizer supplied is faulty.
Comments? Which cable/connector could be causing this -- if it is that?
Take apart, Clean Connections, Put back together.... If same problem sounds like a fault part...
duston -
When reassembling the iPhone 5c, I used the flat end of the spudger to press on the connectors and maintain them while replacing the front panel on the body of the iPhone.
The third and "deepest" connector no longer slips out of its socket, which it did before holding the whole lot with the spudger.
If the ESD plate covering the connectors is properly re-attached to the phone, you should not have to do this. The cover holds all the connectors in place just fine.
iBroke -
I replaced the display assembly to resolve an issue with the phone not responding to any touch input. I assumed it was a bad digitizer. However, I have the same problem with the new display assembly—no touch response at all. The phone starts up fine and the screen works, I just can’t “slide to unlock”. This is also preventing me from downloading photos from the phone since I can’t enter the passcode. I have cleaned the connections and reseated the cables. Is it possible this is a problem on the logic board? If so, is there any way to get the photos off the phone since I can’t enter the passcode on the screen?
-
-
-
背面ケースからフロントパネルアセンブリを取り外します。
-
-
-
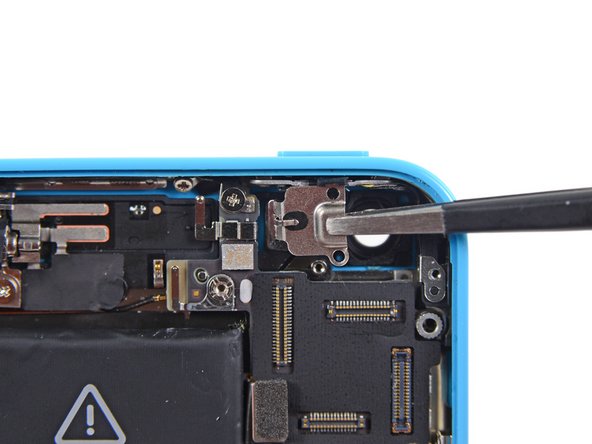
背面ケースに留められた上部アセンブリ接続ブラケットから次のネジを外します。
-
3.0 mm スタンドオフネジ
-
1.5 mm #000プラスネジ
-


デバイスを再組み立てする際は、これらの手順を逆の順番に従って作業を進めてください。
デバイスを再組み立てする際は、これらの手順を逆の順番に従って作業を進めてください。
44 の人々がこのガイドを完成させました。
以下の翻訳者の皆さんにお礼を申し上げます:
100%

これらの翻訳者の方々は世界を修理する私たちのサポートをしてくれています。 あなたも貢献してみませんか?
翻訳を始める ›

8 件のコメント
This should not be rated "difficult" because it's extremely easy.
THIS is difficult.: iPhone 5cのオーディオコントロールとパワーボタンケーブル
Yes, this one is relatively easy.
Anything involving a heat gun is "Difficult ".
Anything involving mandatory spare parts and a heat gun is "Very Difficult ".
:-)
There is a cable connected to be power button on my iPhone c and all the videos don't show how to remove it HELP PLEASE
You can find the guide for removing/replacing the cable for the power button right here. That cable also contains the flash, microphone, and volume controls.
I have watched all the videos on YouTube on how to take the iPhone 5c apart butt there is a cable connected to power button that the videos do not show me how do you remove so I can open the phone fully
My screen was flashing on and off, and then "slide to power off". If I turned the phone off, it powered itself back on. Apple store wanted $260 something. I found the little ribbon wire that runs along side the camera from (the right screw step 24 pic) the power button to, I assume ground. I found some oxidation on the contacts (both ends) and cleaned it with CaiLube MCL and put it back together. You could use alcohol too but I wouldn't waste it on that. Problem solved. Thanks iFixit!
Hi fixit,
Your instructions on repairing and replacing parts on I phones,
Cannot be bettered and worth every penny supporting I give
You 5 stars,
Yours faithfully,
Martin jacques