はじめに
このガイドはデバイス本体上部付近にあるディスプレイコネクター上に搭載されたWi-Fi アンテナの交換方法を取り扱っています。
必要な工具と部品
-
-
iPhoneの先端に向かって背面パネルを押し上げます。
If the back doesn't slide in properly upon reassembly, you didn't insert the motherboard properly. Remove it and try it again, DO NOT try to force it down!
-
-
-
-
指で背面パネルを掴み、iPhoneから取り外します。同時に小サイズの吸盤カップをご使用ください。
using suction cup with too much force breaks rear panel
Remove the single 2.5 mm Phillips screw securing the battery connector to the logic board- for me this Phillips screw won't budge from its place have tried all the phillips combinations 000, 00, 0, 1 and the straight /slotted 1.5 mm but nothing. can some help me please purchased a replacement battery for my iPhone 4 but not able to do it just because of this screw.
If the screw head is not buggered, press the tip of a hot soldering iron to the screw for a second or two. Don't get it too hot, or you'll damage something.
splaye -
don't use hot soldering iron . the female outlet the battery plugs into is very fragile . for no extra money you can buy a battery that has magnetic tools specifically to pick this screw out . if worse comes to worse be certain the screw will come no looser then use tweezers and pick it out . the #1 fear with this technique is DO NOT DROP THE SCREW . I have done this and crawling on my hands and knees till I find it was depressing
-
-
-
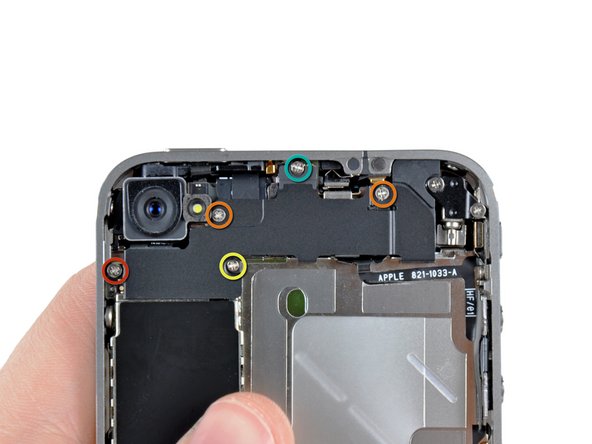
基板にWiFiアンテナを固定している次の5本のネジを取り出してください。
-
2.3 mm プラスネジー1本
-
1.6 mmプラスネジー2本
-
1.4 mmプラスネジー1本
-
4.8 mmプラスネジー1本
As the hole for the EMI shield/antenna was slightly small, I had to hold the screw with tweezers whilst spinning it with the screwdriver so it would "drill" down through and connect
panchocole - 返信
Out of all the repair youtube videos that supposedly people seem to know how to fix the I phone 4. Through my own error I found out the large screw at the middle top (blue) should not be removed just loosened there is a small ground clip that attaches to the threads on the screw and touches the back of the board to provide WIFI ! I found this after not receiving WIFI I striped out the main board found the clip, placed it on the top side so the small clip touched the gold dot on the top right side of the board(WRONG) the phone shorted out the power management chip so my phone wont charge or recognise the data cord! kaput !! a simple mistake but hope it gives you an advantage that's why the WIFI plate is designed to allow removal without completely removing the screw!
-
デバイスを再組み立てする際は、これらのインストラクションを逆の順番に従って作業を進めてください。
デバイスを再組み立てする際は、これらのインストラクションを逆の順番に従って作業を進めてください。
277 の人々がこのガイドを完成させました。
以下の翻訳者の皆さんにお礼を申し上げます:
100%
Midori Doiさんは世界中で修理する私たちを助けてくれています! あなたも貢献してみませんか?
翻訳を始める ›
添付文書
9 件のコメント
It's doesn't work i'm sorry
I purchased an iPhone 4 GSM new/sealed from an Apple Store in July 2010
and never needed to connect to multiple Wi-Fi networks until recently.
When I would go from a known Wi-Fi connection to another one,
I would need to go into Settings to reconnect each time.
I figured that I needed to replace the Wi-Fi antenna.
When I took off the back panel, I discovered that the 4.8mm Phillips screw
that grounds the Wi-Fi antenna is not present. So, you might want to first
check that the screw is there and properly secured.
Still doesn't work ... one or two bar near a-port express / everything is in order - just one screw miss / yellow one [1.4 mm Phillips] - U think that's the reason ?? Please, help :(
gustyn2000 - 返信
Ifixit no longer sells the WiFi antennas but I found a perfectly good one on Ebay
panchocole - 返信
Um... That isn't the WiFi antenna. The wireless antenna is under the logic board. It runs along the inside edge and looks like the 3g antenna. It connects at the top and bottom but can still function with one end connected. Perhaps the bottom cap isn't seated properly? It would explain the symptoms... Also I wouldn't worry about the screws so much. Its such a snug fit that once the flex cables are reattached and the back cover is on nothing can move anyway, plus it will make it easier for you next time you need to have a look or if it gets wet and you need to pull the battery in a hurry. This guide should be taken down. The world is confusing enough... Just saying;)
You sir, are correct. This item is a shield for the components underneath of it.
lil6d8 -
Where I can see the small clip antenna?
Where I can find the small antenna in iPhone 4 it's a small clip you


using something like the 18-compartment tray will GREATLY help with this one; there are over a dozen groups of parts. For re-assembly having a digital calipers to measure the 2.4 vs the 2.6mm screws also helps greatly.
awr - 返信
My method for hardware management during delicate phone surgery is to take and print out on 8.5"x11' paper, one or more pictures of the open phone in various stages of disassembly, and then tape the screws to the appropriate spots on the pictures. Also write numbers on the pictures next the screws to indicate the order in which you removed them.
lens42 -
I use a plastic egg tray, I drop all the screws and small parts (like the camera) for each step into the same egg indentation. You can see that the screws are different lengths, so I don't put one screw into it's own spot. I used 5 egg indentations to replace my screen.
Mangled Jargon -
I did a successful surgery on my iPhone, be warned this is not for the faint of heart!
I've done iPod screen replacements, battery replacements, this is by far much more difficult and intricate.
Great write up! Thanks a million.
Jaysen Strange - 返信
I've changed some iPod screens as well and that has been the least pleasant experience so far. Glue and the main connector that has to be unwrapped and connected from the rear where you have no feel or control where it belongs.
iPhone repair is complex, but doable and has very few "traps".
mcbohdo -
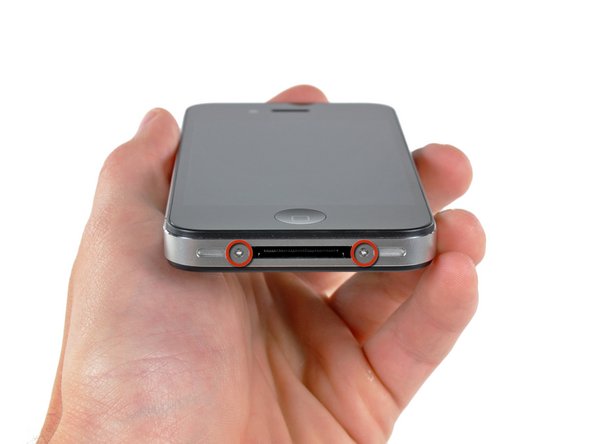
Couldn't even get both screws out of the bottom of the case. One was easy and other refuses to budge. Screws so small I can't see if it is turning or screw driver is properly seated. Sad I too have done screen replacements on other phones. Don't know any secrets to get the screw out
ckracht - 返信
I also have a problem with seeing what is happening with some of those tiny little screws and parts. For other projects that I do, I use an Opti-Visor. It slips over your head and provides 10x magnification. ( You can find them on Amazon).
Yeah, it adds cost to the project and you would have to wait for delivery, but it sure makes a world of difference in seeing what you are working with / on.
jhow -
On an early iPhone 4 I found that the #000 Phillips bit included in the 54 Bit Driver Kit didn't actually fit the screws. However the JIS #000 also in the kit did fit quite well. This is due to the JIS bits "thinner" design to prevent camming out of the slot. Otherwise everything went well. Looking forward to replacing the battery in my other phone that has the pentalobe screws. Glad I got the 54 Bit kit!
etler - 返信
Use a vacuum duster and a sharp tool to pry out the dust, this can increase the volume insanely!
Dpairs - 返信
What does the park that is gold and next to the 4.8mm screw for the antenna? Looks like I am missing that part and almost positive that is why I can't pick up or connect to any wifi signals. I have the screw and the antenna from another phone that is working and tried it on the broken phone and still doesn't work. Only thing different is that gold metal piece to the left of that 4.8 mm screw. Can I buy that part? how do I attach it?
Jay Pennington - 返信
great instructions did it the first time
Mr J - 返信
For organisation of the parts and for a much easier process of rebuilding i use a big magnetic flat surface with a grid drawn on it. Then I use a dry erase marker to make any notes I need and to number the parts in order as i disassemble . Believe me it saves a lot of time and hassle especially if you drop one of those tiny screws good luck finding it but when your working over the magnet and drop a screw its going to be right where it fell. At first I tried the piece of paper to keep organised but all it takes is one small slip and you move the paper too quick and your left with a jumbled bunch of screws and parts and a painstaking task of putting it all back correctly, aka a big waist of time and effort.
case-yg - 返信
I found it very useful to use a magnet sheet when doing these repairs. I use electrical tape or a sharpie to make a grid, and place each micro screw in a separate box on the grid.
I work directly over the magnet sheet, so that if something drops I have a better chance at not losing it.
If you do lose a screw, go over the work area with a fridge magnet. It will pick it up if it hasn’t popped too far away.
Megan Telliano - 返信