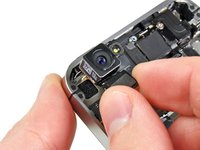
メインコンテンツにスキップ

iPhone 4 Verizon Rear Camera Replacement

必要な工具と部品

  1. iPhone 4 Verizon Rear Camera Replacement, Rear Panel: 手順 1、 1の画像 1
    • Before you begin, discharge your iPhone battery below 25%. A charged lithium-ion battery can catch fire and/or explode if accidentally punctured.

    • Power off your iPhone before beginning disassembly.

    • Your phone's rear cover may have two #000 Phillips screws or Apple's 5-Point "Pentalobe" screws. Check which screws you have, and ensure you also have the correct screwdriver in order to remove them.

    • Remove the two 3.6 mm Pentalobe or Phillips #000 screws next to the dock connector.

  2. iPhone 4 Verizon Rear Camera Replacement: 手順 2、 2の画像 1 iPhone 4 Verizon Rear Camera Replacement: 手順 2、 2の画像 2
    • Push the rear panel toward the top edge of the iPhone.

    • The panel will move about 2 mm.

  3. iPhone 4 Verizon Rear Camera Replacement: 手順 3、 1の画像 1
    • Pinch the rear panel with your fingers, and lift it away from the iPhone. Alternatively, use a Small Suction Cup .

    • Be careful not to damage the plastic clips attached to the rear panel.

  4. iPhone 4 Verizon Rear Camera Replacement, Battery: 手順 4、 1の画像 1
    • Remove the single 1.5 mm Phillips screw securing the battery connector to the logic board (if present).

  5. iPhone 4 Verizon Rear Camera Replacement: 手順 5、 1の画像 1
    • Use the edge of a plastic opening tool to gently pry the battery connector up from its socket on the logic board.

    • Be very careful to only pry up on the battery connector and not the socket on the logic board. If you pry up on the logic board socket, you may break it entirely.

    • Remove the metal clip covering the antenna connector.

  6. iPhone 4 Verizon Rear Camera Replacement: 手順 6、 2の画像 1 iPhone 4 Verizon Rear Camera Replacement: 手順 6、 2の画像 2
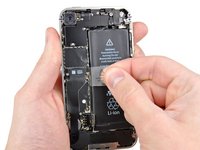
    • Pull up on the exposed clear plastic tab to peel the battery off the adhesive securing it to the iPhone.

    • If the tab breaks before the battery is freed, apply a few drops of high concentration (over 90%) isopropyl alcohol under the edge of the battery. Wait about one minute for the alcohol solution to weaken the adhesive. Carefully slide a spudger under the battery tab to release the adhesive.

    • Prying in other places may cause damage. Don't try to forcefully lever the battery out. If needed, apply a few more drops of alcohol to further weaken the adhesive. Never deform or puncture the battery with your pry tool.

    • If there's any alcohol solution remaining in the phone, carefully wipe it off or allow it to air dry before installing your new battery.
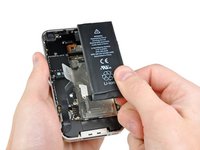
    • Remove the battery.

    • If your replacement battery came in a plastic sleeve, remove it before installation by pulling it away from the the ribbon cable.

    • Before reassembly, clean metal-to-metal contact points with a de-greaser such as windex. The oils from your fingers have the potential to cause wireless interference issues.

    • Perform a hard reset after reassembly. This can prevent several issues and simplify troubleshooting.

  7. iPhone 4 Verizon Rear Camera Replacement, Rear Camera: 手順 7、 1の画像 1
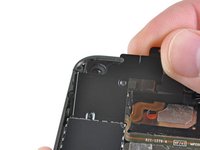
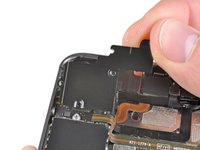
    • Remove the following five screws:

    • Three 1.3 mm Phillips screws

    • One 1.5 mm Phillips screw

    • One 2.4 mm Phillips screw

  8. iPhone 4 Verizon Rear Camera Replacement: 手順 8、 2の画像 1 iPhone 4 Verizon Rear Camera Replacement: 手順 8、 2の画像 2
    • Lift the cable cover from its edge nearest the top of the iPhone.

    • Pull the cable cover tabs out of their slots cut into the EMI shield on the logic board and remove it from the iPhone.

  9. iPhone 4 Verizon Rear Camera Replacement: 手順 9、 2の画像 1 iPhone 4 Verizon Rear Camera Replacement: 手順 9、 2の画像 2
    • Use the edge of a plastic opening tool to pry the rear camera connector up from its socket on the logic board.

    • Be careful not to break any components off the surrounding area on the logic board as you pry upwards.

    • Remove the rear camera from the iPhone.

    • Be careful not to scratch the back of the display assembly after the removal of the rear facing camera.

終わりに

To reassemble your device, follow these instructions in reverse order.

15 の人々がこのガイドを完成させました。

作成者

8人の作成者と共同で作成されました。

Andrew Bookholt

585,718 ポイント

619のガイドは作成済み

2 件のコメント

This guide also works for the AT&T iPhone4S. With a little care, the RF shield can be removed without taking the battery out, though you should still disconnect it. It only takes about 20 minutes from start to finish.

Chuck Sembroski - 返信

My 4S camera has a black rubber isolator between the portion of the logic board that runs across the top of the phone and the camera body. It was covered by a black tape piece that covers the little prong that is secured between the logic board and that mounting screw. I replaced my logic board and this thing fell out. I am not certain I have it replaced properly, but the camera does not move at all and is lined up correctly, so it does fit the space. It is a C channel that fits over the edge of the logic board. I think only some phones have this. I do not see it in *any* of the various 4S guides. If it is in there it is probably important. If you remove your camera be CAREFUL to note whether you have this .25” long 2mm thick black rubber bit. If you do, CAREFULLY inspect its orientation so you can replace it if you knock it loose. Everything still works perfectly, so at least it seems I did no harm in placing it where I did.

Wade Rackley - 返信

コメントを追加

統計データ:

過去 24時間: 0

過去 7 日: 0

過去 30 日: 6

今までの合計 11,601