メインコンテンツにスキップ

iPhone 4 Contact Clip Replacement

必要な工具と部品

  1. iPhone 4 Contact Clip Replacement, Rear Panel: 手順 1、 2の画像 1 iPhone 4 Contact Clip Replacement, Rear Panel: 手順 1、 2の画像 2
    • Before you begin, discharge your iPhone battery below 25%. A charged lithium-ion battery can catch fire and/or explode if accidentally punctured.

    • Power off your iPhone before beginning disassembly.

    • Your iPhone 4 rear cover may have either two #000 Phillips screws or Apple's 5-Point "Pentalobe" screws (second image). Check which screws you have, and ensure you also have the correct screwdriver in order to remove them.

    • Remove the two 3.6 mm Pentalobe or Phillips #000 screws next to the dock connector.

    • Be sure the driver is well seated when removing Pentalobe screws, they are very easy to strip.

  2. iPhone 4 Contact Clip Replacement: 手順 2、 2の画像 1 iPhone 4 Contact Clip Replacement: 手順 2、 2の画像 2
    • Push the rear panel toward the top edge of the iPhone.

    • The panel will move about 2 mm.

  3. iPhone 4 Contact Clip Replacement: 手順 3、 1の画像 1
    • Pinch the rear panel with your fingers and lift it away from the iPhone. Alternatively, use a Small Suction Cup .

    • Be careful not to damage the plastic clips attached to the rear panel.

    • If you are installing a new rear panel, be sure to remove the plastic protective sticker from the inside of the camera lens and the sticker from the large black area near the lens.

  4. iPhone 4 Contact Clip Replacement, Contact Clip: 手順 4、 1の画像 1
    • Remove the single 2.5 mm Phillips screw securing the battery connector to the logic board.

  5. iPhone 4 Contact Clip Replacement: 手順 5、 3の画像 1 iPhone 4 Contact Clip Replacement: 手順 5、 3の画像 2 iPhone 4 Contact Clip Replacement: 手順 5、 3の画像 3
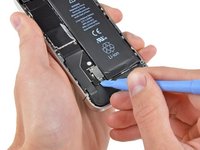
    • Use an iPod opening tool to carefully pry the battery connector up from the ends closest to the top and bottom edges of the iPhone.

    • Do not pry against the contact clip.

    • Remove the contact clip from the iPhone.

    • Before reconnecting the battery connector, be sure the pressure contact (shown in red) is properly positioned next to the battery connector.

    • Before reassembly, be sure to clean all metal-to-metal contact points on the pressure contact as well as its contact point on the rear panel with a de-greaser such as windex. The oils on your fingers have the potential to cause wireless interference issues.

終わりに

To reassemble your device, follow these instructions in reverse order.

91 の人々がこのガイドを完成させました。

作成者

6人の作成者と共同で作成されました。

Scott Head

52,785 ポイント

8のガイドは作成済み

チーム

iFixit iFixit人のメンバー

Staff

136 メンバー

16,562のガイドは作成済み

コメント 1 件

need a job as assistant with the author ...i am a 16 year old kid who loved being with iphones ..i can do a all kind of software problems in iphones and ipads....please reply.sir

mac - 返信

コメントを追加

統計データ:

過去 24時間: 1

過去 7 日: 4

過去 30 日: 35

今までの合計 84,578